Super Naruto: Clash of Ninja 4/Kidomaru
Jump to navigation
Jump to search
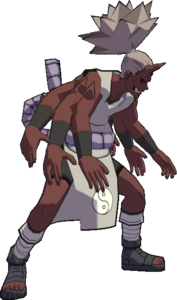

| Kidomaru
| |
|---|---|

| |
| Health: | 220 |
| Guard Gauge: | 1760 |
| Backdash Type: | Normal |
Summary
The web-spitting, Sound Four Kidomaru is one of the more unique fighters in SCON4. His Spider-Man j.B, reminiscent of ![]() Temari and
Temari and ![]() CS2 Sasuke, allows him to safely poke in neutral with a high damage launcher. The fun really begins once you start to master his A special attacks and ring combo jutsu which features hit-grabs, unblockables, KNJ web traps, super confirms and one of the better counters in the cast. If you like making the most of an off-beat, varied moveset full of situational but powerful attacks, Kidomaru might be the arach-ninja for you.
CS2 Sasuke, allows him to safely poke in neutral with a high damage launcher. The fun really begins once you start to master his A special attacks and ring combo jutsu which features hit-grabs, unblockables, KNJ web traps, super confirms and one of the better counters in the cast. If you like making the most of an off-beat, varied moveset full of situational but powerful attacks, Kidomaru might be the arach-ninja for you.
Notes
String List
| String # | Inputs | Notes |
|---|---|---|
| ||
| ||
| ||
| ||
Weak Attacks
5B
Toggle Hitboxes Toggle Hitboxes
|
|---|
6B
Toggle Hitboxes Toggle Hitboxes
|
|---|
2B
Toggle Hitboxes Toggle Hitboxes
|
|---|
4B
Toggle Hitboxes Toggle Hitboxes
|
|---|
8B
Toggle Hitboxes Toggle Hitboxes
|
|---|
Running B
Toggle Hitboxes Toggle Hitboxes
|
|---|
j.B
Toggle Hitboxes Toggle Hitboxes
|
|---|
Strong Attacks
5A
Toggle Hitboxes Toggle Hitboxes
|
|---|
6A
Toggle Hitboxes Toggle Hitboxes
|
|---|
2A
Toggle Hitboxes Toggle Hitboxes
|
|---|
4A
 |
|
|---|---|
Toggle Hitboxes Toggle Hitboxes
|
8A
Toggle Hitboxes Toggle Hitboxes
|
|---|
Running A
Toggle Hitboxes Toggle Hitboxes
|
|---|
j.A
Toggle Hitboxes Toggle Hitboxes
|
|---|
Throws
5Y
j.Y
Special
5X
Toggle Hitboxes Toggle Hitboxes
|
|---|
2X
Toggle Hitboxes Toggle Hitboxes
|
|---|
Strategy
Colors
Default ( )
)

Color 2 ( )
)

Color 3 ( )
)
