Super Naruto: Clash of Ninja 4/Kidomaru
Jump to navigation
Jump to search
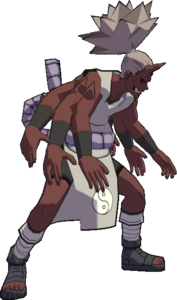

| Kidomaru
| |
|---|---|

| |
| Health: | 220 |
| Guard Gauge: | 1760 |
| Backdash Type: | Normal |
Summary
The web-spitting, Sound Four Kidomaru is one of the more unique fighters in SCON4. His Spider-Man j.B, reminiscent of ![]() Temari and
Temari and ![]() CS2 Sasuke, allows him to safely poke in neutral with a high damage launcher. The fun really begins once you start to master his A special attacks and ring combo jutsu which features hit-grabs, unblockables, KNJ web traps, super confirms and one of the better counters in the cast. If you like making the most of an off-beat, varied moveset full of situational but powerful attacks, Kidomaru might be the arach-ninja for you.
CS2 Sasuke, allows him to safely poke in neutral with a high damage launcher. The fun really begins once you start to master his A special attacks and ring combo jutsu which features hit-grabs, unblockables, KNJ web traps, super confirms and one of the better counters in the cast. If you like making the most of an off-beat, varied moveset full of situational but powerful attacks, Kidomaru might be the arach-ninja for you.
Notes
String List
| String # | Inputs | Notes |
|---|---|---|
| ||
| ||
| ||
| ||
Weak Attacks
5B
Toggle Hitboxes Toggle Hitboxes
|
|---|
6B
Toggle Hitboxes Toggle Hitboxes
|
|---|
2B
Toggle Hitboxes Toggle Hitboxes
|
|---|
4B
Toggle Hitboxes Toggle Hitboxes
|
|---|
8B
Toggle Hitboxes Toggle Hitboxes
|
|---|
Running B
Toggle Hitboxes Toggle Hitboxes
|
|---|
j.B
Toggle Hitboxes Toggle Hitboxes
|
|---|
Strong Attacks
5A
Toggle Hitboxes Toggle Hitboxes
|
|---|
6A
Toggle Hitboxes Toggle Hitboxes
|
|---|
2A
Toggle Hitboxes Toggle Hitboxes
|
|---|
4A
 |
|
|---|---|
Toggle Hitboxes Toggle Hitboxes
|
8A
Toggle Hitboxes Toggle Hitboxes
|
|---|
Running A
Toggle Hitboxes Toggle Hitboxes
|
|---|
j.A
Toggle Hitboxes Toggle Hitboxes
|
|---|
Throws
5Y
j.Y
Special
5X
Toggle Hitboxes Toggle Hitboxes
|
|---|
2X
Toggle Hitboxes Toggle Hitboxes
|
|---|
Strategy
Colors
Default ( )
)

Color 2 ( )
)

Color 3 ( )
)

Changes from Vanilla
List may be outdated
- Air Throw added
- Ring Combo: 8A is 8A; 6A is 6A; 2A is 2A; 4A is 4A; 5A is 5BBB(A)
- WUK animation: is 2B(B); has one additional frame of intangibility before fuse and the hitbox starts and ends one frame later
- 3MC: 6A and 8A killing in no longer locks out the use of the same moves
- Grabbable Moves: 6A, 2A, JA, 8A, 5BBBB(A), 2BBB(A), 5BBAB(A), 2BBAB(A)
- 5B: has more lift on hit
- 5B(B): stuns longer by 2 frames on hit and 3 frames on block
- 5BB(B): hitbox adjusted slightly, hitbox active one more frame, animation ends 5 frames earlier; can delay into A follow up longer
- 5BBA(R): ring transition made one frame later
- 5BBB(B): flags cleaned up; recovers faster
- 5BBB(A): is now ring combo
- 5BBBB(B): increased damage
- 5BBAB(B): has no knockback on the first two hits and none of the hits pushes block
- 5BBAB(A), 5BBBB(A): now sends opponent flying across the screen instead of bouncing
- 5BBAB(A): follow up does not last as long; changed to match others
- 6B(B): has one more frame duration and slightly more lift on hit
- 6B(A): added as ring
- 6BB(B): does more damage; 3 frames before the teleport that are grabbable added; can be delayed 14 frames longer
- 6BB(A): now leads to ring
- 4B: first two hits link into the third better
- 2B: has sweep added with less lift
- 2BB(B): has more lift; flags adjusted; ends earlier
- 2BBB(B): flags adjusted
- 2BBAB(B): does more damage
- 8B(R): ring added
- JB: hitbox appears a frame earlier
- RB: flags adjusted to better fit the move; ends 9 frames earlier
- 5A: has no charges but releases the charged projectile
- 4A: def starts frame 12, loop that drains chakra starts at frame 2 (from 20), drains 190 units per frame (from 180)
- A4A: activates into a single frame of blocking if needed
- 6A: does 1+10 damage instead of 5 damage
- RAA(B): transition much faster with an end window
- RAA(A): now leads to ring combo
- JA: staggers
- 5X: transfers into the activated animation quicker; hitboxes appear one frame sooner, all hitboxes made slightly bigger; middle arm hitbox moved to waist
- 2X: is immune to mids and highs until he begins to lower his hands; spider hitbox is bigger
- GRKnJ: changed to a custom animation using the 5X activator; moved back a bit
Resources
Gameplay footage
- Dark Tournament 2: Hebrew vs Taelon (vs
 Jirobo, Dope vs Taelon(vs Jirobo), Hebrew vs Leeshmow (vs
  Mizuki,
  Sakon & Ukon)