Vampire Savior/Esoterics
Blocking
Proximity Blocks
This a Pre-block state that allows defending while preventing the opponent from walking backwards. Some general rules for pre-block are:
- Projectiles activate Proximity Block at full screen
- Proximity block activates when your Push-Box is in a set range of the opponent.
- Be mindful that your attacks also extends your push-box.
- Height and verticality is ignored, only lateral distances activate Proximity Block
Techs and GC
- Tech hits and GC's are not necessarily mutually exclusive. It is possible to first tech hit a move and GC immediately afterwords. The HUD will show the Guard Reversal message since it overwrites the Tech Hit message, but it is clear that both have occurred since the opponent will be pushed back and the defender will begin their GC move.
- Tech hits are done by pressing multiple buttons during blockstop. Simultaneous inputs are not counted as multiple inputs, but rather only as a single input. In other words LP+MK+HP is counted as one single input where as LP~MK~HP is counted as three since there was some small delay between the three inputs. This is why sliding/pianoing is necessary for tech hitting.
- The amount of pushback a tech hit causes is relative to the button used when the tech hit occurs, light (jab/short) will cause minimal pushback, medium (strong/forward) will cause moderate pushback, heavy (fierce/roundhouse) will cause large pushback.
- Tech hits lessen the amount of blockstop and blockstun duration that will occur on a move. They will also push an opponent if the player tech hits a projectile. If the attacker has their back to the corner then tech hits will neutralize pushback and neither player will be pushed anywhere.
- The occurrence of teching is % chance based and increases in chance per number of inputs. It starts at 0% for the first two inputs and becomes 25% on the third input, each additional input raises it by 25% until it caps at 100% at 6 inputs, so you get the following:
| 1 input | 2 inputs | 3 inputs | 4 inputs | 5 inputs | 6 inputs |
| 0% | 0% | 25% | 50% | 75% | 100% |
- VSAV accepts 1-input per frame of animation, so the fastest possible Tech-Hit activates after 3-frames on a 25% chance.
Prebuffering
- It is possible to prebuffer a GC input prior to entering blockstop or blockstun. The window for execution is 8 frames between the last direction input and the attack input necessary for the GC. A common technique is to do HCB, confirm the block, then DF+attack. In other words: 63214 3+P/K. Because 6(3)2(14)3 = 623 = DP. This allows for relatively easy 1hit GC's.
- Prebuffering does not work for Tech (pushblock) though.
Fuzzy Guard
- Fuzzy Guard is handled a bit differently in VSav from most games. In VSav you can switch your guard position at any time during blockstun, but you are unable to switch your guard or guard position during blockstop. Some moves have greater blockstop than others, for example Bulleta j.HK has quite a lot of blockstop where as Lei-Lei j.HP has very little (almost none).
- What this means is that if a character is currently blocking a projectile high they will be unable to block low for the blockstop duration, likewise if they are blocking it low they will be unable to block high for the blockstop duration. That allows some characters to perform situational unblockables, since the opponent isn't able to switch their guard position.
- An example would be with Lilith at max range doing 236PP then j.LK c.LK, the j.LK forces the opponent to block high and then they are stuck in blockstop until the fireball connects and are then stuck in blockstop from the fireball, this makes the c.LK from Lilith unblockable since they are unable to switch to a low block. However, there are many much more practical applications to this, where as Lilith's application is nearly useless.
Common Unblockables
- Bishamon ES Fireball:
- Range dependent. Generally the range Bishamon is pushed to after a blocked close HK will set the distance for an unblockable ES Fireball. This allows Bishamon to do a loop because his fireball Runpast followup is untechable, and therefor he is able to reset the distance before the opponent wakes up and do another unblockable ES Fireball, looping the technique until he runs out of meter. This is due to the proximity block flag not being set on the 1st active frame when standing a specific distance away from the opponent.
- Bulleta j.HK, Land, cr.lk
- Bulleta's j.HK can be blocked low or high (either direction), however it puts the opponent in a substantial amount of blockstop (roughly 10 to 13 frames) which may allows Bulleta to land and perform another attack while the opponent is unable to switch their guard state. If the opponent blocks a very deep j.HK standing then Bulleta's c.LK will become an unblockable low, since the opponent won't be able to switch to a low block during blockstop. If the opponent blocks low then they can block the c.lk, however Bulleta can jump and do an immediate j.MP on tall crouching characters like Victor and it will be unblockable since the opponent will be unable to switch to a high block. Defensive techniques like Tech-Hit or Guard-Cancel mitigate this offense.
- Zabel j.LK:
- The last 3 active frames for Zabel's j.LK is unblockable because they do not cause Proximity block. Zabel's ES GC is natively an un-rollable knockdown, so opportunities for UB J.lk Oki is character specific, but abundant. The most applicable scenario for Bell's UB j.lk is after certain air-hits, like air-dash j.mp. Bell recovers in-time to do a quick IAD J.lk that can be tricky to execute, but reliably be an unblockable reset. This nets huge damage.
- Lei-Lei 236HP asynchronous offense:
- This move hits high on the way down, and since it's so delayed she can be hitting low simultaneously as the overhead connects. Such as c.LK/c.MK/c.HP at the same time as the 236HP hits, creating an unblockable scenario. If the low & the item hit on the exact same frame, than odd & unreliable results occur.
- Gallon 623PP:
- There is a special condition where Gallon uses 623PP to fly into the corner against a cornered opponent, then uses 2P to push the opponent out of the corner, the next hit of the ES move will be unblockable (such as 4P or 7P). Regardless of which direction the opponent blocks on the ground or in the air, it can not be blocked. This is due to Y-axis calculations and the player unable to determine which direction the block should occur.
Character Stats
Standing Height

- Tall
- 1 — Anakaris (Head hurtbox disappears while in hitstun.)
- 2 — Jedah (Head hurtbox disappears while in hitstun.)
- 3 — Victor (Head hurtbox disappears while in hitstun.)
- 4 — Demitri
- Average
- 5 — Bishamon
- 6 — Zabel
- 6 — Q-Bee
- 7 — Bulleta
- 8 — Lilith
- 8 — Morrigan
- Short
- 9 — Sasquatch
- 10 — Lei-Lei
- 10 — Aulbath
- 10 — Gallon (Gains a crouching height hurtbox when walking.)
- 11 — Felicia
Crouching Height

- Tallest
- 1 — Bishamon
- 2 — Victor
- Tall
- 3 — Anakaris
- 3 — Jedah
- 4 — Demitri
- 5 — Aulbath
- Average
- 6 — Zabel
- 6 — Felicia
- 6 — Sasquatch
- 7 — Lei-Lei
- Short
- 8 — Bulleta
- 9 — Morrigan
- 9 — Lilith
- 10 — Gallon (Hurtbox gets taller when in a block animation)
- Shortest
- 11 — Q-Bee
Jump

The picture above is each character on the first airborne frame of their jump, typically being the 4th frame with a few exceptions. When hit during the pre-airborne frames the player will remain grounded, and if hit on the first airborne frame or anytime after they will be air reset.
Pre-jump Hurtboxes
- During the pre-jump frames, the majority of characters have their standing hurtboxes, while a few characters do not.
- Gallon: Crouching hurtbox during the pre-jump frames, giving him upper body invincibility.
- Jedah: Has his hitstun hurtbox during the pre-jump frames, which is his standing hurtbox with the head removed.
- Lilith: Crouching hurtbox during the pre-jump frames, giving her upper body invincibility. This applies to both her normal jump and super jump.
- Sasquatch: Crouching hurtbox during the pre-jump frames, giving him upper body invincibility.
- Zabel: Jumping hurtbox during the pre-jump frames, giving him lower body invincibility. Despite appearing to be airborne already, if he is hit during the pre-jump phase he will remain grounded.
Jump Specific Frame Data Character Direction Pre-Jump Airborne(Total) Landing Before Attack Air Guard Before Special Skill Anakaris Forward 4 89 10 15 6 Up 1 24-142 1 19 2 Back 4 89 10 15 6 Aulbath Forward 3 41 7 5 5 Up 3 43 7 5 5 Back 3 42 7 5 5 Bishamon Forward 3 42 7 6 5 Up 3 42 7 6 5 Back 3 42 7 6 5 Bulleta Forward 3 42 5 6 5 4 Up 3 43 5 6 5 4 Back 3 44 5 6 5 4 Demitri Forward 3 42 4 6 5 Up 3 41 4 6 5 Back 3 42 4 6 5 Felicia Forward 3 36 19 5 5 Up 3 36 19 5 5 Back 3 37 19 5 5 Gallon Forward 3 38 6 5 5 Up 3 37 6 5 5 Back 3 39 6 5 5 Jedah Forward 3 48 4 6 5 4 Up 3 50 4 6 5 4 Back 3 51 4 6 5 4 Lei-Lei Forward 3 42 10 6 5 7 Up 3 41 10 6 5 7 Back 3 42 10 6 5 7 Lilith Forward 3 40 7 6 5 Up 3 39 7 6 5 Back 3 40 7 6 5 Lilith
(Super Jump)Forward 6 46 7 8 8 Up 6 46 7 8 8 Back 6 46 7 8 8 Morrigan Forward 3 40 7 6 5 Up 3 39 7 6 5 Back 3 40 7 6 5 Q-Bee Forward 3 43 3 6 5 4 Up 3 45 3 6 5 4 Back 3 46 3 5 5 4 Sasquatch Forward 3 38 7 5 5 Up 3 38 7 5 5 Back 3 39 7 5 5 Victor Forward 3 42 7 6 5 Up 3 45 7 6 5 Back 3 45 7 6 5 Zabel Forward 3 38 7 5 5 6 Up 3 38 7 5 5 6 Back 3 39 7 5 5 6
- You can avoid landing recovery by immediately inputting 2+Dark Force
Defense Ratings
- Tier 1 (Highest)
- Victor
- Zabel (Dark Force)
- Phobos
- Tier 2 (High)
- Bishamon
- Oboro Bishamon
- Sasquatch
- Tier 3 (Average)
- Anakaris
- Aulbath
- Bulleta
- Demitri
- Felicia
- Jedah
- Donovan
- Dee
- Pyron
- Tier 4 (Low)
- Gallon note that Dark Gallon has slightly less GUTS than Gallon - https://x.com/VMP_KyleW/status/1468472990455136257
- Q-Bee
- Zabel
- Tier 5 (Lowest)
- Lei-Lei
- Lilith
- Morrigan
- Anakaris (Dark Force)
- Aulbath (Dark Force)
- Tier 6
- Lei-Lei (Dark Force)
Damage Comparison Class Combo #1 Dmg. Combo #2 Dmg. Combo #3 Dmg. Tier 1 16/21 42/67 40/74 Tier 2 16/21 44/69 43/78 Tier 3 17/23 46/72 44/79 Tier 4 17/23 47/74 44/82 Tier 5 18/24 50/77 49/89 Tier 6 19/25 — — - Combo #1: Demitri (1 hit) "LP Demon Cradle"
- Combo #2: Zabel (4 hits) "j2.HP >> 5.MP xx Evil Scream"
- Combo #3: Bishamon (9 hits) "j.MK > j.HK >> 2.LK >> 2.MP xx ES Karame Dama xx 4.P >> ES Kien Zan (4 hits)"
Walk Speeds
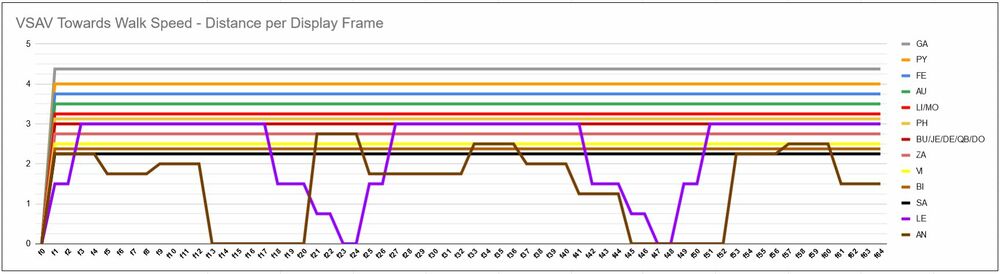
Towards Walk Speed pixel per frame, Visualized
Back Walk Speed pixel per frame, Visualized
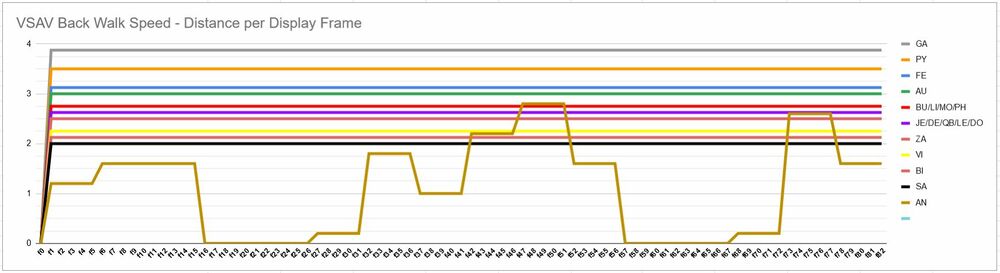
Listed from fastest (top) to slowest (bottom). The number is representative of how fast they walk.Character Forward Back Gallon 4.375 3.875 Felicia 3.75 3.125 Aulbath 3.5 3 Lilith 3.25 2.75 Morrigan 3.25 2.75 Bulleta 3 2.75 Demitri 3 2.625 Jedah 3 2.625 Q-Bee 3 2.625 Zabel 2.75 2.5 Victor 2.5 2.25 Bishamon 2.375 2.125 Sasquatch 2.25 2 Lei-Lei Variable 2.625 Anakaris Variable Variable Vampire Savior 2 Characters Pyron 4 3.5 Phobos 3.125 2.75 Donovan 3 2.625
- Lei-Lei's forward walk speed is slower than Sasquatch but faster than Anakaris.
- Lei-Lei's forward walk speed in Dark Force is slower than Gallon but faster than Felicia.
- Anakaris' forward walk speed is slower than Lei-Lei.
- Anakaris' back walk speed is likely the slowest.
- Zabel's crawl has the same speed as his walk.
IAD Attack Speed
- Q-Bee has the fastest overhead attack.
- Zabel & Lei-Lei's are also shown here for reference.
https://twitter.com/hosoquatch/status/1504049840736505858
Reversals & Knockdowns
Reversals
When recovering from knockdowns, blockstun, hitstun or air resets, if a Special or EX Move is used on the correct frame it will come out instantly as a reversal, though you must be aware of a few things.
Frame chart starting from the moment of recovery (1 block = 1 frame) ... 0 1 2 3 4 5 6 7 8 9 10 ... Before Recovery ◆ ← 0F 0F ~ ... 1F ~ ... 4F ~ ... 0F ~ 4F ◆ 0F Immediately after recovering, when the reversal comes out. 0F ~ From this moment onwards you can be hit, and guarding is enabled. 1F ~ Normal attacks, throws (if no tech roll), Special Moves, Dark Force, walking, dashing and jumping are enabled. 4F ~ When recovering after a tech roll, throws are enabled after this frame. 0F ~ 4F Duration of throw invincibility. - For the immediate frame after recovering, typical actions such as jump, throw, and walk are not possible; however, you can reversal with a special move. Essentially, movement becomes possible 1 frame faster with a successful reversal.
- If the command is completed before the reversal timing occurs, the entire input will be disregarded. Therefore pianoing reversals is not possible and the first button press must be accurate (frame perfect/just frame). Another result of this is that you cannot get two attempts at a reversal using negative edge (button release). In particular, if you complete the motion with a button press before the reversal frame, then release the button on the perfect frame, you still do not get a reversal. However, getting a reversal with negative edge is still possible: you need to press and hold the button before you complete the motion, finish the motion, and release on the right frame. You cannot "piano release" the negative edge input either.
- In short, there is no known trick to get multiple attempts at the same reversal special. If you complete a valid input for the special before the reversal frame (too early), you are locked out of that special reversal. The best that you can do is attempt a negative edge reversal while blocking, so there is no penalty for missing the reversal. This is commonly done with any frame-1 invuln command throw that does not have a whiff animation or an input overlap. For example, Bulleta wakeup 6324]P[ will give an invuln reversal command throw (if in range) or block high (if not in range). She has to be careful to use the 6324 input to avoid the overlap with her 214P input.
- When the reversal is successful, there are no throw invincibility frames; that is unless the reversal move is throw invincible.
- Throw invincibility ends 5 frames after recovery. Note that there is a random factor if an attack hitbox becomes active on the 6th frame and a throw is input at the same time, sometimes the throw will win and sometimes the attack will win.
- Throws are not possible during the first 4 frames after tech rolling forward or backward (some situations allow throws after the 3rd frame), however it is possible to reversal command throw. The exception to this rule is Bishamon, Q-Bee, and Victor who can throw immediately after tech rolling.
- Q-Bee alone cannot reversal after a knockdown, though she can reversal after hitstun, blockstun and air resets. She also has 3 forced standing hurtbox frames only after a knockdown; but even so if she is hit during these frames while attempting to crouch, she will be in a crouching state for any follow up combo hits.
Recovery Frames
Neutral Recovery Frames
The table below shows the wake up recovery speed of every character in the game, sorted by how many frames it takes them to stand up after being knocked down. "Neutral Recovery" is when the character does not "Tech Roll" left or right upon knockdown, and simply stands up where they fell. As you can see, it typically takes longer to tech roll than it does to neutral recover outside of several characters. There is a huge variance in the recovery speeds between each character in the cast - along with a wide "Difference" in frames with the time it takes them to 'neutral recover vs. tech roll'. Indeed, one of the hardest things to do in Vampire Savior to consistently meaty the opponents recovery, especially if its not a character you're not experienced in fighting. It's suggested to at least take some time trying to memorize characters with particularly slow or fast neutral recoveries since most characters, while different, are relatively similar.
Q-Bee is the only character where Forward Roll and Back Roll have different frame data.
Some characters (FE & GA) will move towards a few pixels during a neutral get-up, allowing some weird left-rights to exist.
When transitioning into a neutral recovery after an air-hit reset, it takes (1) additional frame to enter crouch block. This means that punishes which hit low provide (1) extra frame of leniency. Although minor, this is huge for moves with 1f landing recovery like air Soul Fists & Demon Cradle.
Sorted by Neutral Recovery Character Neutral Recovery Tech Roll Difference Q-Bee 29 61 Forward
54 Back32 Forward
25 BackZabel 33 49 16 Bishamon 34 41 7 Sasquatch 34 58 24 Jedah 35 50 15 Anakaris 38 57 19 Lilith 38 58 20 Morrigan 38 58 20 Aulbath 39 44 5 Demitri 39 37 -2 Felicia 40 66 26 Gallon 40 42 2 Lei-Lei 41 40 -1 Victor 41 41 0 Bulleta 44 42 -2
Neutral/Roll Recovery Difference Frames
The table here shows the wake up speeds sorted by the "Difference" in frames it takes them to 'neutral recover vs. tech roll', organized as such purely out of convenience. Consider this how you should view the okizeme options on each character. The larger the "Difference", the more time you have to position yourself against an opponents tech roll, allowing for application of stronger knockdown mix-ups and pressure. It's fair to say, in most situations, that the smaller the difference is between the neutral recovery and tech roll, the better of recovery a character has - without counting reversal options.
Generally speaking, characters with a larger than 10 frame difference allow time for you to visually follow and position yourself in an optimal way to how they recover, while characters with less than a 10 frame difference require a good read to get a strong mix-up. Be aware that the characters with a small difference also pose some danger if you guess wrong on whether they roll or not; say if you have them cornered and attempt a meaty on a neutral recovery, at which point they may then roll forward and quickly place you in the corner. Understanding the tech roll habits of players using these characters is important.
Sorted by Difference in Neutral/Roll Recovery Character Neutral Recovery Tech Roll Difference Q-Bee 29 61 Forward
54 Back32 Forward
25 BackFelicia 40 66 26 Sasquatch 34 58 24 Lilith 38 58 20 Morrigan 38 58 20 Anakaris 38 57 19 Zabel 33 49 16 Jedah 35 50 15 Bishamon 34 41 7 Aulbath 39 44 5 Gallon 40 42 2 Victor 41 41 0 Lei-Lei 41 40 -1 Demitri 39 37 -2 Bulleta 44 42 -2
- This frame data itself was mostly acquired from the Japanese wiki. However, after testing it myself, Q-Bee's recovery speeds have been adjusted. They had her waking up about 3 frames faster with both her Neutral Recovery and Tech Roll. I'm pretty sure they tested her in one of the Turbo Speeds instead of Normal Speed like they should have.
Pre-Recovery Pushbox Frames
Pre-Recovery Active Pushbox States Character Neutral Back Forward Anakaris Standing / 10f Crouching / 5f Crouching / 5f Aulbath Standing / 4f Crouching / 4f Crouching / 4f Bishamon Standing / 8f Standing / 6f Standing / 8f Bulleta Crouching / * Crouching / 4f Crouching / 4f Demitri Crouching / 2f Crouching / 4f Crouching / 5f Felicia Standing / 12f Standing / 12f Standing / 12f Gallon Crouching / 9f Crouching / 4f Crouching / 4f Lei-Lei Standing / 13f Crouching / 5f Crouching / 5f Lilith Standing / 6f Crouching / 6f Crouching / 6f Morrigan Standing / 6f Standing / 6f Standing / 6f Jedah Standing / 6f Crouching / 4f Crouching / 4f Q-Bee None None None Sasquatch Standing / 10f Crouching / 5f Crouching / 5f Victor Standing / 10f Standing / 5f Standing / 5f Zabel Crouching / 7f Crouching / 7f Crouching / 7f Vampire Savior 2 Characters Donovan Standing / 6f Standing / 6f Standing / 6f Phobos None None None Pyron None None None
Turbo-3 & Frame-Skip information
- The competitive standard is a speed setting of Turbo-3
Input Tricks
Chain Breaking
- Chain Breaking:
- Chaining to a frame advantage normal, then linking into a cancelable normal. Example: Bulleta c.LP c.LK c.MP, +c.MP xx 214P. Linking during a chain enables you to cancel the normal move into a special or super, because while chained normals are uncancellable, linked normals are cancelable.
- Renda Linking:
- Because some light attacks gain added advantage when chained into themselves, certain links become possible when normally they would not be possible. For example, Victor is normally unable to link c.LP to c.MP, but he is able to chain two c.LP's together for the renda bonus, making c.LP c.LP, +c.MP xx [4]6P possible. And of course, chaining into the c.MP from c.LP would not allow Victor to cancel the c.MP into the head-rush.
Kara Cancel & Meter Building
- In VSav the karacancel mechanic is a bit different from modern games. Normal moves that can be special canceled can also be whiff canceled at any time during the startup or active hithrames. For example, Lei-Lei's c.MK can be canceled into Gong at any time during the c.MK startup or hitframes even if it whiffs. Though, a much more common (and effective) way for Lei-Lei to build meter is j.HK kara to 623P, cancel with K, then kara another j.HK into 623P, cancel with K, then kara yet another j.HK with j.214P (resulting in three kara j.HK's, two canceled by Senpuubu and the last canceled by Gong).
- However, all moves can be special/super canceled within the first few frames of the move, regardless of it's cancelability, which includes air moves. For example, even though Lei-Lei's HK is not special cancelable and can not be whiff canceled mid-way through the move, the first couple frames of the move can be canceled.
- It should be noted that this does not apply to chaining or cmd super cancels since chains lose their special cancel properties.
- This is important because normal moves reward meter build as soon as the move begins, rather than when the move is completed. Therefor when you karacancel a heavy attack into a special move you are rewarded meter from both the normal and special, rather than just the special, as [seen here].
- There aren't many normal moves that move a character forwards on the first few frames, so kara-throwing isn't as common or rewarding in VSav as other games. However, it can provide a useful option select in some situations. For example, karacancelling Q-Bee's LP into her 624MP cmd throw results in her performing the throw if she is within range, or doing a standing/crouching LP if she is not in range, which is useful because whiffing a LP is faster than whiffing a MP.
- There are, however, some moves that move the character a great distance after the initial startup. For example Lei-Lei's c.HK can be canceled mid-way through the animation into Tenraiha, which results in a range boost since the c.HK moves her forwards a noticeable amount.
Input Priority
Input Priority Priority Input 1 Special & EX Moves 2 Taunt 3 Dark Force 4 Light Punch 5 Punch Throw 6 Medium Punch 7 Hard Punch 8 Light Kick 9 Kick Throw 10 Medium Kick 11 Hard Kick
Input priority is a side effect of not being able to input multiple commands at the same time to do several things at once. Letting the game randomly decide which move will come out in such a situation would not be a good idea, so there must be an order of what commands are prioritized over which.
The chart above lists the order from least to most prioritized. Hard Kick has the lowest priority, so if you were to press both Hard Kick and Light Punch together your character would perform a Light Punch attack. Likewise, activating Dark Force with HP+HK after doing a 236 motion (236.HP+HK being the result) would cause you to perform a special move instead.
Though Special & EX Moves top out this list, there is the problem of being able to input multiple Special & EX Moves at the same time. This is solved by each character's Specials having their own priority order, such as a 623 input beating out a 236 input. Refer to the section below "Special & EX Moves Input Priority" for this character specific information.
Option Selects Using Input Priority
Knowing input priority gives access to several different option selects. Most of them are based around command grabs.
- Option select kick-activated command throws with a punch button instead of a kick. This may be useful if their throw option selects are poor or don't suit the situation. This works by simply doing an input like 6324.MK+LP to get a Light Punch on whiff. Several characters can take advantage of this:
- Felicia
- Gallon
- Jedah
- You can option select punch-activated command grabs into a Light Punch as well, despite usually being activated with an MP or HP, however this may result in an ES command grab instead.
- Bulleta
- Demitri — has no ES command grab
- Lei-Lei — has no ES command grab
- Morrigan
- Q-Bee
- Option select guard cancel moves that are kick-activated and do not have a non-GC version of the special. Whiff a punch attack instead of a kick if you GC incorrectly. Only two characters can take advantage of this:
- Q-Bee
- Zabel
- Inputting a command grab but pressing MP+MK or HP+HK instead of just MP or HP would give you the command grab if its possible, or if not, a Dark Force.
- Option select kick-activated command throws with a punch button instead of a kick. This may be useful if their throw option selects are poor or don't suit the situation. This works by simply doing an input like 6324.MK+LP to get a Light Punch on whiff. Several characters can take advantage of this:
Negative Edge Inputs
- Noting that the following special moves cannot be executed as a Negative Edge
- https://twitter.com/VMP_KyleW/status/1491521467929952256
- BU Tell Me Why
- BI Togakubi Sarashi
- GA Quick Move
- SA Big Towers
- VI Minimum Step
Special & EX Moves Input Priority
Anakaris Priority Command Move 1 4123.KK Pit to the Underworld 2 214.K Spell of Turning (Eat) 3 236.K Spell of Turning (Spit) 4 236.P Mummy Drop 5 46.P Cobra Blow 6 22.P(or)K Dance of the Coffins
Aulbath Priority Command Move 1 623.PP Water Jail 2 623.K Trick Fish 3 4123.PP Sea Rage 4 6324.MP(or)HP Crystal Lancer 5 6324.MK(or)HK Gens Anger 6 632.KK Aqua Spread (Homing) 7 632.PP Aqua Spread (Hold) 8 (Charge)4~6.P Sonic Wave 9 (Charge)4~6.K Poison Cloud 10 22.PP Direct Scissors
Bishamon Priority Command Move 1 360.MP(or)HP Kirisute Gomen 2 4123.KK Enma Seki 3 6324.PP Oni Kubi Hineri 4 623.P Kien Zan 5 4123.P Karame Dama 6 (Charge)4~6.P Iai Giri (High) 7 (Charge)4~6.K Iai Giri (Low)
Bulleta Priority Command Move 1 4123.KK Beautiful Memory 2 4123.PP Cool Hunting 3 6324.MP(or)HP Sentimental Typhoon 4 6324.KK Apple For You 5 214.P Shyness & Strike 6 623.P Cheer & Fire 7 (Charge)4~6.P Smile & Missile 8 (Charge)4~6.K Smile & Missile 9 (Charge)2~8.P Hop & Missile
Demitri Priority Command Move 1 263.PP Midnight Bliss 2 263.KK Demon Billion 3 360.MP(or)HP Negative Stolen 4 623.P Demon Cradle 5 236.P Chaos Flare 6 214.K Bat Spin ? LP,MP,6,MK,MK Midnight Pleasure
Gallon Priority Command Move 1 6324.MK(or)HK Wild Circular 2 4123.KK Dragon Cannon 3 623.P Beast Cannon 4 236.P Beast Cannon 5 214.P Million Flicker 6 28.K Climb Razor
Felicia Priority Command Move 1 623.P Cat Spike 2 623.K Delta Kick 3 4123.PP Dancing Flash 4 4123.KK Please Help Me 5 6324.MK(or)HK Hell Cat 6 236.P Rolling Buckler
Jedah Priority Command Move 1 4123.KK Prova di Servo 2 22.PP Finale Rosso 3 6234.MK(or)HK Sangue Passare 4 214.P Nero Fatica 5 236.P Dio Sega
Lei-Lei Priority Command Move 1 623.P Senpuubu 2 4123.PP Chuukadan 3 4123.KK Chireitou 4 6324.MP(or)HP Houtengeki 5 236.P Ankihou 6 214.P Henkyouki
Lilith Priority Command Move 1 623.KK Splendor Love 2 623.P Shining Blade 3 4123.KK Gloomy Puppet Show 4 6324.P Mystic Arrow 5 236.P Soul Flash 6 214.K Merry Turn ? LP,LP,6,LK,HP Luminous Illusion
Morrigan Priority Command Move 1 6324.MP(or)HP Vector Drain 2 63214.K Valkyrie Turn 3 623.P Shadow Blade 4 236.P Soul Fist ? LP,LP,6,LK,HP Darkness Illusion ? 6,HP,MP,LP,6 Cryptic Needle ? MP,LP,4,LK,MK Finishing Shower
Q-Bee Priority Command Move 1 623.PP Qj 2 214.K Delta A 3 4123.P C > R 4 4123.KK +B 5 6324.MP(or)HP O.M. ? Mash Kicks SxP
Sasquatch Priority Command Move 1 720.KK Big Sledge 2 320.K Big Swing 3 623.K Big Typhoon 4 623.P Big Blow 5 4123.PP Big Freezer 6 4123.KK Big Eisbahn 7 6324.P Big Brunch 8 41236.Taunt Big Trap 9 236.P Big Breath 10 22.P Big Towers
Victor Priority Command Move 1 720.KK Gerdenheim 3 2 360.P Mega Spike 3 623.K Giga Burn 4 214.P Gyro Crush 5 236.K Mega Shock 6 (Charge)4~6.P Giga Forehead 7 (Charge)2~8.P Giga Stake 8 (Charge)2~8.KK Thunder Break
Zabel Priority Command Move 1 623.PP Hell Dunk 2 6324.KK Death Voltage 3 4123.K Hell Gate 4 6324.MP(or)HP Skull Punish 5 214.K Death Hurricane 6 64.PP Evil Scream 7 28.K Skull Sting
Turn Around Frames
- Turn around animation has a duration of ?-frames (Confirm)
- During turn around you are unable to complete a REVERSAL
- During turn around you are unable to immediately ireppa (confirm this)
- It is advantageous to place your opponent into their turn-around animation.
- To setup this scenario, the advantageous player has to put themself into a turn-around animation prior to the opponents.
Turn Around Conditions
- You can place yourself into a turn-around animation by-
- Executing a move that recovers backwards
- moving through the opponent
- after a reset (mid-screen or corner)
- after a knockdown
- at neutral by jumping or dashing
- at neutral by using a mobile special move or super
- After a knockdown with a late pursuit that whiffs
- You can place your opponent into a turn-around animation by -
- Executing a move that has a backwards knockdown - Their ground roll inputs are reversed!
- moving through the opponent
- after a reset (mid-screen or corner)
- after a knockdown
- at neutral by jumping or dashing
Turn Around Priority
- Certain moves have a higher priority than a turn around animation
- Depending on the moves priority, different execution shortcuts are enabled
- If the move has a higher priority & is executed on the fist frame, the move will be completed facing backwards, prior to the turn around animation completing.
- If the move has a lower priority, the execution needs to be split based on the direction the character is facing, the move will be completed facing the intentional direction canceling some of the turn around animation.
- Example-A P1-Side; Charge Move of 4~6+Attack can be executed by holding a single direction of 4 as the character's turn around animation technically executes the second direction. Just hold 4 then press attack as the turn around animation happens & a charge move will be executed.
- Example-B P1-Side; Dragon Punch as 623+Attack can be executed by inputting 4, then during the turn around animation input 123+attack to get a Dragon Punch to execute prior the turn around animation completion. In this example, the Dragon Punch will execute facing the direction the turn around animation completes in.
Turn Around Matrix
Lots of testing & verification required to complete this chart
Turn Around Matrix Character Recover Backwards Knockdown Backwards Higher priority than Turn Around Animation Comments Zabel None ? ? ? Q-Bee P-Throw
Air Throw
C->R
ΔA
O.M.? ? Q-Bee can instant dash out of turn around
splitting Quick Jelly with Jump startup is the fastest executionSasquatch Pursuit on-hit ? ES Big Typhoon - DEATHBLOW ONLY
HP-Throw? ? Gallon K-Throw
Air Throw? Dashing https://twitter.com/moropickles/status/979034707772948481 Felicia K-Throw
Pursuit on-hit ?Hell-Cat Toy Touch
Back Dash
long dashhttps://twitter.com/moropickles/status/980176243306807296
https://twitter.com/egooolei/status/981173048060493824
https://twitter.com/egooolei/status/981384647929159681Bishamon P-Throw ? ? ? Bulleta P-Throw
Air ThrowSentimental Typhoon Dashing ? Aulbath Pursuit on-Hit ? ? Aqua Spread ? Demitri K-Throw ? ? ? https://www.youtube.com/watch?v=MLfgyPShvDg Lilith Air Throw
Pursuit on-hit ?? ? ? LeiLei None ? ? ? Jedah Pursuit on-hit ? Ira Spinta (All Versions) ? ? Morrigan Shadow Blade Vector Drain Dash
Vertical DashDuring backwards Vertical Dash Morrigan can execute air specials & supers Victor None ? ? https://twitter.com/egooolei/status/985151195244195840 Anakaris None ? ? ?
Stages
The table below shows the possibility out of 16 that a specific stage will appear when that particular character challenges in versus mode.
Stages Character Feast of the Damned Concrete Cave Tower of Arrogance Red Thirst Deserted Chateau Abaraya Vanity Paradise War Agony Forever Torment Green Scream Jedah 2 2 2 1 2 1 1 1 3 1 Bulleta 6 6 4 Q-Bee 8 8 Lilith 10 6 Demitri 10 3 3 Morrigan 3 3 10 Anakaris 12 4 Victor 5 5 3 3 Zabel 3 3 10 Lei-Lei 3 3 10 Gallon 9 2 2 3 Felicia 4 8 4 Aulbath 4 12 Sasquatch 4 4 8 Bishamon 8 8 Bugs
Sources
- Egos Twitter Moments
- Ego’s YouTube Playlist
- Darkstalkers Frame Data Site BUG
- KyleW Twitter Moments
- ArcadeLegacy Tutorial Playlist
- Japanese Wiki "Character pages"
- VAMPIRE SAVIOR ultimate combo video by TKO - Tool Assisted
- sm19309424 - ヴァンパイアセイヴァー コンボ動画
Hardware Bugs
- Wiring Coin Switch# 01, Coin Switch# 02, P1-Start & P2-Start to a single button & repetitively pressing that button causes the games frame rate to drop
- If command supers do not activate while you know the right inputs + meter is present, It's an issue that arises from a manufacturer of "kick harnesses" that depend on Neo-Geo's D-Button. The easiest solution is to place scotch tape on that specific pin of the kick harness.
- https://twitter.com/AilerusAL/status/714980395616505856
- https://twitter.com/HilaryyyPNW/status/741169414784028672
- https://twitter.com/Kajoq/status/920466156489793537
- http://seesaawiki.jp/vswiki/d/%a1%da%b6%a6%c4%cc%a1%db%bd%e7%b2%a1%a4%b7#content_3
- https://twitter.com/LeviGribbon/status/1282432114064011266
System Bugs
I have not listed bugs associated to Auto-Guard mode (4-5 exist within Ego’s YouTube Channel)
- Regarding incorrect colors at the Random Character Select Icon
- Dark Force x Background Images
- Coin Interruption
- Draw Game x Dark Force x Finale Rosso
- Draw Game x Dark Force x Lilith's DF-SuperJump Bug
- Shadow can "Mirror Match" the same color palette
- Disable-Roll Bug
- Conditions of activation
- A.) Connect with an attack which causes a vulnerable knockdown on air-hit, opponent must enter their unique animation
- B.) Attack with a different unique state change, which also causes a knockdown. Electric, Ice, Fire, Split(Chopped-in-half), Poison
- C.) Attacks do not have to consecutively combo, just be sure to avoid the opponents neutral-state
- D.) Opponent cannot be in knockdown until the second state-change is applied
- You can maintain the Disable-Roll bug by continuously preventing the opponent from entering a neutral state.
Q-Bee ES-Delta A into +B Q-Bee ES-Delta A into QJ Q-Bee ES-Delta A into QJ into +B https://twitter.com/VMP_KyleW/status/1019147689437511680 Bishamon - Karame Dama into Tsuji Hayate Bishamon - Karame Dama into ES-Tsuji Hayate Zabel - ES-Guard Cancel Zabel - ES-GC Interrupt into Evil Scream https://twitter.com/VMP_KyleW/status/1019149321801891840 Zabel - ES-GC Interrupt into Death Voltage https://twitter.com/VMP_KyleW/status/1019149001700999168 Lei-Lei - Stun Item into Chuukadan Aulbath - Aqua Spread into Poison Breath Anakaris - Stun-Item into Chuukadan https://twitter.com/egooolei/status/1018082686903021568 - Dizzy Bug
- Conditions of activation
- A.) Connect with an attack which causes a vulnerable knockdown on air-hit & allows the opponent to mash-to-escape. Opponent must enter their unique animation
- https://twitter.com/felineki/status/1020492784720138240
- https://twitter.com/felineki/status/1020493308899053568
- https://twitter.com/VMP_KyleW/status/1020493508291919872
- B.) Prevent the opponent from entering a neutral state
- C.) Throw the opponent - Throw mush place opponent on the ground similar to the initial trigger.
- D.) Opponent Techs the throw
- * Using proximity-block setups or having the opponent do a Reversal Attack is the best way to meet the second condition
Zabel Air-Throw https://www.youtube.com/watch?v=FQhFbm4ehek Zabel Air-Throw https://twitter.com/egooolei/status/1021352306510446592 Bishamon Air-Throw https://twitter.com/egooolei/status/1019166156928634880 Bishamon Ground-Throw https://twitter.com/VMP_KyleW/status/859191559199178752 Bishamon VS Gallon https://twitter.com/VMP_KyleW/status/1111471213140799489 Bishamon VS Gallon https://twitter.com/VMP_KyleW/status/1111131392421724160 Bishamon ES-variant Ground-Throw https://twitter.com/VMP_KyleW/status/1017279754485940225 Bishamon Air-Throw https://twitter.com/egooolei/status/980422609874513922 Aulbath Air-Throw https://twitter.com/BattousaiCV/status/644549305035046914 Aulbath Air-Throw https://twitter.com/egooolei/status/1019166156928634880 Aulbath Air-throw https://twitter.com/egooolei/status/1019162219584487425 Aulbath Air-Throw https://twitter.com/egooolei/status/1018100349788274688 Aulbath Air-Throw https://twitter.com/egooolei/status/1018111921415970820 - Numerous examples of unsuccessful Dizzy-Bug attempts
- https://twitter.com/VMP_KyleW/status/1019827194489548800
- https://twitter.com/VMP_KyleW/status/1016921745716985856
- https://twitter.com/VMP_KyleW/status/994823792684912642
- https://twitter.com/VMP_KyleW/status/1004541975545036800
- https://twitter.com/VMP_KyleW/status/1016904163555332096
- https://twitter.com/Imberlicchio/status/956127407336980480
- https://twitter.com/VMP_KyleW/status/1009136472035717121
- https://twitter.com/VMP_KyleW/status/1017291161394769921
- https://twitter.com/VMP_KyleW/status/1016904163555332096
- https://twitter.com/VMP_KyleW/status/1008559175855558656
- https://twitter.com/VMP_KyleW/status/1016921745716985856
- https://twitter.com/VMP_KyleW/status/1018223107188748288
- https://twitter.com/VMP_KyleW/status/1016904163555332096
- https://twitter.com/VMP_KyleW/status/994807203445071872
- https://twitter.com/VMP_KyleW/status/1014710525555425281
- https://twitter.com/VMP_KyleW/status/1014713177706098688
- https://twitter.com/VMP_KyleW/status/1014715172064120832
- https://twitter.com/VMP_KyleW/status/1014719809773232128
- https://twitter.com/VMP_KyleW/status/1014721058136444928
- https://twitter.com/VMP_KyleW/status/1014722084008628224
- Ground Throw & Air Throw does not recover white-life
- https://twitter.com/VMP_KyleW/status/996300019220103168
- https://twitter.com/arkmorrigan/status/996490787109064704
- https://twitter.com/VMP_KyleW/status/996525933556363264
- https://twitter.com/VMP_KyleW/status/996527355127517184
- https://twitter.com/KENGALLON/status/996551986265780224
- https://twitter.com/VMP_KyleW/status/996588301724221442
- No Pushback on Hit
- Gallon's Million flicker
- LeiLei Pendulum setup
- Felicia’s head-ride sets up this bug against herself
- Proximity block
- LeiLei's DarkForce landing frames
- White shadows while in Dark Force
- Speculated to be a hardware issue
- First instance of the Bug
- Tech-Hits
- Post Dizzy
- Post Knockdown
- Post KO
- Post Hit
- Post Anakaris Teleport
- Post Quick Jelly
- Negated
- Overflow Displacement
- https://twitter.com/XXin73XX/status/852548708382134272
- https://twitter.com/onioni1019/status/1510234244467277824
- https://twitter.com/AilerusVMP/status/1510084949281497089
- https://twitter.com/VMP_KyleW/status/1510487570840391682
- https://twitter.com/VMP_KyleW/status/1511031482709540868
- https://twitter.com/VMP_KyleW/status/1510502889193558016
- https://twitter.com/VMP_KyleW/status/1512308248904314881
- https://twitter.com/VMP_KyleW/status/1510495687477137416
- https://twitter.com/VMP_KyleW/status/1510393778003070977
- https://twitter.com/XXin73XX/status/1510671331616235521
- Tech-hit displacement of Projectiles
- Felicia's Neko Punch
- Lilith's Soul flash
- Bulleta's 3+HK or 5HK
- Sasquatch's Ice Puddle
- Aulbath's Aqua Spread
- Meaty Dark Force Punish
- Player-2 walk through
- Player-2 has an added advantage to walk through the opponent (Force a corpse-hop) in scenario which a Player-1 would not have been able to. This happens specifically in the corner. Some of the quicker & thinner characters (MO, LI, BU, GA, QB etc.) may walk through regardless of which player-side they are. It's the larger/slower characters that rely on the player-2 (BI, VI, LE, SA Etc.) to enable this mixup.
- Guard-Lock Unblock
- Overhead to low + Tech-Hit
- Bulleta's Low Option-1
- Bulleta's Low Optoin-2
- Felicia's Low Options
- Felicia's Low Option-2
- Felicia's Overhead Option
- Felicia's Overhead Option-2
- Lilith's Low Option
- Leilei's Low Option
- Anakaris Low Option
- Demitri's Low Options
- Other notable options are: QB Quick Jelly, JE Dio Sega, AN using other's projectiles
- Frame Perfect Unblock (High+Low)
- Turn-Around Priority
- Bulleta's ground or air Throw
- Morrigan's Jet Pack
- Aulbath's Water Jail
- Queen-Bee's Tiger-Knee Quick Jelly Setup
- Morrigan's ES-Shadow Blade input as 6321 or 4123
- Victor's 720 Setup
- Sasquatch's Es-Brunch Setup
- Turn Around x Charge Move
- Unblock State-Changing Meter-Costing Projectiles
- Anakaris Pharaos Magic
- Video Example required
- Lilith's Puppet Show
- Bishamon ES-Spirit
- https://twitter.com/VMP_KyleW/status/854597778898436096
- https://twitter.com/VMP_KyleW/status/925977874636689408
- https://twitter.com/VMP_KyleW/status/917239495006683136
- https://twitter.com/VMP_KyleW/status/889007260742987776
- https://twitter.com/VMP_KyleW/status/887905985318100992
- https://twitter.com/VMP_KyleW/status/885748177189588992
- https://twitter.com/VMP_KyleW/status/927297278133510144
- https://twitter.com/VMP_KyleW/status/906047161137217537
- https://twitter.com/VMP_KyleW/status/889019853276721153
- https://twitter.com/VMP_KyleW/status/889009287455846401
- https://twitter.com/VMP_KyleW/status/928140534622728192
- https://twitter.com/VMP_KyleW/status/928483204650057729
- https://twitter.com/VMP_KyleW/status/858717009764245504
- https://twitter.com/VMP_KyleW/status/928137345265647616
- Bishamon Bricks
- Impossible Drop-Out Combos
- Felicia's Dancing Flash
- Lilith Luminous Illusion
- Demitris's Midnight Pleasure
- Dark Force recovery
- Force a crouch state
- A true meaty attack can be blocked
- A true meaty can hit if they guard incorrectly
- Proximity block will not override Dark Force deactivation
- Unblock ES-Guard-Cancel Frames
- See The first chart here for specific character values - Characters not listed are assessed at 7-frames
- Play as "Dark Force Zabel
- Technically, DF-Zabel is his own character (16th character). you can force this selection at the character select screen by playing as Zabel in Arcade mode, entering into Dark Force. As the CPU connect a long animation attack (720 for example), use P2-Coin to join the fight. Dark Force is not deactivated & the character select screen will force #16 Zabel to display - It's a graphical error of Bulleta. This gets more silly when P2 selects shadow & wins the fight. As shadow steals the soul of DF-Bell, his win pose is visible - It's a graphical error of Bulleta. Lastly, on the proceeding character select screen, Shadow now has Zabel's lower half loaded.
- Mobility options after a K.O.
- Character Colors 9 & 10
- Auto-Guard only Color-9 (0X8)
- Auto-Guard Color-10 (0x9)
- Shadow can force Color 9 or 10 into a non-Auto-Guard Match
- Combo counter bugs
- Display is not intended above 99-hits
- Combo's above 256-hits is not allowed
- Combo Counter only resets when the opponent goes to a neutral state
- Shared RAM Values Interactions
- https://twitter.com/VMP_KyleW/status/1103171184928014336
- https://twitter.com/VMP_KyleW/status/1103386409711198209
- https://twitter.com/VMP_KyleW/status/1103186512282181632
- https://twitter.com/VMP_KyleW/status/1103196075110723584
- https://twitter.com/VMP_KyleW/status/1104641013723746304
- https://twitter.com/VMP_KyleW/status/1102795914521931776
- https://twitter.com/VMP_KyleW/status/1102797974571085824
- https://twitter.com/guratan_felicia/status/1099795445017075712
- https://twitter.com/VMP_KyleW/status/1099895361701703680
- https://twitter.com/VMP_KyleW/status/1099896061244596225
- https://twitter.com/VMP_KyleW/status/1101035540667785216
- https://twitter.com/VMP_KyleW/status/1101888413639172097
- https://twitter.com/VMP_KyleW/status/1101889557891432448
- https://twitter.com/VMP_KyleW/status/1101905382082035713
- https://twitter.com/VMP_KyleW/status/1103178875117268992
- Cheap-Kill's Red-Flash activation can causse palette effects to not occue when done on the same frame
- 255 Meter Bug
- CPU has 1 meter, CPU does an ES-Attack, CPU does a GC
- CPU's Impossible Actions. CPU actions are not restricted by the same conditions the players are. Q-Bee, Anak & Demitri have notable resulte
- Q-Bee using specials between rounds - https://twitter.com/XXin73XX/status/1545460150613741568?s=20
- Anak special canceling st.mp -
- Demitri doing Air Chaos Flare really low to the ground -
Character Specific bugs
- Zabel
- Q-Bee
- Sasquatch
- Gallon
- Bishamon
- Bulleta
- Felicia
- Aulbath
- Lilith
- Lei-Lei
- Demitri
- Morrigan
- Jedah
- Victor
- Anakaris


