Eternal Fighter Zero/Sayuri Kurata: Difference between revisions
(→f5B) |
|||
| Line 90: | Line 90: | ||
|advBlock=-1 | |advBlock=-1 | ||
|cancel=N SP IC | |cancel=N SP IC | ||
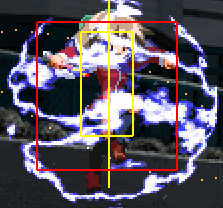
|description=Sayuri swipes with her magical wand. This move has | |description=Sayuri swipes with her magical wand. This move has is very disjointed, most characters will have a tough time competing with it. Be careful of opponents with ways to get under this normal, such as slides. Perfect for harassing at a safe range and smacking people out of the air, especially against opponents stuck in the corner. Has a long cancel window. The higher hitbox whiffs on every crouching character. | ||
}} | }} | ||
}} | }} | ||
Revision as of 04:50, 26 June 2024

Introduction
Despite having an unusual hover dash, Kurata Sayuri (倉田 佐祐理) is the closest character EFZ has to a Street Fighter type footsies playstyle. Her strong normals and slow moving projectiles allow Sayuri to slow the match down and focus on poking and whiff punishing, fishing for just one knockdown to start running her simple but potent mixups and pressure strings. Her hoverdash, although slow, can be used to crush lows and land an overhead, while with 2 super meter she gains a powerful command throw. In terms of specials, she has some slow moving projectiles to cover her approach, while her Magical☆Press gets her a corner knockdown from anywhere on screen. Defensively, she has a number of reversals as well as a unique counter, "Ah, Got Your Skill~". This move can counter any melee hit and grants Sayuri the ability to guard cancel into a Genocide Cutter homage whenever she blocks the countered move after.
Sayuri is one of the supporting characters in Kanon, a visual novel produced by Key in 1999. She is a normal third-year student at the high school that Yuuichi goes to, and has been best friends with Mai since they first met during first-year. She is very polite and formal, but has a strange habit of addressing herself in the third person. During Kanon, Sayuri supports Yuuichi becoming Mai's friend and does what she can for them, stubbornly staying by Mai's side even as strange incidents surrounding Mai continue to escalate...
Sayuri was part of EFZ's original cast.
Stage: Courtyard of the Lunch Break (昼休みの中庭)
BGM: The Girls' Opinions (彼女たちの見解)
Character-Specific Notes
- Sayuri's forward dash is a hoverdash that moves at roughly a 45 degree angle. Sayuri does not have unique dashing attacks during a hoverdash, performing her jumping attacks instead. The hoverdash does not count as an airdash, allowing Sayuri to jump or airdash from them. Sayuri's hoverdash has a bug that can add forward momentum to jumps.
- Player 2 Sayuri has a couple of bugs that make her stronger than player 1 Sayuri.
- Sayuri's IC animation on the ground is bugged and lets her recover before the superflash ends.
- Sayuri's jump and double jump are bugged, leaving her slightly more vulnerable than other characters during them.
- Sayuri's RG stun state is 21.66 frames long instead of the usual 20, likely due to a bug.
- Sayuri will be forced into her standing hurtbox after recovering from either crouching hitstun from a weak attack (Attack Level 1) or standing hitstun from any attack (likely bugs).
- Sayuri has some of the most abnormal hurtboxes when juggled and causes many combo routes to be more difficult against her, if not impossible.
Normal Moves
| Frame Data Help | |
|---|---|
| The notation for the move lists can be found under Controls. | |
| Cells filled with a "-" indicate a placeholder. Cells filled by a "/" indicate a non-applicable field. | |
| Values separated by a "~" (X~Y) indicate a range or variance. A "~" preceding a single value (~X) may indicate approximation. A "-" separating frame values of a property (X-Y) indicate the duration of the property. | |
| Cell data accompanied by a ※ indicate properties unusual to the template. Explanations for such properties can be found at another ※ in the description. If a move requires multiple ※'s, subscripts will be attached to indicate relation (※1, ※2, ※3...). | |
| Frame data with decimal values .33 or .66 relate to subframes. | |
| Version | Used for moves with multiple special attacks on one motion. |
| Damage | The base damage value that the specific hit will do. See damage scaling for more information. |
| Proration | Base value Power% reduces by per hit. |
| Juggle | Juggle value used to determine juggle time after a move hits an aerial or juggle state opponent. |
| Guard | Indicates how the move must be blocked, if it can be blocked at all.
Low: Crouch Block |
| Property | Shows what properties the move has and the time (in frames) that these properties are active. Example: "I: 0.33-9", which means the move is invulnerable on the first subframe of the move until the 9th full frame (or 27th subframe).
I: Full Invincibility |
| Startup | Indicates where the move's first active hitbox is. |
| Active | Total frames the hitbox is active for. |
| Recovery | Total frames until the character can block. Note: After the recovery of any action, before any other action may occur, there exists 1 frame in which the only action you may take is to block. |
| Adv Hit | Frame advantage on hit. |
| Adv Block | Frame advantage on block. |
| Cancel | Possible cancel options.
N: Normals |
Standing
5A
5A  |
|---|
c5B
c5B  |
|---|
f5B
f5B  |
|---|
5C
5C   |
|---|
Crouching
2A
2A  |
|---|
2B
2B  |
|---|
2C
2C  |
|---|
Jumping
j5A
j5A  |
|---|
j5B
j5B  |
|---|
j5C
j5C  |
|---|
Throws
Ground Throw
Ground Throw Close 6C/4C  |
|---|
Air Throw
Air Throw Close j6C  |
|---|
Special Moves
Specials
236*
Magical☆Shot マジカル☆ショット 236*  |
Can be done on the ground and in the air. |
|---|
623*
Magical☆Sword マジカル☆ソード 623*  623A 623A   623B 623B
|
|---|
214*
Ah, got your skill~ あ、コツ掴みましたー 214*  The only good counter The only good counter
|
|---|
Magical Cutter
Magical☆Cutter マジカル☆カッター A/B/C while in grounded blockstun  Hit 1 Hit 1  Hit 2 Hit 2  Hit 3 Hit 3
|
|---|
j412*
Magical☆Smash マジカル☆スマッシュ j412*  A/B A/B   C C
|
Sayuri dives forward with magical energy. |
|---|
41236*
Magical☆Press マジカル☆プレス 41236*  |
|---|
Eternity Specials
236236*
Magical☆Agents マジカル☆エージェンツ 236236*  All of 236236C's agents. Just a capture of each hitbox, not accurate to in-game animation. All of 236236C's agents. Just a capture of each hitbox, not accurate to in-game animation.
|
Sayuri turns her wand into a gun and fires it down the stage with secret agents assisting her. Sayuri shoots notably faster than the agents, but their shots have slightly taller hitboxes. All versions reach more than fullscreen. ※First two sets of shots from the agents are 0.66F active, rest are 1F. |
|---|
214236*
Magical☆Pressure マジカル☆プレッシャー 214236*  |
An extra-powerful version of Magical☆Press. This is Sayuri's highest damage combo ender. |
|---|
6321463214*
Magical☆Thunder マジカル☆サンダー 6321463214*   |
|---|
Final Memory
FM
Magical☆On Stage マジカル☆オンステージ 2 2 A 2 S  |
|---|
Strategy
- Sayuri's main gameplan is to abuse her obnoxiously large normals to poke, whiff punish and generally Street Fighter her way to victory. Sayuri will get most of her damage out of capitalising off the opponent's mistakes and abusing command throws when the opponent becomes too respectful of her normals and pressure.
Footsies
- Sayuri's normals are some of the best in the game. On the ground she has f5B for an excellent eye height level poke that can sometimes be used to smack people out of the air. 2B is another excellent tool which covers the area below that of f5B. 2C is a decent anti air for when aerial opponents get too close for comfort and leads easily into juggle loops if it connects. In the air she has jB which has incredible horizontal priority. jC trumps this however, in being her best aerial normal. Sayuri's can neutral jump jC to stuff ground and aerial approaches alike.
- As for specials, 236* can be used to zone and cover screen space. Grounded 236C should generally be avoided, but in the air all versions of j236* can, and should, be used. This move can also be FIC'd, allowing Sayuri to follow close behind the star as a safer way to approach the opponent.
- 623A is also particularly potent in neutral. With 8F of startup and a huge hitbox that moves forward with Sayuri, this move has lots of uses. You can add it after f5B/2B pokes and be relatively safe on block/RG, or just use it as it's own neutral tool. Mixing it up with her other neutral tools can make for very surprising forward movements covered by a genuinely disgusting hitbox, leading into a knockdown.
Blockstrings
- If done correctly, Sayuri can have some seemingly endless blockstrings if she manages her meter efficiently. Her main blockstring tools are: 41236A, 623A IC, 236A/B, 236A/B IC to catch mash/reversals, c5B f5B .. c5B f5B frame trap, and generally using her pokes at a safe distance (f5B and 2B, occasionally cancelling into star or 623A).
- Her simplest and most predictable string is 2AA 2B 5C 41236A. If not for Recoil Guard, this string would be inescapable. You can repeat this over and over and the only way to beat it is to RG the 41236A. This will be the basis of our blockstrings. From this, you can adjust the string and begin to vary the timing of the hits. For instance, instead of 41236A which is fairly slow, you can instead use 623A to try and catch your opponent off guard. In the same sense, you can do 2AA 2B 236A/B and even FIC into f5B to prevent the possibility of jumping out. Keeping your strings varied and unpredictable will make it harder for your opponent to Recoil Guard, giving them fewer chances to steal your turn.
- Every 8 seconds you will get access to Red IC, allowing you to go for riskier setups using IC. One example is 236A/B IC IAD jAAA - this forces a mixup situation of how many highs, when will they stop and go low, will they go for a command throw after the star is blocked, etc etc. Another option is from the mixups listed in Okizeme: using 66jC j236B FIC overhead or c5B, and as another option using the insane priority and invulnerability on j412C to predict reversals.
214A
- After RGing, Sayuri's 214A can be an especially potent tool. From stand RG, it allows Sayuri to punish any 3.66F gap or longer, and from crouch RG it allows punishes for 5.66F or longer. Usage will depend on the matchup, but there are various places it should work universally, like between 2A and 2B, between any B and C normals (although better players will use these for blockstrings far less), or between jAA strings. If your opponent is getting predictable with their blockstrings, this is the way to punish them for it. Just be careful not to overuse this - 21F of recovery with a total move length of 46F makes it easy to punish.
- Once you have captured a desirable attack with 214A (this is usually something that is frequently used in the opponent's blockstrings), it may be good to stop using 214A and move to focusing on punishing with Magical☆Cutter. Due to a bug this move is far stronger as Player 2, on this side Magical☆Cutter can be used during any blockstun as long as the captured move is active - this allows you to punish the startup of the move you captured even if the move you're in blockstun from wasn't the captured move. As Player 1 Magical☆Cutter is still potent, just not as outrageously strong, only usable when you're in blockstun from the move you captured.
Stored Momentum from Rising Dash
- Sayuri's rising ground dash has a unique property - if she jumps after dashing, she will keep some horizontal momentum.
- This momentum is stored until:
- Sayuri uses the stored momentum (by jumping)
- Sayuri moves left or right on the ground
- She does a ground dash/backwards jump - the stored momentum has no effect on either of these but will still be used.
- Doing a neutral jump after a dash will show you the amount of forward momentum that is stored. When doing a forward jump the stored momentum will be added onto the usual momentum of Sayuri's forward jump.
- Doing a forward jump from the ground with the stored momentum is possible but requires forward and up to be pressed on the same frame. If 8 is pressed too early, you will get a momentum neutral jump. Pressing 6 too early will give you a regular forward jump. One trick to get a momentum forward jump from the ground is to make it impossible for air inputs to be executed, buffering a ground special during this time and buffering 9 during the ground special. The string will look something like 66 jB (whiff) j236B j[9]. During the jB (whiff) you buffer the 236B, and because you're already performing a normal j236B will not come out. Instead, you'll get 236B upon landing, allowing you to buffer the forward jump with ease. She can also do it after 66 j236A, buffering the j9 during the star. The jump wont come out until she hits the ground, even though Sayuri is capable of double jumping after 66 j236*.
- Using the stored momentum on a double jump is much easier as there is no way of clearing the stored momentum in the air.
- This has applications mainly in neutral, and especially after a ground star. The added momentum on Sayuri's forward jump allows her to keep just behind the star while it's travelling, and can be quite surprising if used sparingly.
Combos
| Notation Help | |
|---|---|
| Disclaimer: Combos are written by various contributors, some combo notations may deviate slightly from the notation listed below. For more information, see Controls | |
| IC | Input Instant Charge (22C) when you have the right amount of RF Meter. |
| FIC | Input Flicker Instant Charge (22C) when you have the right amount of RF Meter. |
| {X/Y/Z} | Move X or Y or Z can be used. |
| #* | Indicates that any of A, B and C may be used with #. Example: 214*. |
| [<- X] [-> X] | Side switch notation. All inputs grouped by the square brackets are performed facing the arrow's direction. They are still written as if they were done facing right, however. |
| [X]xN | Loop the inputs in the square brackets as many times as N. |
| c5B | Proximity normal only usable while close. |
| f5B | Proximity normal only usable outside of c5B range or when cancelled from another normal. Known as far 5B. |
| jX | Button X is input during your first jump. |
| djX | Button X is input during your double jump. |
| X(whiff) | Indicates that X is intended to whiff. |
| X(tech trap) | Indicates a combo ender intended to catch the opponent's air tech. The most common kind of tech trap is j6C, which will air throw early techs and jC later techs. Executionally identical to X(whiff) but different in purpose. |
| ~ | Indicates a followup for moves which have them. Example: 236A~236A. |
| .. | Indicates a short delay. |
| IAD | Indicates an Instant Air Dash. |
| IABD | Indicates an Instant Air Back Dash. |
| (X) | X move is omittable from the combo. |
| tk.X | Indicates the motion "X" is input immediately after leaving the ground. Stands for tiger knee. |
Regarding dj6C(tech trap) Tech Punishes
- The timing of your tech punish should always aim to throw the opponent after the earliest possible air tech, this timing will cover all possible tech timings. You can see the timing and some examples here, and an extremely late tech example here.
Essential Combos
No IC
- Anywhere
- 2AA 5BB 5C(1hit) 41236A
- 2AA 5BB 5C(1hit) 41236A
Basic Combos
No IC
- Anywhere
- 2AA 5BB 5C(1 hit) 2141236A
- 2AA 5BB 5C(1 hit) 2141236A
- 2AA 5BB 5C(2 hits) 236236A
- 2AA 5BB 5C(2 hits) 236236A
- Corner
- 236A/B 2B jC j66 jAB land 5AA 5BB 2C jAABC dj6C(tech trap)
- 236A/B 2B jC j66 jAB land 5AA 5BB 2C jAABC dj6C(tech trap)
Red IC
- Anywhere
- 41236C jC j66 jAB 5AA 5BB 2C jAABC dj6C(tech trap)
- 41236C jC j66 jAB 5AA 5BB 2C jAABC dj6C(tech trap)
- Corner
- 2AA 5BB 623A IC 5AA 5BB 2C jAABC dj6C(tech trap)
- 2AA 5BB 623A IC 5AA 5BB 2C jAABC dj6C(tech trap)
100% Blue IC
- Corner
- 2AA 5BB 5C 623A IC 2B jC j66 jAB 5AA 5BB 2C jAABC dj6C(tech trap)
- 2AA 5BB 5C 623A IC 2B jC j66 jAB 5AA 5BB 2C jAABC dj6C(tech trap)
- Midscreen
- 2AA 5BB 623C IC 44 66 jC j66 jAB c5B 2C 41236A
- 2AA 5BB 623C IC 44 66 jC j66 jAB c5B 2C 41236A
Advanced Combos
Meterless
- Anti Air, Corner Facing Out
- 5AA 2C jB .. jC j66 jAC c5B 2C 41236A
- 5AA 2C jB .. jC j66 jAC c5B 2C 41236A
- Anti Air, Anywhere
- 2C jC j66 jAB 2C jC j66 jAC 2C j9 jAABC dj9 dj6C(tech trap)
- 2C jC j66 jAB 2C jC j66 jAC 2C j9 jAABC dj9 dj6C(tech trap)
Red IC
- Anywhere
- 2AA 5BB 5C 41236C IAD jAC 5BB 2C jABC dj6C(tech trap)
- 2AA 5BB 5C 41236C IAD jAC 5BB 2C jABC dj6C(tech trap)
- Works on: Rumi, Mio, Neyuki, Shiori, Sayuri, Ikumi, Doppel, Nayuki, Mishio.
- Corner
- {c5B/f5B/2B/2C} 623A IC 5BB 2C jC j66 jAC 5AABB 2C jAABC dj6C(tech trap)
- {c5B/f5B/2B/2C} 623A IC 5BB 2C jC j66 jAC 5AABB 2C jAABC dj6C(tech trap)
- Works with any 1 hit of a normal into 623A IC as a starter.
- 2A {c5B/f5B/2B/2C} 623A IC 2B 2C jC j66 jAC 5AABB 2C jAABC dj6C(tech trap)
- 2A {c5B/f5B/2B/2C} 623A IC 2B 2C jC j66 jAC 5AABB 2C jAABC dj6C(tech trap)
- Works with any 2 hits of normals into 623A IC as a starter.
- 2AA {c5B/f5B/2B} 623A IC 2C jC j66 jAC 5AABB 2C jAABC dj6C(tech trap)
- 2AA {c5B/f5B/2B} 623A IC 2C jC j66 jAC 5AABB 2C jAABC dj6C(tech trap)
- Works with any 3 hits of normals into 623A IC as a starter. Difficult on small characters, see the combo below.
- 2AA {c5B/f5B/2B} 623A IC (c5B) 2C jB .. jC 5AABB 2C jAABC dj6C(tech trap)
- 2AA {c5B/f5B/2B} 623A IC (c5B) 2C jB .. jC 5AABB 2C jAABC dj6C(tech trap)
- For use on small characters. If you're worried about dropping the ender, you can change the ender to 5AAAA 2C jAABC dj6C(tech trap). Omit the c5B before the first 2C if you have trouble.
- 66jC j236B IC jC 2C jB .. jC j66 jAC 5AA 5BB 2C jAABC dj6C(tech trap)
- 66jC j236B IC jC 2C jB .. jC j66 jAC 5AA 5BB 2C jAABC dj6C(tech trap)
- Overhead route.
100% Blue IC
- Anywhere
- 5AA(anti-air) 2C jC j66 jBC j412A IC land jC j66 jC j412A land jC djC dj66 djBC land jABC 5BB 2C jAABC dj6C(tech trap)
- 5AA(anti-air) 2C jC j66 jBC j412A IC land jC j66 jC j412A land jC djC dj66 djBC land jABC 5BB 2C jAABC dj6C(tech trap)
- Not possible on smaller body characters.
- Corner
- 2AA 5BB 5C 623A IC 2B 2C jC j66 jC {2B/c5B) 2C jC j66 jAC 5AABB 2C jAABC dj6C(tech trap)
- 2AA 5BB 5C 623A IC 2B 2C jC j66 jC {2B/c5B) 2C jC j66 jAC 5AABB 2C jAABC dj6C(tech trap)
- The {2B/c5B} option is important. 2B is higher damage but much stricter on juggle height, c5B is less damage but more lenient. If you think the opponent's juggle height is too low, use c5B. Works with any 5-6 hit starter ending in 623A IC.
- 2AA c5B {236A/B} 2B jC j412A IC djC dj66 djC .. dj412A land jC djC dj66 djBC land jABC 5BB 2C jABC dj6C(tech trap)
- 2AA c5B {236A/B} 2B jC j412A IC djC dj66 djC .. dj412A land jC djC dj66 djBC land jABC 5BB 2C jABC dj6C(tech trap)
- Max damage. Final 2C jABC 5BB is difficult, omitting the 2C makes this slightly easier. If the opponent is too high to connect with c5B, you can do 5A 2C jABC dj6C(tech trap) as a finisher instead.
- Midscreen
- 2AA 5BB 623C IC 44 6[6] jC j66 jBC 2B 2C jC j66 jAC 5AA 5BB 2C jAABC dj6C(tech trap)
- 2AA 5BB 623C IC 44 6[6] jC j66 jBC 2B 2C jC j66 jAC 5AA 5BB 2C jAABC dj6C(tech trap)
Magical☆Shot Launch Combos
- Sayuri is one of the few characters with the ability to launch into a juggle combo without having to use meter. If you have good reactions and timing, you'll be able to get 3k+ damage without having to spend any resources. The setups are character specific, and the most stable pickups are listed below. All combos are started from point blank, the 2A's are used for spacing and allowing you to hit confirm properly. Midscreen combos leave out the enders due to changing drastically depending on distance from corner and particular combo route, these are noted with [...]. For timing purposes and spacing purposes, microwalks are sometimes used - this is simply walking forward a very small amount. These are intended to be used as a starting point for learning star launches, as the situations where they can be used in matches are a lot more complicated - you are encouraged to experiment with their practical uses on your own.
Midscreen
Against Standing
- Akiko, Doppel, Ikumi, Kaori, Misaki, Minagi, Mishio, Rumi
- 2AA c5B 236B microwalk 5A jC j66 jAC[...]
- 2AA c5B 236B microwalk 5A jC j66 jAC[...]
- Mio
- 2AA c5B 236A microwalk 5A jC j66 jAC[...]
- 2AA c5B 236A microwalk 5A jC j66 jAC[...]
- Misuzu
- 2AA c5B slight delay 236B 5A jC j66 jAC[...]
- 2AA c5B slight delay 236B 5A jC j66 jAC[...]
- Kano
- 2AA c5B 236B jB j66 jAB[...]
- 2AA c5B 236B jB j66 jAB[...]
- Sayuri
- Cannot reliably convert into juggles.
Against Crouching
- Sayuri
- [jC 2A/2AA] 2C 236A 5A jC j66 jAB[...]
- [jC 2A/2AA] 2C 236A 5A jC j66 jAB[...]
- Mishio
- [jC 2A/2AA] c5B 236A microwalk 5A jC j66 jAC[...]
- [jC 2A/2AA] c5B 236A microwalk 5A jC j66 jAC[...]
- Akiko, Ikumi, Kano, Kaori, Misaki, Mio, Misuzu, Minagi, Rumi
- Cannot reliably convert into juggles.
Same for both standing and crouching
- Akane, Mai, Makoto, Mizuka, Nayuki, Shiori
- [jC 2A/2AA] c5B 236A microwalk 5A jC j66 jAC[...]
- [jC 2A/2AA] c5B 236A microwalk 5A jC j66 jAC[...]
- Mayu
- [jC 2A/2AA] c5B 236A microwalk 5A jC j66 jAC[...]
- [jC 2A/2AA] c5B 236A microwalk 5A jC j66 jAC[...]
- Ayu, Nayuki (asleep), Unknown
- Cannot reliably convert into juggles.
Corner
Against Standing
- Doppel, Ikumi, Kano, Misaki, Makoto, Mishio, Misuzu, Nayuki (asleep), Nayuki (awake), Rumi, Shiori
- 2AA c5B 236A/B walk back slightly f5B .. 2C jB .. jC 5AABB 2C jAABC dj6C(tech trap)
- 2AA c5B 236A/B walk back slightly f5B .. 2C jB .. jC 5AABB 2C jAABC dj6C(tech trap)
- Mayu, Minagi, Unknown
- 2AA c5B 236A/B 5A .. 2C jB .. jC 5AABB 2C jAABC dj6C(tech trap)
- 2AA c5B 236A/B 5A .. 2C jB .. jC 5AABB 2C jAABC dj6C(tech trap)
- Akane, Mai, Mizuka
- 2AA c5B 236A/B f5B .. 2C jB .. jC 5AABB 2C jAABC dj6C(tech trap)
- 2AA c5B 236A/B f5B .. 2C jB .. jC 5AABB 2C jAABC dj6C(tech trap)
- Akiko, Kaori
- 2AA c5B 236B walk back slightly f5B .. 2C jB .. jC 5AABB 2C jAABC dj6C(tech trap)
- 2AA c5B 236B walk back slightly f5B .. 2C jB .. jC 5AABB 2C jAABC dj6C(tech trap)
Against Crouching
- Akane, Akiko, Mayu, Kano, Makoto, Shiori, Misuzu, Minagi, Mishio, Misuzu, Mizuka, Nayuki
- [jC 2A/2AA] c5B 236A 5A .. 2C jB .. jC 5AABB 2C jAABC dj6C(tech trap)
- [jC 2A/2AA] c5B 236A 5A .. 2C jB .. jC 5AABB 2C jAABC dj6C(tech trap)
- Mishio in particular is difficult to hit with 5A after 236A.
- Mai, Misaki, Nayuki (asleep)
- [jC 2A/2AA] 2C 236A f5B .. 2C jB .. jC 5ABB 2C jAABC dj6C(tech trap)
- [jC 2A/2AA] 2C 236A f5B .. 2C jB .. jC 5ABB 2C jAABC dj6C(tech trap)
- Ikumi
- [jC 2A/2AA] 2C 236A walk forward slightly f5B .. 2C jB .. jC 5ABB 2C jAABC dj6C(tech trap)
- [jC 2A/2AA] 2C 236A walk forward slightly f5B .. 2C jB .. jC 5ABB 2C jAABC dj6C(tech trap)
- Alternatively, 2AA c5B 236A 5A .. 2C starter.
- Doppel, Kaori, Rumi, Sayuri, Unknown
- Not viable or very unstable.
Same for both standing and crouching
- Ayu, Mio
- [jC 2A/2AA] c5B 236A 5A .. 2C jB .. jC 5AABB 2C jAABC dj6C(tech trap)
- [jC 2A/2AA] c5B 236A 5A .. 2C jB .. jC 5AABB 2C jAABC dj6C(tech trap)
- Alternative option for Misuzu
- [jC 2A/2AA] 2C 236A f5B .. 2C jB .. jC 5AABB 2C jAABC dj6C(tech trap)
- [jC 2A/2AA] 2C 236A f5B .. 2C jB .. jC 5AABB 2C jAABC dj6C(tech trap)
Okizeme
- Compared to some characters in EFZ, Sayuri's okizeme options may appear lackluster at first, but she still has access to some powerful setups. Her main crossup oki tool is jB, but converting from hits with this is tough and Sayuri definitely has better, albeit more expensive, setups to use.
j412C/jC Which Way
 First part of j412C.
- j412C is absolutely incredible. It has 38F of invul at the start, with the only downside being 5F of vulnerability with no hitbox cover before the second half the the move. The initial hitbox is huge. This makes it an especially scary okizeme tool - while it is possible to punish, it is difficult to properly time a 4F 5A before the second half of the move starts.
- Off a lot of midscreen knockdowns (most commonly being 623A) you can go for a same side jC or a crossup j412C option select. To do this, IAD (instant air dash) after the knockdown and as you crossup the opponent input j412C in the opposite that you are air dashing. Essentially, this makes the input j632C. The game will auto correct the direction and go towards the opponent. If you end up doing an IAD that's too low to crossup, your j412C will just turn into a jC allowing you to land and confirm into a regular ground combo. To see followups for the crossup version, please use this reference.
66 jC Overhead/c5B Low
- With 22F of startup, 66jC is the fastest Sayuri has for an overhead. She can combo from this easily with j236B FIC, which you can see here. Has the ability to stuff lows and leads to some nice damage. Your alternative option, which you'll be using more often, is c5B. This is a Sayuri's longest reaching low and can be tough to use at first, as it requires some knowledge of the range at which close normals activate. Hitconfirming c5B is made easier by the fact it has an extra 6F of special hitstop.
- The distance you can use 66jC on a crouching character from varies depending on the matchup. Below gives a very basic indication of which characters 66jC'd at point blank and which cannot.
- Point Blank
- Akiko, Ikumi, Kaori, Mai, Minagi, Misaki, Mishio, Mizuka, Sayuri
- Beyond c5B range (distance varies)
- Akane, Ayu, Kano, Makoto, Mayu, Mio, Misuzu, Nayuki (asleep), Nayuki (awake), Rumi, Shiori, Unknown
236A IC IAD Which Way
- Sayuri's star projectile can be used to create mixups on waking up opponents. Using 236A IC and instant air dashing over the opponent, with correct timing you can make it ambiguous which side you are on when the opponent wakes up. This setup is very easy to choose the side on, and if you choose crossup you can use j412A to convert from hits. You need to input this the same way you would the j412C crossup listed above, meaning you'll have to input is as j632A after you cross the opponent up.
41236C Which Way
- After her RF Magical☆Pressure, Sayuri is capable of using a correctly timed 66jB .. jC 66jB(whiff) juggle combo to make a hard to see gap in the corner (or no gap at all), creating left/right opportunities. The 66jB(whiff) acts as your tech punish. You can see the setup in action here. The tech punish combo can be found here.
Magical☆Thunder
- When your opponent begins being overly respectful and stops mashing, you can bring out the tool that makes Sayuri pressure genuinely scary. Magical☆Thunder (6321463214*) is a command throw super that deals a lot of damage, especially compared to Sayuri's usual combo damage output. The only useful versions are Level 2 and Level 3, as Level 1 is jumpable post super flash rendering it next to useless. Level 2 and 3 cannot be jumped post superflash so they must be predicted or the opponent must be mashing or holding jump in order to beat them. These command throws have decent range, you don't have to be standing right next to the opponent for them to connect, but you can be no more than a few paces away. I'd recommend testing out the ranges of Level 2 and 3 respectively to get a feel for their uses.
- The first half circle input can be hidden during regular pressure in many ways. A simple example would be:
- 63214D 5A short delay, walk forward while waiting for blockstun throw invulnerability to end 63214B
- The D input after 63214D is a way to clear the input buffer and guarantee that 63214 5A wont turn into 214A.
Matchups
Rumi Nanase
The Shinai
- If she loses her shinai make her life hell. Don't give her an easy time getting it back. Use 2141236A/B's corner carry potential during combos when needed to force Rumi's shinai off screen and keep it off screen for as long as you can. Shinai-less Rumi struggles against Sayuri playing lame keepaway, even when Sayuri is cornered.
Vs Armour
- Sayuri's armour breakers are:
- No Meter
- Without access to RF meter or super meter, your main armour breaker is 41236A/B. This can be a rather risky option for very little payout as it is prone to getting RG command thrown if you become predictable, but still important to use as a pressure option.
- Red Reinforce
- With RF meter Sayuri becomes an armour destroying machine, especially with super meter access.
- With good enough reactions, it's possible to punish some armoured move's startups with 41236C. One example is in neutral where Rumi's only options are f5B and 5C, typically at Sayuri's f5B or 2B range, hitting the armour frames should allow for some players to confirm into 41236C (shortcut as 413C to increase effectiveness).
- Red Reinforce with 2 Super meter
- A higher commitment option with lower requirements for reaction times is {2B/f5B} IC 2141236B/C. IC is used both as a means to confirm and an extended window to input 2141236B/C in time to punish. This idea can also be applied to many other situations, such as 236A/B IC in neutral > confirm move's startup > 2141236B/C.
- Rumi Armoured Throw (Rumi 41236C)
- This move has such long startup that it is very easy to punish as long as you retain your jump cancel option. A key way to do this is to do 2AA c5B (wait) as a main confirm, which is effective due to the increased hitstun on c5B. c5B then allows you to either confirm into a combo or still gives you access to your jump cancel to avoid Rumi's throw, fall back down, and punish.
Key RG 214A Spots
Note: This is not an exhaustive list.
- With Shinai
- 2AA - 7F startup, easily punished with crouch RG 214A.
Mio Kouzuki
Vs Short Range Mode
- On your wakeup
- Vs j2C
- In general you just want to react to this as best as possible. Mio's ability to FIC j2C makes it a rather safe oki option, making reversals a waste of meter. If you notice your opponent getting sloppy and not buffering FIC, then you can start using things like 41236C that do not have superflash. Any move with superflash will allow the opponent to react and FIC their j2C.
- Sayuri 6321463214B/C - Mio's frequent use of j2C makes it extremely risky to wakeup super command throw, try to use this sparingly.
- Sayuri 41236C - decent option against crossup j2C setups, where Mio is high enough that she cannot buffer FIC without wasting the setup.
- On Mio's wakeup
- Mio's wakeup options in Short Range are dauntingly strong. She can feel impossible to pressure and keep in the corner, but it's not a lost cause.
- Sayuri j412C can be used as a relatively safe hard callout for any of Mio's wakeup reversals. 3F startup, 36F active and 39F of invincibility from frame 1. Trying to oki Mio is all about dissuading her from using her incredible wakeup options using this move. Once the opponent starts respecting this and blocking on wakeup, the mindgames begin.
- Sayuri's backdash is also important. Can be used to bait all of Mio's wakeup reversals in Short Range mode, even allowing for an easy free launcher with 236A as a punish against Mio's 214214A and 214C.
- Notes on Mio's moves
- Mio's 623* is 4F startup. Respect it.
- It's possible to meaty safejump 623A, B, and C with Sayuri's jC but the timing and height for it seems tight. Using this too frequently leaves you open to wakeup stand RG.
- jAA loses to 623B.
- Mio's 623* is 4F startup. Respect it.
Vs Long Range Mode
- On Mio's wakeup
- Sayuri's usual options of IAD jAA / jC / land 2A work a lot better in this mode.
- Mio's only real reversal (invincible until active) in this mode is her Final Memory. She does have moves with invincibility on startup which you need to be aware of due to the length of invincibility and the move's startup, but they all have a period of vulnerability before active.
- These moves are:
- 412C - Invul frames 1-17, startup 19F. Will hit any attempts to backdash on Mio's wakeup, be aware of this. This will whiff on Sayuri at point blank, so you can do Sayuri's usual IAD okizeme in the corner without worry.
- 236236C - Invul 1-9, 11F startup. Scary but expensive. Usually only used as a last resort.
- 214214A/B
- A version is invul 1-10, 15F startup. Try to land and block this if you are unable to stuff it with jA/jC. Not too much of a threat but a bit annoying if blocked in the air, as this will knock up and away from Mio, giving her space.
- B version is invul 1-5, 9F startup.
Win Quotes
| Japanese | English |
|---|---|
|
佐祐理の射程と |
Unfortunately for you, |
|
すみません |
Sorry. |
|
あははー |
Ahaha~ |
|
ふぇー |
Fwee? |
|
テイルトウェイト |
If I could ("Tiltowait" is a Level 7 Mage Spell from the game Wizardry. It is the strongest magic, causing a nuclear explosion and damages all monster groups.) |
|
(To Mai) |
(To Mai) |
|
(To UNKNOWN) |
(To UNKNOWN) |
|
(To Sayuri) |
(To Sayuri) |
Colors

In-game References
External References
- Sayuri's "Magical☆Sword" move is based on Gambit's "Cajun Slash" move, from Marvel vs. Capcom 2.
- Sayuri's "Ah, got your skill~" move is based on Chaka, Khan, and Black Polnareff's "Oboetazo" move, from Jojo's Bizarre Adventure.
- Sayuri's "Magical☆Cutter" move is based on Rugal's "Genocide Cutter" move, from The King of Fighters series.
- Sayuri's "Magical☆Smash" move is based on Omega Rugal's "Gravity Smash" move, from the The King of Fighters series.
- Sayuri's "Magical☆Press" move is based on Rugal's "God Press" move, from the The King of Fighters series.
- Sayuri's "Magical☆Pressure" move is based on Rugal's "Gigantic Pressure" move, from the The King of Fighters series.
- Sayuri's "Magical☆Agents" move is based on Bulleta's "Cool Hunting" move, from the Vampire Savior series.
- Sayuri's "Magical☆Thunder" move is based on Benimaru Nikaido's "Electrigger" move, from the The King of Fighters series.
- Sayuri's "Magical☆On Stage" move is based on Rugal's "Dead End Screamer" move, from the The King of Fighters series.