
Samurai Shodown/FAQ: Difference between revisions
Jump to navigation
Jump to search
m (→Other) |
|||
| Line 433: | Line 433: | ||
===What do the System Data numbers mean?=== | ===What do the System Data numbers mean?=== | ||
*'''Damage | *'''Damage Taken:''' How much more or less damage the character takes. (e.g. 105% means the character takes 1.05x damage) The scaling applies to all moves. | ||
*'''Rage | *'''Rage Factor:''' This is used to calculate how much rage the character gets after taking damage. Rage increased = Damage x Rage Factor + 2 | ||
*'''Rage | *'''Rage Duration:''' This is how long the character spends raged. | ||
*'''Jump | *'''Jump Duration:''' The full length of a jump in frames. | ||
*'''Dash | *'''Dash Speed:''' Dash speed is determined by how fast the dash is compared to Haohmaru's, which is considered as average. | ||
*'''Back | *'''Back Dash:''' The total duration of back dash in frames. | ||
*'''Weapon Pickup / Drop:''' The total frames needed for the character to pick up or drop their weapon. At frame one of weapon pick up you are considered armed so the opponent cannot interrupt weapon pickup. | *'''Weapon Pickup / Drop:''' The total frames needed for the character to pick up or drop their weapon. At frame one of weapon pick up you are considered armed so the opponent cannot interrupt weapon pickup. | ||
Revision as of 08:58, 3 February 2023
Who should I play?
Easy characters are pickup-and-play with fairly simple game plans. Great for beginners and players coming from other games.
Intermediate characters require some knowledge of their mechanic, setups, and need some execution.
Advanced characters have execution requirements or specific knowledge needed to be played effectively.
Easy
| Character | Best Range | Archetype | Notable Tools/Traits | Playstyle Summary |
|---|---|---|---|---|
| Mid-Far | Shoto/Neutral |
|
Haohmaru is a well-rounded "shoto"-style character with strong neutral and high damage. | |
| Mid-Far | Neutral |
|
Kyoshiro Senryo is a mid-range zoner with powerful anti-airs and unconventional mixups. | |
| Mid-Far | Neutral/Counter |
|
Jubei Yagyu is a defensive character with a suffocating mid-range presence and powerful fundamentals. | |
| Mid-Far | Neutral |
|
Charlotte is a defensive footsies character who keeps the opponent at bay with her great mid-range pokes and poweful zoning tools. | |
| Mid-Far | Keep-away |
|
Earthquake is a big-body zoner who wants to overwhelm the opponent with his powerful long-range pokes from afar. | |
| Close | Rushdown/Mixup |
|
Shiki is a fast rushdown character who suffocates the opponent with her close-range pressure and mixups. | |
| Mid | Neutral |
|
Yashamaru Kurama is a footsies character with best-in-class aerial control and long reaching pokes. | |
| Mid-Close | Rushdown/Mixup |
|
Darli Dagger is a no-nonsense rushdown character who keeps up the pressure with her great jumping buttons and high damage. | |
| Mid | Neutral |
|
Wan-Fu is an all-or-nothing rushdown character who can force himself onto you by throwing his weapon away. | |
| Mid | Neutral/Mixup |
|
Warden is a powerful fundamentals-focused character who suffocates the opponent with his amazing normals. |
Intermediate
| Character | Best Range | Archetype | Notable Tools/Traits | Playstyle Summary |
|---|---|---|---|---|
| Mid-Close | Hit and Run/Stance |
|
Nakoruru is a pixie character who can easily dominate the neutral game in the air or on the ground. | |
| Mid-Close | Hit and Run/Setplay/Mixup |
|
Hanzo Hattori is a mixup-grappler with very good mobility and powerful okizeme. | |
| Mid-Far | Zoner/Setplay/Mixup |
|
Galford is a hybrid zoner/rushdown character who uses his dog Poppy to create opportunities for himself. | |
| Mid-Far | Zoner |
|
Tam Tam is an aggressive zoning character, who can easily force you into hard 50/50 mixups. | |
| Mid-Close | Rushdown/Mixup/Setplay |
|
Genjuro is a close-range rushdown character with a large arsenal of powerful mixup tools on the ground. | |
| Mid-Close | Neutral/Resource Management |
|
Kazuki Kazama is an aggressive "power-up" character with explosive damage potential and varied neutral. | |
| Mid-Far | Zoner/Stance |
|
Mina Majikina is a stance-based zoner with high mobility and strong buttons for every situation. | |
| Mid-Far | Shoto/Zoner |
|
Iroha is an oppressive zoner with great aerial mobility and strong high-low mixups. | |
| All | Zoner/Mixup |
|
Cham Cham is a flexible rushdown-character who can pester the opponent from afar or up-close. | |
| Mid | Neutral |
|
Hibiki Takane is a footsies monster with high damage and some of the best normals in the game.
| |
| Mid-Far | Zoner/Mixup |
|
Shiro Tokisada Amakusa is a zoner with powerful, long-range pokes and unconventional movement options. |
Advanced
| Character | Best Range | Archetype | Notable Tools/Traits | Playstyle Summary |
|---|---|---|---|---|
| Mid-Close | Neutral/Mixup |
|
Ukyo Tachibana is a defensive mixup character with strong grounded neutral and one of the best 50/50 mixups in the game. | |
| Close | Rushdown/Mixup |
|
Yoshitora Tokugawa is a "toolbox" character with a large bag of powerful mixups and strong pressure from his jump-ins. | |
| Far | Zoner/Setplay/Trap |
|
Wu-Ruixiang is a trap-based zoner who lays mines on the ground to create opportunities for herself. | |
| Close | Timescam/Setplay/Trap |
|
Rimururu is a passive-aggressive pixie character who thrives on frustrating the opponent until they overextend. | |
| Far/Close | Zoner/Setplay/Mixup |
|
Basara is a tricky zoner with deceptive movement and strong mixups from a knockdown. | |
| Mid | Neutral/Mixup |
|
Shizumaru Hisame is a flexible character with powerful rushdown tools and strong control over the airspace. | |
| Mid-Far | Zoner/Setplay/Mixup |
|
Sogetsu Kazama is a setplay character with very good neutral, allowing him to get his okizeme started easily. | |
| Mid-Far | Neutral/Zoner/Setplay/Timescam |
|
Gongsun Li is a runaway zoner who dicates the pace of the match with her great fireball and fast teleports. | |
| Mid-Close | Neutral/Mixup |
|
Baiken is a mixup character with great control over the mid-range who can keep up the pressure once she gets an opening. |
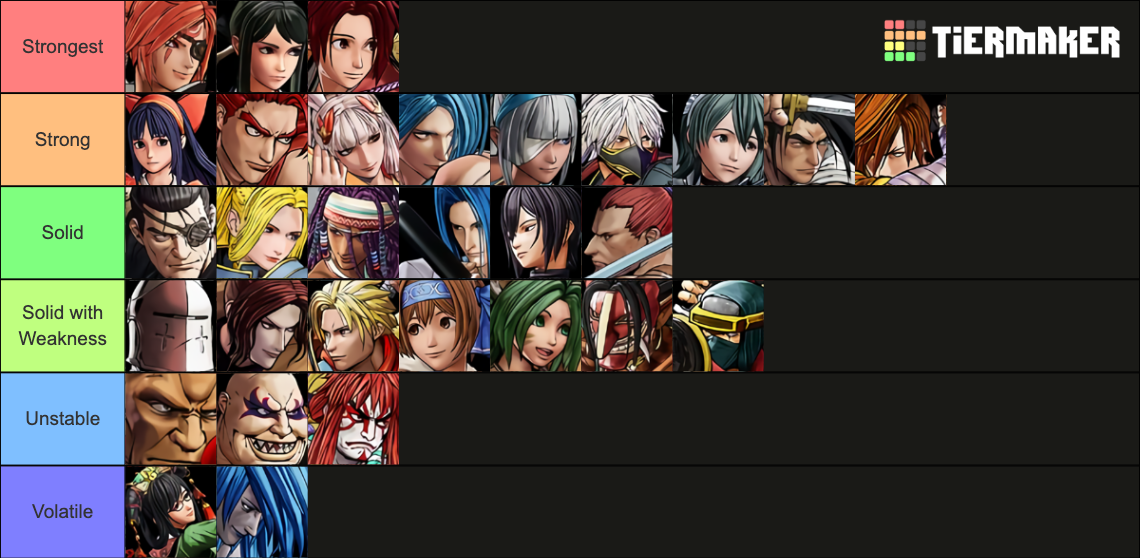
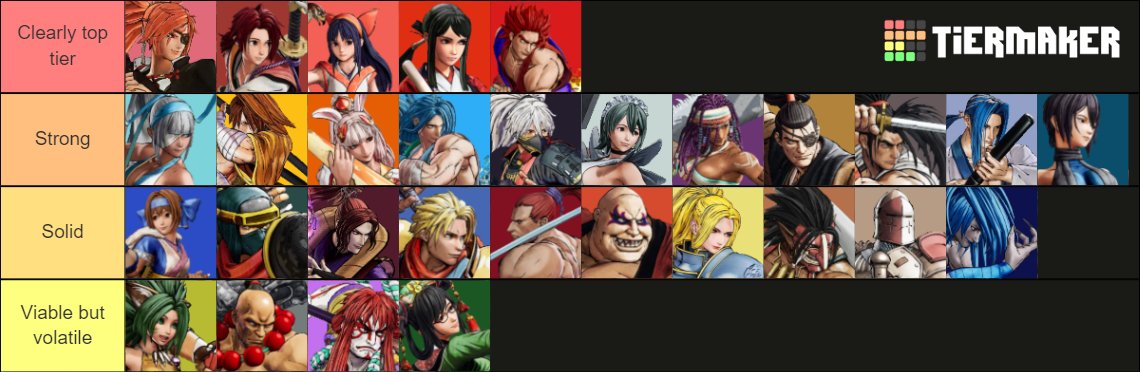
What's the game's tier list?
Here are some tier lists from notable players for the current patch (Ver 2.40).
North America


Japan

Credit to Doracat via https://twitter.com/youseidora/status/1563645810033979393?t=jk_zxCzUPts0-7ud3HiIxQ&s=19.
Europe

Hundert's tierlist explanation: https://docs.google.com/document/d/1OTMv681Bn8MsEzqsSRpUvFX5BcRGn37aZqXgmMfaeD0
What are some common beginner mistakes?
In order of importance:
- Not using Rage Explosion.
- Rage Explosion is a powerful comeback mechanic. In general, if you are down in life, below 40% life, and have already lost a round; then it's time to Rage Explode. Of course each player's rage explosion strategy will vary by player preference, character, and situation.
- Using Lightning Blade after a throw.
- Lighting Blade damage is greatly reduced after a throw. More so than other throw follow up options. In almost all cases, it's better to use another throw follow up.
- Jumping during an opponent's Rage Explosion.
- Lighting Blade does high damage and can easily be used to anti air. If your character can't adjust their jump movement, don't jump. Even if your character can adjust their jump, jumping is still highly risky.
- Not using Just Defense.
- Just Defense can be a powerful answer to fireball zoning. An opponent may try to zone you out with fireballs. With proper Just Defends, the opponent is feeding you rage meter. It is also great to use on wakeup. If you're going to guard on wakeup, guard just as your character stands so that a blocked attack is just defended. If your opponent is within stance break range, then you can even use that to escape the pressure.
- Not knowing your BNBs.
- Samsho is not a combo heavy game. Very simple combo routes will get your damage conversions to optimal or near optimal. BNBs are typically going to be a normal into a special. Just 2 moves. At a basic level, you'll need BNBs in two situations. The first situation is a punish or hit confirm. The second is a throw follow up. Know your BNBs in these cases. The routes are likely to change when rage is active, so know rage and non-rage routes.
- Using Rage Explode too early.
- It is not usually to your advantage to Rage Explode before you have lost a round. You might be able to win a round that you might have otherwise lost, but you've set yourself up for failure in the following rounds.
- Mashing Deflectable Normals.
- If a skilled opponent sees you mashing, they will deflect and SSM you. And taking an SSM makes losing the round near certain. If you feel the need to mash out of a scramble, 2D is a low risk option.
- Not mixing up recoil cancels
- Winning the recoil mind game is a big part of Samsho. If you are predictable with your recoil options, an opponent will know what you're about to do and punish. On a recoil, you can deflect, use a special move, or just do nothing. Do what your opponent isn't expecting.
Frame Data & System Data
What does Frame Data mean?
Frame data describes the full sequence of animation for an attack.
- Damage: This is the base damage the attack will do without scaling. For more information: Damage Scaling Chart.
- Guard: Whether the attack has to be blocked mid, low, or high.
- Startup: States the first frame in which the attack will hit.
- Active: How many frames the attack can hit for.
- Recovery: The recovery of the move on whiff. Recovery = Total - Startup - Active + 1
- Total: The full duration of the move, from start to end.
- Hit advantage: How many frames you can move before the opponent after hitting the opponent from the front. +5 means you recover 5 frames before the opponent, -3 means he recovers 3 frames before you.
- Block advantage: Like the other advantages, except when the move is blocked. Since there are recoil animations, this will often be very different from the others.
- Guard damage: This is how much damage the attack will do to the internal guard meter in percentage.
- Cancel: If the attack has cancelable regions.
- Recoil: If the attack has a recoil animation when blocked and there are recoil cancel regions.
- Deflectable: If the attack is deflectable by weapon deflect, 236A+B.
- Unarmed: If the attack is available unarmed, or only while unarmed.
For better understanding of each category, see the Mechanics page.
What's Frame Data good for?
Frame data is mostly for tuning your game and understanding how/why things happen. You don't need it to be able to play, but it helps iron out the wrinkles.
A simple example is that you can look at the block disadvantage of a move, such as -21, and know that any attack with 21F or faster startup can punish it guaranteed.
What do the System Data numbers mean?
- Damage Taken: How much more or less damage the character takes. (e.g. 105% means the character takes 1.05x damage) The scaling applies to all moves.
- Rage Factor: This is used to calculate how much rage the character gets after taking damage. Rage increased = Damage x Rage Factor + 2
- Rage Duration: This is how long the character spends raged.
- Jump Duration: The full length of a jump in frames.
- Dash Speed: Dash speed is determined by how fast the dash is compared to Haohmaru's, which is considered as average.
- Back Dash: The total duration of back dash in frames.
- Weapon Pickup / Drop: The total frames needed for the character to pick up or drop their weapon. At frame one of weapon pick up you are considered armed so the opponent cannot interrupt weapon pickup.
All characters' data are written on the System Data page.
Is Season Pass 1 free?
Season Pass 1 was only available for free on PS4 outside Japan for a limited time right before the game's release in the west. Nowadays you'll have to pay for it.
I bought Season Pass 2 on PS4 but I can't use Mina?
Due to an issue with the PS Store, Season Pass 2 had to be delayed and thus only Mina was able to be purchased separately. When the season pass was made available later on, they decided not to include Mina in it while making it cheaper than Season Pass 1. Therefore, you will need to buy both Season Pass 2 and Mina on PS4 for the full package.
How do I find tech on Twitter?
Besides the general hashtags #SamuraiShodown, #SamSho and #サムライスピリッツ, #サムスピ in Japanese, each character in the game has a specific hashtag which people should aim to use when posting tech for ease of searching. The rule of thumb is to start with #SS_ (for Samurai Spirits / Samurai Shodown) and append the first two letters of a character's name. In case of overlap, a different 2nd letter is picked. For example: Shiki (#SS_SH) and Shizumaru (#SS_SZ), Haohmaru (#SS_HA) and Hanzo (#SS_HZ), or Charlotte (#SS_CH) and Cham Cham (#SS_CC). The current list is as follows:
| Character | キャラクター | Hashtag / ハッシュタグ |
|---|---|---|
| Amakusa | 天草四郎時貞 | #SS_AM |
| Baiken | 梅喧 | #SS_BK |
| Basara Kubikiri | 首斬り破沙羅 | #SS_BA |
| Charlotte | シャルロット | #SS_CH |
| Cham Cham | チャムチャム | #SS_CC |
| Darli Dagger | ダーリィ・ダガー | #SS_DA |
| Earthquake | アースクェイク | #SS_EA |
| Galford | ガルフォード | #SS_GA |
| Genjuro Kibagami | 牙神幻十郎 | #SS_GE |
| Gongsun Li | 公孫離 | #SS_LI |
| Hanzo Hattori | 服部半蔵 | #SS_HZ |
| Haohmaru | 覇王丸 | #SS_HA |
| Hibiki Takane | 高嶺 響 | #SS_HI |
| Iroha | いろは | #SS_IR |
| Jubei Yagyu | 柳生十兵衛 | #SS_JU |
| Kazuki Kazama | 風間火月 | #SS_KA |
| Kyoshiro Senryo | 千両狂死郎 | #SS_KY |
| Mina Majikina | 真鏡名ミナ | #SS_MI |
| Nakoruru | ナコルル | #SS_NA |
| Rimururu | リムルル | #SS_RI |
| Shiki | 色 | #SS_SH |
| Shizumaru Hisame | 緋雨閑丸 | #SS_SZ |
| Sogetsu Kazama | 風間蒼月 | #SS_SO |
| Tam Tam | タムタム | #SS_TA |
| Ukyo Tachibana | 橘右京 | #SS_UK |
| Wan-Fu | 王虎 | #SS_WA |
| Warden | ウォーデン | #SS_WD |
| Wu-Ruixiang | 呉瑞香 | #SS_WU |
| Yashamaru Kurama | 鞍馬夜叉丸 | #SS_YA |
| Yoshitora Tokugawa | 徳川慶寅 | #SS_YO |


