Background
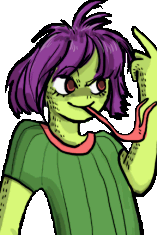
Anna is the younger sister of Ruri, the owner of a popular pub named Hammer Spot.
The pub has been operated by her family for over 100 years, but Anna isn’t really interested in helping.
She hates drunk people, so she rarely spends time there. She would much rather go out shopping and put together new fashionable outfits.
Occasionally, she gets angry with drunk customers at the pub and gets into fights. However, that has yet to hurt the business. In fact, some customers come to the pub just to see her fight.
Ruri plans on setting up a ring in Hammer Spot for Anna to fight in, promising that as long as Anna fights, she’ll never have to help with anything else at the pub.
"TSUCHINOKO~!"
Overview
Playstyle
|
Recommended Types: Super
 Anna plays like Millia, kind of, sit behind 5EX, get knockdown, and loop okizeme till' death. Anna plays like Millia, kind of, sit behind 5EX, get knockdown, and loop okizeme till' death.
|
| Pros |
Cons |
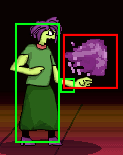
- The Best Lockdown: 5EX is the best lockdown move in the game, it's multi-hit, hard to get around, and deals good damage. Along with moving slowly, letting Anna easily back opponents into the corner.
- Great Mix: As a compliment to her lockdown, she has two instant overheads in j.X and j.EX, along with 2X, an insanely feared and fast low. She can apply this behind 5EX to command a disgusting amount of respect, then use that mental stack to get her combo grab.
- Real Okizeme: Most characters don't have real Okizeme, Anna's 5EX and accessible mix-ups actually lets her do Millia-style Okizeme. She can even OS with 5EX + GRAB to beat things like Raging Demon.
- Doesn't Need To Neutral: Unlike the Shotos, 5EX is slow and takes awhile to go away, so she can effectively shut off fireball neutral with it. She can also 2X, which is an insane low-profile that's hard to punish.
- Combo Grab: Her grab combos, for whatever reason, which is very rare in Kyanta.
- No Use for Ultras: Her Ultras are bad or very boring, they can deal damage but aren't very good, this means she can save her meter for EXs and safely run Super-type without missing out on anything.
|
- No Damage/No Ultra Damage: She just doesn't deal damage, even her optimal damage is far worse than Kyanta's, who has pretty bad damage. She also lacks Ultras that can deal hefty damage for her, making her match-ups against volatile characters, like Gyanta or Taro, harder.
- No Meter Taunt: Meter taunts are free economy and help immensely, not having one, especially with her very safe 5EX, stops her from being completely braindead.
- Must Trade: Anna can't build meter very well or keep opponents out, she has great lockdown but if a character can poke her through it the match-up then becomes a matter of who has more health and meter, rather than who makes the better decisions.
|
Movelist
5A
|
| Damage
|
Guard
|
Startup
|
Active
|
Recovery
|
Invuln
|
Adv. Hit
|
Adv. Block
|
Adv. Parry
|
Effect
|
| 5
|
Mid
|
1
|
1
|
2
|
0
|
?
|
?
|
?
|
N/A
|
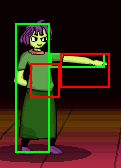
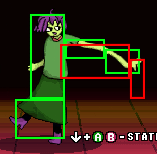
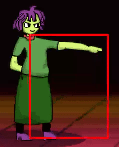
Insanely quick and safe 1f jab, very long reaching.
Coincidentally, identical to Rare's 5A except with a worse hurtbox.
|
|
2A
|
| Damage
|
Guard
|
Startup
|
Active
|
Recovery
|
Invuln
|
Adv. Hit
|
Adv. Block
|
Adv. Parry
|
Effect
|
| 5
|
Low
|
1
|
2
|
2
|
0
|
?
|
?
|
?
|
N/A
|
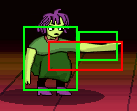
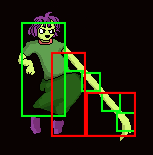
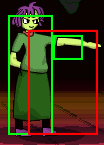
Equally as solid as her 5A, gets a tiny bit of extra activity, but in general it's basically the same as 5A but low.
|
|
J.A
|
| Damage
|
Guard
|
Startup
|
Active
|
Recovery
|
Invuln
|
Effect
|
| 15
|
High
|
5
|
4
|
3
|
0
|
N/A
|
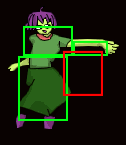
Weirdo air-momentum jab, a bit poor of a hitbox but fast, halts vertical movement.
Very applicable in combos, carries well off of a midscreen launcher into the corner.
Ends in the air so it can combo into j.B or be used to approach, like an air-dash.
|
|
5B
|
| Damage
|
Guard
|
Startup
|
Active
|
Recovery
|
Invuln
|
Adv. Hit
|
Adv. Block
|
Adv. Parry
|
Effect
|
| 15,15,18 (42)
|
Mid
|
9
|
11
|
5
|
0
|
?
|
?
|
?
|
N/A
|
Multi-hit forward poke, not very fast or safe, is outclassed by other options in neutral.
Better off using a different button such as 2X or 2B when approaching with a venom ball.
Applies well in corner combos though.
|
|
2B TSUCHINOKO~! TSUCHINOKO~!
|
| Damage
|
Guard
|
Startup
|
Active
|
Recovery
|
Invuln
|
Adv. Hit
|
Adv. Block
|
Adv. Parry
|
Effect
|
| 20
|
Low
|
7
|
5
|
7
|
0
|
?
|
?
|
?
|
N/A
|
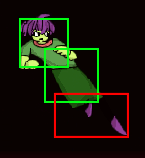
A very very long low similar to Robo-Azuma's 2B, isn't a disjoint however and isn't as safe.
Best used behind a venom ball or for poking unsafe moves. It extends your hitbox a lot, so NEVER try to punish grabs with this.
|
|
J.B
|
| Damage
|
Guard
|
Startup
|
Active
|
Recovery
|
Invuln
|
Effect
|
| 20
|
High
|
5
|
12
|
Until Ground
|
0
|
N/A
|
Odd air-float with a huge and disruptive hitbox. Similar to Buttobi's j.B.
Movement can be influenced with 4 and 6, halts all vertical momentum, can even apply as an instant overhead in some cases.
Especially safe against tall characters or those without good anti-airs. Can be punished if you don't back off properly though.
|
|
5X
|
| Damage
|
Guard
|
Startup
|
Active
|
Recovery
|
Invuln
|
Adv. Hit
|
Adv. Block
|
Adv. Parry
|
Effect
|
| 10
|
Mid
|
13
|
Until Off-screen
|
16
|
0
|
?
|
?
|
?
|
N/A
|
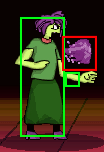
Free version of the infamous venom ball, not that good honestly.
Controls space all the same but reduced damage, smaller hitbox, a single-hit reduces the application.
Very susceptible to being jump-in parried or traded with.
|
|
2X s̸̠͖͙̤̈́̒̈́̌͐l̴͚̯͉̻̇̓́̇͘ì̶̛̛͖͔̲̤̟̥̬̓̽̑̀̒ḑ̸̯̲̝̫̜̜͎̉̅͒̈́̈́͑͘͝e̵̯̝̱̒̈̑ s̸̠͖͙̤̈́̒̈́̌͐l̴͚̯͉̻̇̓́̇͘ì̶̛̛͖͔̲̤̟̥̬̓̽̑̀̒ḑ̸̯̲̝̫̜̜͎̉̅͒̈́̈́͑͘͝e̵̯̝̱̒̈̑
|
| Damage
|
Guard
|
Startup
|
Active
|
Recovery
|
Invuln
|
Adv. Hit
|
Adv. Block
|
Adv. Parry
|
Effect
|
| 20
|
Low
|
3
|
16
|
3
|
0
|
?
|
?
|
?
|
KD
|
Nearly unpunishable slide with little-to-no recovery. Extremely spammable and extremely hard to hit.
Can only be reliably punished by players up against the wall with fast 2As. If not, or if you're approaching with a 5EX, you win. That's it.
Can only be punished by characters with very very good "Until Ground" jumping moves, assuming there's no 5EX to back up Anna.
Low-profiles other projectiles and many moves, this along with 5EX is the reason people run this character.
|
|
J.X
|
| Damage
|
Guard
|
Startup
|
Active
|
Recovery
|
Invuln
|
Effect
|
| 20
|
High
|
7
|
Until Ground
|
3
|
0
|
N/A
|
Very weird move in terms of frame-data. Is active until you land, in which there's 3 frames of recovery once you land.
Technically active "Until Ground", but that would imply it's cancelled by the ground and has no recovery, similar to any of the "Until Ground" j.As, but it isn't and has recovery.
|
|
5EX
|
| Damage
|
Guard
|
Startup
|
Active
|
Recovery
|
Invuln
|
Adv. Hit
|
Adv. Block
|
Adv. Parry
|
Effect
|
| 20*2 (38)
|
Mid
|
8
|
Until Off-screen
|
12
|
1-8
|
Knockdown
|
?
|
?
|
KD, KB
|
Practically broken projectile. Makes all of her buttons and tools safe if done from behind or inside it.
Without it, she's not very hard to deal with, but behind her projectile she has the flexibility to force anything.
It's multi-hit nature makes it very hard to easily jump-in air parry, couple that with Anna being able to do pretty much anything during this, it will always trade.
Hope and pray that you are on the opposite side of the projectile or try to wait it out until it goes off-screen, or be good with parries.
Smart Annas will use this to force looping Okizeme situations, so you'll have to rely on trading to counter-play this tool.
|
|
2EX worse 2X worse 2X
|
| Damage
|
Guard
|
Startup
|
Active
|
Recovery
|
Invuln
|
Adv. Hit
|
Adv. Block
|
Adv. Parry
|
Effect
|
| 30
|
Low
|
1
|
12
|
4
|
1-13
|
Knockdown
|
?
|
?
|
KD
|
Fast 2X, a good reversal and escape option.
Moves you wayyy too quickly to be as applicable as 2X is, but it's great for poking through projectiles or disrupting opponents.
Can be applied in some combos very well and 2EX>2X links into itself endlessly with proper timing.
|
|
J.EX
|
| Damage
|
Guard
|
Startup
|
Active
|
Recovery
|
Invuln
|
Effect
|
| 30
|
High
|
4
|
Until Ground
|
3
|
1-4
|
KD
|
Suffers the same weird frame-data as j.X, it's active until you land, in which there's 3 frames of recovery once you land.
Technically active "Until Ground", but that would imply it's cancelled by the ground and has no recovery, similar to any of the "Until Ground" j.As, but it isn't and has recovery.
Your main launcher outside of grab. Very fast and launches pretty well leaving for great j.A follow-ups and carries.
Can be tiger-knee'd for an instant overhead launcher that's safe on block. Very good move. Just be sure to give it a couple of frames, buffer j.ex from the ground whiffs.
|
|
Ultra 1 (Y)
|
| Damage
|
Guard
|
Startup
|
Active
|
Recovery
|
Invuln
|
Adv. Hit
|
Adv. Block
|
Adv. Parry
|
Effect
|
| N/A
|
N/A
|
5
|
During Install
|
N/A
|
1-5
|
N/A
|
N/A
|
N/A
|
N/A
|
Similar to Yun's Genei Gin from Third Strike. Good install, lets you cancel normals into normals and speeds up a lot of the frame-data for most.
Offers an interesting alternative to Super-type, gives you a ton of pseudo-infinites and guarantees about 100-ish damage off of one Ultra even from midscreen.
Extremely under-used, mainly outclassed by Super-type alone.
Keep in mind, during installs you cannot input EXs or KCs.
Which makes this even worse than it has to be.
|
|
Ultra 2 (Y)
|
| Damage
|
Guard
|
Startup
|
Active
|
Recovery
|
Invuln
|
Adv. Hit
|
Adv. Block
|
Adv. Parry
|
Effect
|
| 75
|
Grab
|
2
|
4
|
4
|
1-10
|
Knockdown
|
Knockdown
|
N/A
|
KD, NKB
|
Insta-slam, can be combo'd into unlike most command grabs.
Extremely quick, but the damage isn't very high and simply doing one of the throw-combos in the corner or playing neutral for a bit will get you the same damage.
It's not bad, but more or less outclassed and has little use. Very situational Ultra.
|
|
Grab (AB)
|
| Damage
|
Guard
|
Startup
|
Active
|
Recovery
|
Invuln
|
Adv. Hit
|
Adv. Block
|
Adv. Parry
|
Effect
|
| 40
|
Grab
|
3
|
4
|
5
|
0
|
Knockdown
|
Knockdown
|
N/A
|
KD, KB
|
Excellent 1-hit grab. Great to mix in with poison ball pressure.
Applies very well in the corner as a meterless combo starter with good damage.
Great in all aspects.
|
|
Taunt (Select)
|
| Damage
|
Guard
|
Startup
|
Active
|
Recovery
|
Invuln
|
Adv. Hit
|
Adv. Block
|
Adv. Parry
|
Effect
|
| +20 to next attack
|
N/A
|
N/A
|
N/A
|
59
|
N/A
|
N/A
|
N/A
|
N/A
|
N/A
|
Anna hisses like a snake and gets the standard damage buff, not too fancy.
Buff goes away on hit, block, or parry like all other buffs.
Relatively fast and can be done safely behind 5EX, not too bad but she doesn't need it so much like other damage buff taunts it's useless.
|
|
Combos
| Notation Help
|
Disclaimer:
Combos are written by various writers, so notation may differ slightly from this notation.
For more information, see Controls.
Character-specific notation, will be on the character's page.
|
| FB
|
Refers to the act of gaining a "Flash Bonus", which grants you extra meter, on the hit of a move.
|
| KC
|
Refers to pressing B+Y on the same frame, or the macro-button for B+Y. This is known as a Kyanta-Cancel, this game's Roman-Cancel.
|
| DC
|
Refers to cancelling a move by activating Demon type's buff, similar to KC.
|
| XEX
|
Refers to pressing X+Y on the same frame, or the macro-button for X+Y.
This is known as an EX move, for example: j.EX>5EX>2EX.
|
| {X/Y/Z}
|
Move X or Y or Z can be used.
|
| #X
|
Indicates that any of A, B and C may be used with #. Example: 3A (Down-right, Light.)
If you have trouble with this notation, you may want to google for "Numpad Notation" elsewhere.
|
| (X)xN or (X)xN-N
|
Loop the inputs in the square brackets or parenthesis as many times as N, sometimes doesn't include brackets or parenthesis but still means the same thing.
Also occasionally includes a dash to indicate that a varying amount of hits can be performed.
|
| j.X
|
Button X is input while you are in the air jump.
|
| X(whiff)
|
Indicates that X is intended to whiff.
|
| (Delay) or (Wait)
|
Indicates a short delay on the hit.
|
| (X)
|
X move is omittable from the combo, this will be mentioned in the hover text.
|
| tk.X
|
Indicates the motion "X" is input immediately after leaving the ground. Stands for tiger knee.
|
| AA
|
Indicates the move hits an opponent in the air, referred to as an Anti-air. Hence AA.
|
| [X]
|
Indicates if a move should be held down.
|
| ]X[
|
Indicates if a held move should be released, for example: 5[B] > 5]B[.
|
Air
5B > KC > j.A(FB) > j.B > (j.EX)x5 > (5A)x4 (181)
Midscreen
j.X > 5A > 2X (39)
j.X > 5A > U2 (98)
- Only U2 confirm, extra jabs can be done in corner.
j.EX > 5A > (j.A)x3 > j.EX > (5A)x5 (95)
Demon Midscreen
2X > DC > 2EX > 2A > (j.EX)x6 (165)
Corner
Grab > 5A > (j.A)x3 > j.EX > (5A)x5 (105)
2X > 2B > 5B > (5A)x3 (78)
Flash Bonus
Grab > KC > j.B > KC > j.A(whiff) > j.A(FB) > j.B > 5A > 2X > KC >(5A)x3 > 2EX (180)
Other Resources/Notable Players
Other Guides/Showcases
Notable Players
Disclaimer: This list is derived from community input and is in no way comprehensive or a form of ranking of any kind. Our community criteria can be found here.
| Usual Color |
Handles/Links |
Region |
Status |
Notes
|
|
|
Dantarion
|

United States
|
|
|
| Color 07
|
YellowSwerve
|

United States
West Coast
|
Active
|
 Kyanta / Kyanta /  Tsukinami / Tsukinami /  Anna Anna
|
| General
|
|
| Advanced
|
|
| Characters
|
|
