 |
Outdated Version
- This page is for an outdated version of the game (AH3). To see Saki Tsuzura's character page for the latest version (AH3LMSS), click here.
|

Saki Tsuzura
| Health Modifier | 0% |
| Guts Threshold | ~50% |
| Maximum Guts | ~25% |
| Guts Factor | ~5% |
| Base EHP | ~25263 |
 Saki's Move List
Introduction
Next time, we make a neutral charge. Saki, like Heart is one of the easier characters to play with great mileage. She has a great set of normals and many tools for pressure, defense and mixups. She's a very solid character.
Starting Out
1 - Homing Approach
Does Saki's JA remind you of Heart's? Well good, remember that it is just as good. Note that it does not cancel it itself though. It is great when homing towards your opponent since it will hit above and below Saki. Another good tool is J2B. If you homing over your opponents head, the timing of the move makes it good for baiting anti airs and punishing right after.
2 - Neutral Spacing
J2C has a good hitbox and almost no recovery. You could use to be be more forceful in off a single jump jump or 7/8D. You don't want to be too predictable in your approach though, carelessness could lead into eating damage. 2A has a great hitbox and fast start up so you could use it off a step for more aggressive spacing. You should also get into the habit of using 5B on hit or block right after it. This is important because 5B is jump cancellable on block. This means that you can IAD into an overhead or Just cancel into 2C for the low. If they block the low you could cancel into Orna for an overhead after that. Another good tool is Brionac. The A version covers a decent amount of space and is slightly plus on block. You could use it to be more aggressive when spacing near your opponent. The C version has great reach and a great hitbox. You should time it with openings in your opponents neutral game to almost any response to Brionac. The C version has a lot of recovery and is minus on block though, so your usage needs to be systematic.
3 - Hit Confirms
For air-to-air JA hits, you can simply tie the hit up with JB and J4B. If you land a J2B, try to be able to confirm straight into Gorm Glas, or with as few 2As as possible. If you can you can follow up without having to use homing cancels or EF.
4 - Defense
Claimh Solais is not only great for anti air, but for reversals as well. You can use the A version to beat out a lot of jumps ins and cross ups as well. Oh hit you can link right into Liath Fail for more damage. People who know how Saki works will be trying hard to bait this. In those cases you can respond with 5A and 6C for the anti air and or combo confirm. If this gets blocked, use a HC to stay safe. If you don't have time to charge Claimh Solais, you can reversal with Liath Fail instead. Her 2A is also good so you do have the options of poking out with that as well. You also have a command roll. Its not recommended for general use, but it can help you escape the corner or a throw and punish with a corner combo in some situations. Just remember that you're going to be very unhappy if they guess right.
Arcana Selection
Saki has a wide range of Arcana to choose from. She doesn't really need EF for combos, so she can burn it on other things such as pressure, chip damage and burst. Many good choices give her extra damage off random confirms or help her with spacing/zoning as she has no innate projectiles.
Love
Love gives Saki a good good set of long range options to play with. You could use love balls to help give Saki some cover to force a close range with a greater degree of stability. You can also increase the damage of you combos by adding super love laser after a JE when facing away from the corner. This arcana is recommended to all Saki players from experts to beginners. Halo is similar to Love in this sense. Which one you choose is based on preference.
Thunder
Saki's own arcana is great for her. Thunder allows Saki to play at he best range with ease through the use of step and charge moves. You could also make use of Thunder's EF attributes to punish jump ins and respond with a flash kick. You can also use Thunder's lightning bolts to improve Saki's okizeme game after a knock down. The only problem is that Thunder doesn't help with her midscreen game. You'll still have to work a little bit to get in.
Time
Time gives more focus on mixups for Saki. She can use infinite light and Fragarach in the air to start up mixups with Causality and Freedom from Bondage. Gorm Glas also combos well with 6D. The speed boost from EF also makes Saki's strong rushdown even harder to block. Note that you'll still have some issues getting in, and Time's FG recovery time leaves room for only a few mistakes. When dealing with character that are most effective from mid to far range, its better to avoid Time.
Fire
Saki's OG arcana of choice. Fire can help turn a lot of Saki's hit confirms into big damage with EF. Besides that, you also get nice damage off fireballs into homing cancels and Kakou Ha combo enders. Air fireballs also provide good cover for your spacing game since they cannot be reflected. Fire's EF traits are good since saki's rush down is so already fierce. You can easily stack up a ton of chip damage with this, along with charge E unblockables.
Flower
The elimination of counter hits for Saki is a blessed thing for her. You can also burn your FG on burst for the most part. Multilayered Crimson Nirvana is also a good tool for pressure on knockdown and guard breaks. You can also use flower for hidden lameness. With your back against the wall, you could lay a couple of plants and lay in wake of your opponent in EF. If they don't come, just stay there and increase your AG. If they come, bail out with La'a into an EFC or just high jump as a low risk option. If you know they are gunning right at you, counter with a Claimh Solais and then combo into JE to blow them away from you. This of course, depends on you having a life lead until you have three bars. When down on life, use the meter you have on Multilayered Crimson Nirvana to increase damage off combos. When you're good on life, use Dream Flower or plant more regular flowers and continue to maintain your fortress.
Strategy
...
Move List
Note: Saki's complete frame data can be found here: Saki's Frame Data
Normal Moves
|
5A
|
- Jump-cancellable.
- Whiffs crouching characters.
Hits on frame 4. -1 on block. Useful for hitting opponents out of instant air dashes, jump-homing in your face, or in the Saki mirror, Saki's own j.2B. In combos, reduces hitstun by 6 frames rather than 2 like other A normals.
|
|
5B
|
- Has clash frames during start-up.
- Hits low.
- Jump-cancellable.
Standing low. Moves Saki forward a bit but has deceptively short horizontal reach: her foot tends to miss the wider "feet hurtbox" of the opponent. On block, you can jump-cancel it and j.2C, airdash, or homing to reset pressure. The start-up clash frames aren't very reliable.
|
|
6B
|
- Best combo starter.
- Jump-cancellable.
Like 5B, but moves Saki farther forward and has much more horizontal reach. If the opponent whiffs a DP/super, start your punish combo with 6B if you can. Leads to Saki's highest-damage combos.
|
|
5C
|
- Has clash frames during start-up.
- Superjump-cancellable.
Multi-purpose normal. Airborne during frames 2-13. Can be used as an anti-air clash box (cancel clash into airthrow), although the clash box does not completely cover Saki's head. Cross-ups and deep/low jump-ins are likely to hit Saki without touching the clash box, unfortunately. Can also be used to clash most projectiles. You can mash 5C/j.C to clash multiple hits. On block, 5C superjump-cancel j.2C is a frame trap and 5C 214A EFC 2A is also a frame-trap if you can do it as quickly as possible. Unsafe if they 4GC your previous move and 5C whiffs.
|
|
6C
|
- Air-unblockable.
- Jump-cancellable.
- Whiffs crouching characters.
Not a good anti-air! Most often used in combos and to air-unblockable falling opponents.
|
|
5E
|
- Air-unblockable.
- Cannot cancel into non-Arcana specials and supers.
- Guard-breaks if fully charged.
- Has projectile-reflection frames during start-up.
Rarely used. Moves Saki forward. Guard-breaking the opponent deals no damage on its own. After a guard-break at midscreen, the opponent can shake out before they hit the wall. A guard-break in the corner causes an untechable wall-slam. Some Arcanas such as Punishment guarantee you can combo after a fully-charged 5[E] anywhere.
|
|
2A
|
Typical 2A. Hits on frame 5. -1 on block. Short horizontal range compared to many other characters.
|
|
2B
|
- 2nd-best combo starter.
- Hits low.
- Superjump-cancellable.
Better horizontal reach than 5B but slightly less than 6B. Can be superjump-cancelled to reset pressure, but this leaves a bigger gap compared to jump-cancelling 5B or 6B.
|
|
2C
|
Can be used as a somewhat long-range poke to go under some attacks. Should always be special-cancelled or homing-cancelled on block, otherwise it is unsafe. 2C 214A EFC 2A is a frame-trap if you can do it as quickly as possible. Unsafe if they 4GC your previous move and 2C whiffs.
|
|
2E
|
- Air-unblockable.
- Cannot cancel into non-Arcana specials and supers.
- Guard-breaks if fully charged.
- Has projectile-reflection frames during active frames.
Rarely used. Can be used instead of 6C to air-unblockable falling opponents. Guard-breaking the opponent deals no damage on its own. After a guard-break, the opponent can shake out before you can catch them with homing. Some Arcanas such as Fire, Punishment, and Halo guarantee you can combo after a fully-charged 2[E].
|
|
j.A
|
- Has projectile-nullification frames during active frames(?).
- Hits overhead.
- Jump-cancellable.
Hits on frame 6, slower than almost every other character's j.A. If you and the opponent clash in mid-air, do not mash j.A! Has 6 active frames. The projectile-nullification frames are roughly(?) the same as the active frames, but they disappear if j.A clashes. Frequently used as a jump-in followed by j.2B or 2A for a high/low mixup. Useful as an air-to-air by jumping up or towards the opponent.
|
|
j.B
|
- Can cross-up.
- Hits overhead.
- Jump-cancellable.
- Very good combo starter.
Useful jump-in and air-to-air if the opponent is approaching from a lower angle. Useful as a cross-up jump-in, especially in the corner, although it can be difficult to combo off of it midscreen. In combos, reduces hitstun by 6 frames rather than 4 like other B normals.
|
|
j.4B
|
- Has clash frames during active frames.
- Hits overhead.
- Jump-cancellable.
- Whiffs crouching characters.
Very useful as a defensive air-to-air against an approaching opponent. Can be used in mixups where you cross-up, whiff j.4B land 2A.
|
|
j.2B
|
- Cannot cancel into non-Arcana specials and supers.
- Hits overhead.
Vertical divekick. Saki's primary overhead. Hits on frame 21. Has little or no landing recovery. In combos, reduces hitstun by 6 frames rather than 4 like other B normals.
|
|
j.C
|
- Has clash frames during start-up.
- Hits overhead.
Can be used as an offensive air-to-air but j.4B is a better air-to-air in every way. Clashes on frames 1-2 only. The clash frames are mainly there to allow you to mash 5C/j.C to clash multiple hits. After an air-to-air clash, it is very difficult to continue to clash using j.C since most other attacks are not active until frame 3 or later. Has a lot of blockstun and can be used to set up a fuzzy guard.
|
|
j.2C
|
- Cannot cancel into non-Arcana specials and supers.
Diagonal divekick. Not an overhead. Has little or no landing recovery. Useful for resetting pressure since it has less start-up than neutral homing and j.2C 2A is a tight blockstring. Can cross-up in the corner. Is a Level B attack so it will not beat Catherine's armor on her spin. In combos, reduces hitstun by 6 frames rather than 8 like other C normals.
|
|
j.E
|
- Has projectile-reflection during and after active frames.
- Hits overhead.
Has 6 active frames and even more projectile-reflection frames. Difficult to use air-to-air due to its long start-up and you don't get much damage or oki on hit. Has a lot of blockstun and can be used to set up a fuzzy guard.
|
Special Moves
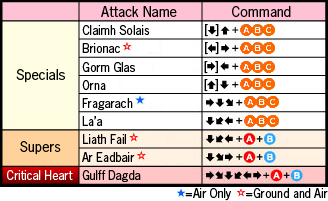
Brionac 「ブリューナク」 - [4]6ABC
- (Description) - A rush kick in the direction that Saki is facing, think of it as Joe Higashi's Slash Kick. All versions hit only once. Depending on what button that you use, you'll charge farther forward.
- (A version) - Least forward movement; Even on block
- (B version) - Moderate forward movement
- (C version) - Most forward movement; Blows the opponent way horizontally; Air unblockable
|
Claimh Solais 「クラウ・ソラス」 - [2]8ABC
- (Description) - A flash kick. Saki does a somersault into the air and kicks the opponent. This is a good move for reversal'ing out of blockstrings, so make sure you always remember that you have the option of letting this move out while you are crouch guarding. Also, don't forget how to follow it up for hit confirms or when it gets blocked.
- (A version) - Has no clash, so it usually completely beat jump ins. You could follow it for for a combo with a HC, but this is usually unnecessarily difficult.
- (B version) - The B version has invincibility, but also clash attached to it.
- (C version) - Two hits. The best course of action upon having this blocked, is to immediately HC it. If it whiffs, you're completely up until you land after all.
|
Orna 「オルナ」 - [8]2ABC
- (Description) - Of all things an "up" charge... This move is pretty much a special version of J2B. Saki jumps up and forward a little bit and does a dive kick. This is an overhead and rather quick too. Saki just further out depending on what button you use. You have air movement afterward regardless of if it was a clean hit or blocked. Because of AH3's relaxed command interpreter, this is easy to put in combos.
|
Gorm Glas 「ゴームグラス」 - [6]4ABC
- (Description) - Another interesting input, a "forward" charge. After the first hit, Saki showers the opponents with kicks, the floats them with a rising flip. Your follow up changes depending on how many hits you used before using this move. If you only used a few, about up to 3, then you can simply follow up with a 6C. If you have more than that then you'll have to use meter and follow up with a 2D homing cancel. You can use this move after a Neutral Throw for a follow up as well.
|
Fragarach 「フラガラッハ」 - J623ABC
- (Description) - A reverse somersault in the air, ground slams the opponent. The different versions change the start up and the (very) slight forward movement from this move. The C version has a tendency to not hit when you combo hit number is high. This can also function as an overhead from an IAD as well.
|
La'a 「ルァハ」 - 214ABC
- (Description) - An elegantly preformed judo forward ukemi. Your collision hitbox disappears for a moment, so you can actually slip through the opponent if you use it well. However your hitbox persists and can be nit with normal attacks so be careful. Still useful for left/right mixups when you can do them safely.
|
Super Moves
Liath Fail 「リア・ファイル」 - 214A+B
- (Description) - Somersault justice. The last hit of the ground version high launches the opponent, you can follow that up with a HC. The last hit of the air version groundslams the opponent. The air version is usually just a combo finisher, but the ground version could be used for cutting into the opponent after a 6D guard cancel. A clash battle with this could go the wrong way though, so be careful
|
Ar Eadbair 「エル・イードヴァル」 - 236A+B
- (Description) - A five hit, super version of Brionac. The last hit will blow the opponent away horizontally. Fast start up (0+7), so you technically mash out with it, but there is no invincibility.
|
Critical Heart
Gulff・Dagda 「ガルフ・ダグザ」 - 632146A+B [+] 2A 2B 5B 5C 5E 2E 5D 5B 5C 8C 2C 5E
- (Description) - In short, a manual rondo. After the first hit, you use the follow up inputs to get the full effects of this XH. Strictly speaking, this does not actually lock the opponent, so even if you hit an airborne opponent with this you cannot get the rest of the XH. You can usually land this off a 5C.
- The normal version has one hit per input, but the EF version has extra hits during the air part, making the timing a bit different: 5B, 5C, and 8C have 2 hits each, while 2C has 4 hits. It's possible to get only one hit from 5B if you time it incorrectly after 5D.
- You can input the first 5 inputs, 2A 2B 5B 5C 5E, pretty fast. Find a consistent rythym: the time between each input is about the same. After 5E, there's a long pause before 2E and then a short pause before 5D. After you fly up to the opponent, in the normal version, the last 5 inputs are pretty fast and have a consistent rythym again. In the EF version, the timing of 5B 5C 8C 2C is about half as fast, but the rythym is still consistent, and then there's a long pause before the final 5E.
- The timing of the whole thing isn't too bad for the most part, but for people that just can't get it down, this move doesn't stop even after you input something extra. In other words you could just mash all the buttons and just remember where you need to change directional inputs. However, for the most part, the inputs during this move, and what they look like normally look pretty much the same, making it easier on you. You do need to be quick with the all the inputs for the most part though. Don't expect to go over 10,000 damage in AH3 with this move off a 2A starter, and it's not like you're in a good position after the move (since you can't use homing because you've put all your meter in to this move). Consider using this move a gamble.
- (Supplement: How to Gulff・Dagda - The Ignoble Version)
   Conditions: In EF or almost charged.
   1. After the superflash and rush, leave the stick at [2] and mash every button but D.
   2. After confirming that 2E hit (The vertical kick) press D.
      After this, keep the stick buffered at [8].
   3. If you followed the opponent, leave the stick up and mash BCE.
   4. When you confirm that 8C hit, jam the stick down to 2 and resume mashing BCE.
   5. If the E finisher hits, congratulations, you've just Gulff・Dagda'd
|
Combos
General Notes
- Generally, Saki's combos are not character-specific and they will work with any Arcana except Earth and Time. The combos below are not character-specific unless otherwise specified.
- When you're practicing combos, I recommend practicing against the following characters:
- Akane: j.4B whiffs against her more easily than other characters. You also get consistent damage numbers because her guts don't start until she's down to 20% health. (Besides, it's more fun to beat up the top tiers!)
- Dorothy: corner combos whiff against her more easily than other characters.
- Fiona: attacks whiff under airborne Fiona that won't whiff against other characters. If you make your own combo, be sure to test it against Fiona!
- All damage numbers below were found vs Earth Akane, whose guts do not reduce the damage dealt. All non-Arcana-specific EF damage numbers were found using the Love Arcana.
- Can't find the combos you're looking for? Looking for optimal combos? Check out the combo threads on the Saki forum! HomingCancel.com Saki Forum
Notation Notes
If you don't know numpad notation, you should look it up first!
- > - Doesn't mean anything! I use these to make combos easier to read.
- [2]8C - Hold 2 (or 1, or 3) before this part of the combo, then input 8C here to flashkick!
- EFC - Extend Force cancel: input A+B+C on the ground during a combo.
- 6HC - Forward homing cancel: input 6D during a combo.
- 5HC~[9] - Input 5D then hold 9 immediately AFTER pressing D.
- j9 - Jump cancel by inputting 9.
- sj9 - Super jump cancel with 9, e.g. input 529.
- j.A j.B dj.A dj.B dj.C - Input A B while airborne, double jump cancel by inputting 9, and input A B C.
- j.623C - Input 623C while airborne.
- dj.623C - Same as above. The "dj" just reminds you that you've used your double jump.
- (nothing / dj.214A+B) - Optional input: either do nothing, or input the 214A+B super.
- 1 bar 6598 dmg / 2 bars 7838 dmg - Meter consumption and damage dealt depend on which option you chose, e.g. nothing or 214A+B super.
Easiest Combos To Learn
First time playing Saki? Use these combos!
|
A B C Flashkick Super - 1 bar 6210 dmg
2A 2B 2C [2]8C (2 hits) j.214A+B
- The first Saki combo everyone does.
|
|
A B C Brionac Super - 1 bar 6049 dmg
2A 2B 2C [4]6B j.214A+B
- Less damage, but [4]6B is frame advantage on block. Also, if they 4GC after blocking your 2C, [4]6B will hit them after the guard cancel invincibility ends.
|
|
5C Brionac Super - 1 bar 6274 dmg
2A 2B 5C [4]6B j.236A+B
- Why 5C instead of 2C? 5C is super jump cancellable on block, 5C sj9 j.2C is a frame trap, and j.2C 2A is a tight blockstring. So you can repeat 2A 2B 5C j.2C over and over until they guard cancel or reversal.
|
|
Bad Homing Cancel Combo - 1 bar 6485 dmg / 2 bars 7725 dmg
2A 2B 2C 6HC > 5A 6C j9 > j.A j.B j.4B dj.A dj.B dj.C dj.623C (nothing / dj.214A+B)
- Trick to make this easier: input 6HC 6A 6C instead of 6HC 5A 6C. Saki's 6A and 5A are the same, so you can keep holding 6 after you homing cancel.
|
|
Bad Extend Force Cancel Combo - 0 bars 6634 dmg / 1 bar 7660 dmg
2A 2B 2C EFC > 5A 6B 6C j9 > j.C j.A j.B dj.A dj.B dj.C dj.623C (nothing / dj.214A+B)
- You should use EFC combos (and meterless [6]4C combos) as often as possible to raise your max meter as much as possible.
|
Basic Combos Without [6]4C And EFC
Saki's best combos use [6]4C and EFC. In fact, you might want to just skip this section and go straight to the bread-and-butters below! But sometimes you just don't have forward charge and don't have EFC either. That's where these basic combos are useful.
|
Basic Brionac HC Combo - 1 bar 7244 dmg / 2 bar 8484 dmg
2A 2B 2C [4]6B 5HC~[9] > j.B j.C land j9 > j.A j.4B dj.B dj.C dj.623C (nothing / dj.214A+B)
|
|
Meterless Brionac Combo - 0 bars 6983 dmg
2A 2B 2C [4]6B land > 5A 6C j9 > (short delay) j.B j.4B dj.B dj.C dj.623A
- Doesn't work if you start the combo with 2A 2A.
- You get better meterless combos with [6]4C instead.
|
|
Basic 2C HC Combo - 1 bar 7626 dmg
2A 2B 2C 6HC > 6B 6C j9 > short delay j.2C land > 5A 6C j9 > j.A j.B j.4B dj.B dj.C dj.623A
- Trick to make this easier: input 6HC 6B 6C j9 j.3C land 6A 6C, holding forward the whole time.
- This combo is not universal. It can whiff on Kamui if she's too far away. It doesn't work in the corner.
- Universal corner ender:
- ... 5A 6C j9 > j.A j.C j.623C - 7010 dmg
|
|
Oops, I Pressed 5C Without EFC Or Charge! - 1 bar 6318 dmg / 2 bars 7826 dmg
2A 5B 5C 6HC > 2A 2B 2C [6]4C (land [2]8A / j.8HC j.B j.4B dj.A dj.B dj.C dj.623C)
- Notation clarification: after [6]4C, you either land and flashkick, or you homing cancel and do an air combo.
- After [2]8A, you can chase their air recovery on the ground with 3D and air-unblockable them with another [2]8A.
|
|
Optimal 5C No EFC Combo - 1 bar 6758 dmg / 2 bars 8584 dmg
2A 5B 5C [4]6B land 214A+B (nothing / j.5HC~8 j.A j.B j.4B dj.A dj.B dj.C dj.623A)
- Cancel [4]6B into 214A+B after you land.
- The Plant Arcana gives you a much better meterless combo from 5C without EFC.
|
High-Damage, Easy-To-Learn Bread And Butters
These combos are the most training-mode-time-efficient combos to learn. They deal high, often close-to-optimal damage. They always end with knockdown. They are generally universal and work regardless of character and screen position (unless otherwise noted). They are simplified somewhat so that you can learn a smaller # of combo routes.
|
Meterless ABC BnB - 0 bars 7450 dmg / 1 bar 8700 dmg
2A 2B 2C [6]4C > land 6C j9 > j.A j.4B dj.B dj.C dj.623C (nothing / dj.214A+B)
- If you add any extra hits to the start of this combo, you won't be able to link [6]4C 6C without meter.
- Alternative starters:
- j.2B land 2A [6]4C ... - 8221 dmg / 9561 dmg
|
|
AAABC BnB - 1 bar 7551 dmg / 2 bars 8791 dmg
2A 2A 2A 2B 2C [6]4C j.3HC land 6C j9 > j.A j.4B dj.B dj.C dj.623C (nothing / dj.214A+B)
- Same as above, except you homing cancel [6]4C.
- Alternative starters:
- j.2B land 2A 2B 2C [6]4C ... - 8389 dmg / 9629 dmg
|
|
BnB Starting From Many Hits - 1 bar 8199 dmg / 2 bars 9439 dmg
j.2B land 2A 2A 2B 2C [6]4C j.8HC > j.B j.4B dj.A dj.B dj.C dj.623C (nothing / dj.214A+B)
- This combo will work from almost any starter. If you're not sure how much hitstun you've lost, do this combo.
- Alternative starters:
- j.B j.C land 2A 2B 2C [6]4C ... - 10355 dmg / 11620 dmg
|
|
EFC Ground BnB - 0 bars 7630 dmg
2A 5B 5C EFC dash > 6B 5C sj9 j.2C j.B land dash > 6B 5C 2C short delay [4]6C (OTG)
- This combo corner carries from anywhere on the screen!
- You can add almost anything to the start of this combo and it will still work. However, it will become more difficult since the pushback will be greater.
- Depending on your Arcana, you may want to use a different ender so that you can set up oki with an Arcana special or super. For example, 5[E] 236236E with the Flower Arcana.
- Alternative enders:
- ... 2C short delay 5[E] (OTG) - 7609 dmg
- ... 2C delay [2]8B (OTG) - 7504 dmg
- ... 2C short delay [6]4C j.214A+B - 1 bar 8816 dmg
|
|
High Damage Meterless BnB - 0 bars 11991 dmg
6B [6]4C > land 5C [8]2C airdash j.B j.4B land 6C j9 > j.A j.4B dj.B dj.C dj.623A
- 6B is Saki's best combo starter. 2B and j.B are also very good starters.
- Use this as your combo for punishing whiffed reversals.
- This combo works on all characters, including Fiona.
- In the corner, you may have to delay the last j.B a bit.
- Alternative starters:
- 2AAA [6]4C ... - 8793 dmg
- j.2B [6]4C ... - 9746 dmg
|
|
High Damage EFC BnB With Super - 1 bar 13322 dmg
6B [6]4C > land 5C [8]2C EFC dash > delay 6B 6C j9 > j.C j.4B j.C j.623C j.214A+B
- 2AAA [6]4C ... - 9671 dmg
- j.2B [6]4C ... - 10851 dmg
|
|
Neutral Throw BnB - 1 bar 6818 dmg / 2 bar 8058 dmg
5A+D (3 hits) 6HC [6]4C > land 6C j9 > j.A j.4B dj.B dj.C dj.623C (nothing / dj.214A+B)
|
|
Claimh Solais (Flashkick) Starter BnB - 1 bar 7460 dmg / 2 bars 9870 dmg
[2]8B j.5HC~8 > j.A j.4B dj.B dj.C dj.623C (nothing / dj.214A+B)
- If the opponent is hit in the air at max range, you may not be able to link j.A. In this situation, you have to use j.214A+B.
- Alternative starters:
- [2]8A ... - 7260 dmg / 9670 dmg
- [2]8C (1 hit) ... - 6634 dmg / 9379 dmg
|
|
Claimh Solais Liath Fail Starter BnB - 2 bars 8991 dmg / 3 bars 10786 dmg
[2]8C (2 hits) j.214A+B (6 hits) j.5HC~8 > short delay j.A j.4B dj.A dj.B dj.C dj.623C (nothing / dj.214A+B)
- If the opponent is too high or too far away, you must HC j.214A+B after fewer hits.
- Alternative starters:
- [2]8A ... - 8600 dmg / 10525 dmg
- [2]8B ... - 8800 dmg / 10725 dmg
|
|
Orna Starter BnB - 0 bars 8446 dmg / 1 bar 9786 dmg
[8]2x > delay j.4B land 6C sj9 > j.A j.B j.4B dj.A dj.B dj.C dj.623C (nothing / dj.214A+B)
- This combo can start from [8]2A, [8]2B, or [8]2C.
- Input j.4B based on the direction Saki is facing, NOT the direction of the opponent.
- If the opponent is behind Saki in the air, j.4B will still hit them.
|
Advanced, Alternative Combo Routes
...
Arcana-Specific Combos (OLD)
The combos below are from the OLD Combos section. This section needs to be updated.
Plant Arcana
- 2A > 5B > 5C > 236E > 5B > 6B > 6C > [jc] > jA > jB > j4B > [jc] > jB > jC > j623A
- 7745 dmg.
- Easy, meterless target combo with Vine.
- Against Fiona, omit the 5B after Vine.
- 236E > [6]4A > 6C > [jc] > jA > j4B > [jc] > jB > jC > j623X (> j214A+B)
- 9323 dmg.
- 10988 dmg with Liath Fail.
- Easy, good-damage combo after Vine.
- 236E > 6B > 6C > [jc] > j2C > land > 5B > 6B > 6C > jA > jB > j4B > [jc] > jB > jC > j623A
- 10290 dmg.
- Harder combo after Vine. If Vine hits the opponent at max range, then you need to 6HC/EFC it.
- 2A > 5B > 5C > EFC > dash > 6B > 5C > [sjc] > instant-air j2C > jB > land > dash > 6B > 5C > 2C > delay [2]8B (OTG) j214214E
- 7398 dmg.
- Ground EFC combo that can lead to a high+low unblockable with a plant seed in the corner.
- If you start this combo near your own corner, end it with [4]6C (OTG) j214214E instead.
- Delay the [2]8B until you see them bounce off the ground.
- If you replace [2]8B with 5C [sjc], you are pushed farther back and you will get 2 seeds on the ground instead of 1.
Palettes
4. Akiha (Tsukihime)
6. Homura (Madoka Magica)
8. Ky Kiske/Millia Rage
11. Chikane Himemiya (Kannazuki No Miko)


