Character Page Progress
This page is still a work in progress, consider joining as an editor to help expand it. Please update this character's roadmap page when one of the editing goals have been reached.
| In Progress |
To-do
|
|
|
- Additional Ressources/Players to watch/ask
- Add any external links to ressources such as video guides or articles.
- If you know any players in particular that can be helpful for learning this character, please add them with, if possible a way to contact them (such as a Discord handle) and a name that can be searched in the match video database.
- Overview/General Gameplan:
- Add a short summary of this character with a list of strengths and weaknesses
- Do your best to describe how to play this character, change or add subsections based on what you would write as a guide.
- Combos:
- Add tech in the starters, enders, OTG pickup and normal/corner combo sections.
- Add damage, meter gain/given numbers and video links to combos as you add them.
- Move Descriptions:
- Add frame data.
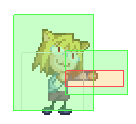
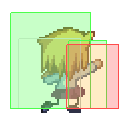
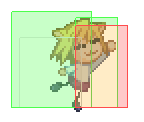
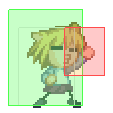
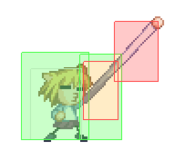
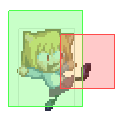
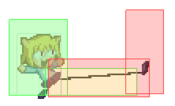
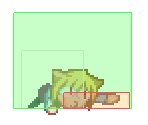
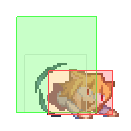
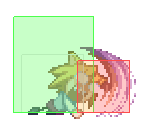
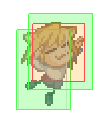
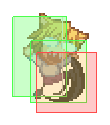
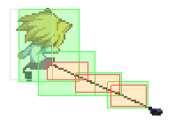
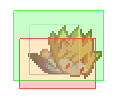
- Add images with hitboxes to the moves.
- Add descriptions to the moves, specify how they function, cite their uses, add captions where helpful, etc.
|
Additional Resources
H-Neco-Arc Match Video Database
Players to watch/ask
JP:
- Text goes here after asterisk
- Text goes here after asterisk
NA:
- Text goes here after asterisk
- Text goes here after asterisk
Overview
Strengths / Weaknesses
| Strengths
|
- Text goes here after asterisk
- Text goes here after asterisk
|
| Weaknesses
|
- Place text here be sure to use "*" for each point*
|
General Gameplan
Place text here*
Neutral
Place text here*
Pressure
Place text here
Okizeme
Place text here
Defense
place text here*
Combos
| Combo Notation Help
|
Disclaimer: Combos are written by various writers, so the actual notation used in pages can differ from the standard one.
For more information, see Glossary and Controls.
|
| X > Y
|
X input is cancelled into Y.
|
| X > delay Y
|
Must wait for a short period before cancelling X input into Y.
|
| X, Y
|
X input is linked into Y, meaning Y is done after X's recovery period.
|
| X+Y
|
Buttons X and Y must be input simultaneously.
|
| X/Y
|
Either the X or Y input can be used.
|
| X~Y
|
This notation has two meanings.
- Use attack X with Y follow-up input.
- Input X then within a few frames, input Y. Usually used for option selects.
|
| X(w)
|
X input must not hit the opponent (Whiff).
|
| j.X
|
X input is done in the air, implies a jump/jump cancel if the previous move was done from the ground.
Applies to all air chain sections:
- Assume a forward jump cancel if no direction is given.
- Air chains such as j.A > j.B > j.C can be shortened to j.ABC.
|
| sj.X
|
X input is done after a super jump. Notated as sj8.X and sj9.X for neutral and forward super jumps respectively.
|
| dj.X
|
X input is done after a double jump.
|
| sdj.X
|
X input is done after a double super jump.
|
| tk.X
|
Stands for Tiger Knee. X motion must be buffered before jumping, inputting the move as close to the ground as possible. (ex. tk.236A)
|
| (X)
|
X is optional. Typically the combo will be easier if omitted.
|
| [X]
|
Input X is held down. Also referred to as Blowback Edge (BE). Depending on the character, this can indicate that this button is held down and not released until indicated by the release notation.
|
| ]X[
|
Input X is released. Will only appear if a button is previously held down. This type of input is referred to as Negative Edge.
|
| {X}
|
Button X should only be held down briefly to get a partially charged version instead of the fully charged one.
|
| X(N)
|
Attack "X" should only hit N times.
|
| (XYZ)xN
|
XYZ string must be performed N times. Combos using this notation are usually referred to as loops.
|
| (XYZ^)
|
A pre-existing combo labelled XYZ is inserted here for shortening purposes.
|
| CH
|
The first attack must be a Counter Hit.
|
| Air CH
|
The first attack must be a Counter Hit on an airborne opponent.
|
| 66
|
Performs a ground forward dash.
|
| j.66
|
Performs an aerial forward dash, used as a cancel for certain characters' air strings.
|
| IAD/IABD
|
Performs an Instant AirDash.
|
| AT
|
Performs an Air Throw. (j.6/4A+D)
|
| IH
|
Performs an Initiative Heat.
|
| AD
|
Performs an Arc Drive.
|
| AAD
|
Performs an Another Arc Drive.
|
Starter
| Condition
|
Notation
|
Damage
vs V.Sion
|
Notes
|
|
| Normal starter, grounded opponent
|
|
text
|
| |
| Meter Gained: text |
Meter Given (vs C-Moon): text |
| text |
|
|
Enders
| Condition
|
Notation
|
Damage
vs V.Sion
|
Notes
|
|
| Normal ender, midair opponent
|
|
???
|
| |
| Meter Gained: text |
Meter Given (vs C-Moon): text |
| text |
|
|
| Normal ender, midair opponent
|
|
???
|
| |
| Meter Gained: text |
Meter Given (vs C-Moon): text |
| Best meterless ender |
|
|
| Normal ender, midair opponent
|
|
???
|
| |
| Meter Gained: text |
Meter Given (vs C-Moon): text |
| Best metered ender. |
|
|
| Normal ender, grounded opponent
|
|
???
|
| |
| Meter Gained: text |
Meter Given (vs C-Moon): text |
| mostly user when you need to build meter for j.214C when you don't already have the sufficient meter. Shouldn't be used outside of this situation as it results in less damage due to scaling. |
|
|
OTG Pick ups
| Condition
|
Notation
|
Damage
vs V.Sion
|
Notes
|
|
| Normal starter, grounded opponent
|
|
text
|
| |
| Meter Gained: text |
Meter Given (vs C-Moon): text |
| text |
|
|
Normal Combos
| Condition
|
Notation
|
Damage
vs V.Sion
|
Notes
|
|
| Normal starter, grounded opponent
|
- 5A6AA > 2{B} > 5C > j.ABC > dj. ABC > ender
|
text
|
| |
| Meter Gained: text |
Meter Given (vs C-Moon): text |
|
|
Corner Combos
| Condition
|
Notation
|
Damage
vs V.Sion
|
Notes
|
|
| Normal starter, grounded opponent
|
|
text
|
| |
| Meter Gained: text |
Meter Given (vs C-Moon): text |
| text |
|
|
Move Descriptions
| Frame Data Help
|
| Header
|
Tooltip
|
| Move Box Colors
|
Light gray = Collision Box (A move lacking one means it can go through the opponent's own collision box).
Green: Hurt Boxes.
Red: Hit(/Grab) Boxes.
Yellow: Clash Boxes (When an active hitbox strikes a clash box, the active hitbox stops being active. Multi-hit attacks can beat clash since they will still progress to the next hitbox.)
Magenta: Projectile-reflecting boxes OR Non-hit attack trigger boxes (usually).
Blue: Reflectable Projectile Boxes.
|
| Damage
|
Base damage done by this attack.
(X) denotes combined and scaled damage tested against standing V. Sion.
|
| Red Damage
|
Damage done to the recoverable red health bar by this attack. The values are inherently scaled and tested against standing V. Sion.
(X) denotes combined damage.
|
| Proration
|
The correction value set by this attack and the way it modifies the scaling during a string. See this page for more details.
X% (O) means X% Overrides the previous correction value in a combo if X is of a lower percentage.
X% (M) means the current correction value in a combo will be Multiplied by X%. This can also be referred to as relative proration.
|
| Circuit
|
Meter gained by this attack on hit.
(X%) denotes combined meter gain.
-X% denotes a meter cost.
|
| Cancel
|
Actions this move can be cancelled into.
SE = Self cancelable.
N = Normal cancelable.
SP = Special cancelable.
CH = Cancelable into the next part of the same attack (Chain in case of specials).
EX = EX cancelable.
J = Jump cancelable.
(X) = Cancelable only on hit.
-X- = Cancelable on whiff.
|
| Guard
|
The way this move must be blocked.
L = Can block crouching
H = Can block standing.
A = Can block in the air.
U = Unblockable.
|
| Startup
|
Amount of frames that must pass prior to reaching the active frames. Also referred to as "True Startup".
|
| Active
|
The amount of frames that this move will have a hitbox.
(x) denotes frame gaps where there are no hitboxes is present. Due to varied blockstuns, (x) frames are difficult to use to determine punish windows. Generally the larger the numbers, the more time you have to punish.
X denotes active frames with a duration separate from its origin move's frame data, such as projectile attacks. In this case, the total length of the move is startup+recovery only.
|
| Recovery
|
Frames that this move has after the active frames if not canceled. The character goes into one frame where they can block but not act afterwards, which is not counted here.
|
| Advantage
|
The difference in frames where you can act before your opponent when this move is blocked (assuming the move isn't canceled and the first active frame is blocked).
If the opponent uses a move with startup that is at least 2 frames less than this move's negative advantage, it will result in the opponent hitting that move.
±x~±y denotes a range of possible advantages.
|
| Invul
|
Lists any defensive properties this move has.
X y~z denotes X property happening between the y to z frames of the animations. If no frames are noted, it means the invincibility lasts through the entire move.
Invicibility:
- Strike = Strike invincible.
- Throw = Throw invincible.
Hurtbox-Based Properties:
- Full = No hurtboxes are present.
- High = Upper body lacks a hurtbox.
- Low = Lower body lacks a hurtbox.
Miscellaneous Properties
- Clash = Frames in which clash boxes are active.
- Reflect = Frames in which projectile-reflecting boxes are active.
- Super Armor = Frames in which the character can take hits without going into hit stun.
|
Normal Moves
Standing Normals
|
|
| Damage
|
Red Damage
|
Proration
|
Cancel
|
Guard
|
| 350
|
192
|
75% (O)
|
-SE-, -N-, -SP-, -CH-, -EX-, (J)
|
LH
|
| First Active
|
Active
|
Recovery
|
Frame Adv
|
Circuit
|
Invuln
|
| 5
|
4
|
6
|
2
|
2.4%
|
-
|
|
A short range punch.
|
| Damage
|
Red Damage
|
Proration
|
Cancel
|
Guard
|
| 600
|
384
|
80% (M)
|
N, SP, -CH-, EX, (J)
|
LH
|
| First Active
|
Active
|
Recovery
|
Frame Adv
|
Circuit
|
Invuln
|
| 8
|
4
|
16
|
-5
|
4.2%
|
-
|
|
Moves forward.
|
| Damage
|
Red Damage
|
Proration
|
Cancel
|
Guard
|
| 1000
|
768
|
60% (O)
|
(N), SP, EX, (J)
|
LH
|
| First Active
|
Active
|
Recovery
|
Frame Adv
|
Circuit
|
Invuln
|
| 10
|
5
|
17
|
-4
|
7.0%
|
-
|
|
Moves forward.
|
|
|
|
| 5B
|
Damage
|
Red Damage
|
Proration
|
Cancel
|
Guard
|
| 850
|
528
|
80% (O)
|
N, SP, EX, (J)
|
LH
|
| First Active
|
Active
|
Recovery
|
Frame Adv
|
Circuit
|
Invuln
|
| 8
|
2
|
16
|
-6
|
4.9%
|
-
|
|
Moves slightly forward and launches the opponent on hit. Can be partially charged to move farther forward.
|
| 5[B]
|
Damage
|
Red Damage
|
Proration
|
Cancel
|
Guard
|
| 1350
|
960
|
50% (O)
|
-SE-, -N-, -SP-, -EX-, (J)
|
LH
|
| First Active
|
Active
|
Recovery
|
Frame Adv
|
Circuit
|
Invuln
|
| 28
|
4
|
15
|
-4
|
2.4%
|
-
|
|
Moves forward more and has a much larger hitbox than 5B. Launches into a techable knockdown.
|
|
|
|
| 5C
|
Damage
|
Red Damage
|
Proration
|
Cancel
|
Guard
|
| 1200
|
720
|
100% (O)
|
N, SP, EX, (J)
|
LH
|
| First Active
|
Active
|
Recovery
|
Frame Adv
|
Circuit
|
Invuln
|
| 6
|
2
|
14
|
-4
|
5.6%
|
-
|
|
Moves slightly forward. Can be partially charged to move farther forward.
|
| 5[C]
|
Damage
|
Red Damage
|
Proration
|
Cancel
|
Guard
|
| 800
|
1152
|
50% (O)
|
-
|
LH
|
| First Active
|
Active
|
Recovery
|
Frame Adv
|
Circuit
|
Invuln
|
| 18
|
3
|
22
|
-10
|
7.0%
|
-
|
|
Moves farther forward than 5C, but launches into a wall bounce on hit. Also does less damage, has worse proration, and no cancel options.
|
|
Crouching Normals
|
|
| Damage
|
Red Damage
|
Proration
|
Cancel
|
Guard
|
| 350
|
192
|
75% (O)
|
-SE-, -N-, -SP-, -EX-, (J)
|
LH
|
| First Active
|
Active
|
Recovery
|
Frame Adv
|
Circuit
|
Invuln
|
| 3
|
2
|
9
|
1
|
2.4%
|
-
|
|
Tied for fastest normal in the game. Not a low and whiffs airborne opponents. Very useful for rebeats.
|
|
2B / 2{B} 2B / 2{B} 2[B] 2[B]
|
| 2B
|
Damage
|
Red Damage
|
Proration
|
Cancel
|
Guard
|
| 750
|
528
|
80% (O) / 100% (O)
|
N, SP, EX, (J)
|
LH
|
| First Active
|
Active
|
Recovery
|
Frame Adv
|
Circuit
|
Invuln
|
| 7
|
12
|
8
|
-8 ~ 3
|
5.6%
|
-
|
|
Long active frames. Important for post j.2C tech traps.
|
| 2{B}
|
Damage
|
Red Damage
|
Proration
|
Cancel
|
Guard
|
| 900 / 750
|
720 / 528
|
70% (O) ~ 100% (O)
|
N, SP, EX, (J)
|
LH / LHA
|
| First Active
|
Active
|
Recovery
|
Frame Adv
|
Circuit
|
Invuln
|
| 15 ~ 28
|
24
|
8
|
-16 ~ 3
|
7.0% / 5.6%
|
-
|
|
One of the most active normals in the game. Can be used instead of 2B to catch all techs as well as no tech after j.2C, although the tech catch itself, as well as pickups on no tech are very finnicky.
|
| 2[B]
|
Damage
|
Red Damage
|
Proration
|
Cancel
|
Guard
|
| 1050
|
816
|
70% (O)
|
N, SP, EX, (J)
|
L
|
| First Active
|
Active
|
Recovery
|
Frame Adv
|
Circuit
|
Invuln
|
| 29
|
24
|
8
|
-14 ~ 9
|
8.4%
|
-
|
|
Wallbounces airborne opponents (5[B] > 2[B])
|
|
|
|
| Damage
|
Red Damage
|
Proration
|
Cancel
|
Guard
|
| 1000
|
528
|
60% (O)
|
N, SP, EX, (J)
|
L
|
| First Active
|
Active
|
Recovery
|
Frame Adv
|
Circuit
|
Invuln
|
| 8
|
2
|
20
|
-4
|
2.4%
|
-
|
|
Sweeps the opponent into a hard knockdown.
|
|
Aerial Normals
|
|
| Damage
|
Red Damage
|
Proration
|
Cancel
|
Guard
|
| 250
|
144
|
75% (O)
|
-N-, -SP-, -EX-, -J-
|
LHA
|
| First Active
|
Active
|
Recovery
|
Frame Adv
|
Circuit
|
Invuln
|
| 4
|
4
|
10
|
-
|
2.1%
|
-
|
|
Fast air normal. Good for adjusting height in combos.
|
|
|
|
| Damage
|
Red Damage
|
Proration
|
Cancel
|
Guard
|
| 600
|
384
|
100% (O)
|
N, SP, EX, J
|
HA
|
| First Active
|
Active
|
Recovery
|
Frame Adv
|
Circuit
|
Invuln
|
| 6
|
3
|
-
|
-
|
5.6%
|
-
|
|
Has a bit of downward disjoint.
|
|
|
|
| Damage
|
Red Damage
|
Proration
|
Cancel
|
Guard
|
| 800
|
576
|
90% (O)
|
N, SP, EX, J
|
HA
|
| First Active
|
Active
|
Recovery
|
Frame Adv
|
Circuit
|
Invuln
|
| 10
|
4
|
-
|
-
|
5.6%
|
-
|
|
Better downward hitbox at distance than j.B but a good bit slower and lacking disjoint. Can be used to convert off rising j.B fuzzies with frame perfect timing.
|
|
Command Normals
|
|
| Damage
|
Red Damage
|
Proration
|
Cancel
|
Guard
|
| 900
|
576
|
100% (O)
|
-
|
LHA
|
| First Active
|
Active
|
Recovery
|
Frame Adv
|
Circuit
|
Invuln
|
| 12
|
-
|
16 ~ 69
|
0
|
7.0%
|
-
|
|
Has a bit of downward disjoint. Has limitted use in catching opponents offguard with a CH.
|
|
|
|
| Damage
|
Red Damage
|
Proration
|
Cancel
|
Guard
|
| 1100
|
720
|
100% (O)
|
-
|
HA
|
| First Active
|
Active
|
Recovery
|
Frame Adv
|
Circuit
|
Invuln
|
| 4
|
2
|
-
|
-
|
9.1%
|
-
|
|
Good combo ender in the corner leading to Neco's trademark 50/50 between catching techs or continuing the combo on no tech.
|
|
Universal Mechanics
Ground Throw
4/6A+D
|
| Damage
|
Red Damage
|
Proration
|
Cancel
|
Guard
|
| 1200
|
672
|
100%
|
-
|
U
|
| First Active
|
Active
|
Recovery
|
Frame Adv
|
Circuit
|
Invuln
|
| 3
|
1
|
22
|
-
|
0.0%
|
-
|
|
Neco uppercuts the opponent away for an untechable knockdown.
|
|
Air Throw
j.4/6A+D
|
| Raw
|
Damage
|
Red Damage
|
Proration
|
Cancel
|
Guard
|
| 1600
|
506
|
30%
|
-
|
U
|
| First Active
|
Active
|
Recovery
|
Frame Adv
|
Circuit
|
Invuln
|
| 2
|
1
|
13
|
-
|
7.0%
|
-
|
|
Neco slams the opponent against the ground using up one ground bounce.
|
| Combo
|
Damage
|
Red Damage
|
Proration
|
Cancel
|
Guard
|
| 1300
|
506
|
100%
|
-
|
U
|
| First Active
|
Active
|
Recovery
|
Frame Adv
|
Circuit
|
Invuln
|
| 2
|
1
|
13
|
-
|
7.0%
|
-
|
|
Neco slams the opponent into the ground for an untechable knockdown. Gives pretty good frame advantage.
|
|
Shield Counter
Auto after a successful Shield
|
| Standing
|
Damage
|
Red Damage
|
Proration
|
Cancel
|
Guard
|
| 500 (345)
|
198
|
50%
|
(SP), (EX), (J)
|
LHA
|
| First Active
|
Active
|
Recovery
|
Frame Adv
|
Circuit
|
Invuln
|
| 9
|
4
|
18
|
-4
|
3.5%
|
-
|
|
Same animation as 5[B]
|
| Crouching
|
Damage
|
Red Damage
|
Proration
|
Cancel
|
Guard
|
| 1500 (1117)
|
714
|
50%
|
(SP), (EX)
|
LA
|
| First Active
|
Active
|
Recovery
|
Frame Adv
|
Circuit
|
Invuln
|
| 9
|
4
|
18
|
-4
|
10.5%
|
-
|
|
Same hitboxes as 2C.
|
| Air
|
Damage
|
Red Damage
|
Proration
|
Cancel
|
Guard
|
| 500 (303)
|
174
|
50%
|
-
|
HA
|
| First Active
|
Active
|
Recovery
|
Frame Adv
|
Circuit
|
Invuln
|
| 7
|
4
|
2
|
-
|
3.5%
|
-
|
|
Same animation as C-Moon j.C
|
|
Shield Bunker
214D in neutral or blockstun
|
| Neutral
|
Damage
|
Red Damage
|
Proration
|
Cancel
|
Guard
|
| 500
|
192
|
50%
|
-
|
LHA
|
| First Active
|
Active
|
Recovery
|
Frame Adv
|
Circuit
|
Invuln
|
| 26
|
4
|
19
|
-5
|
0.0%
|
Clash 1-10
|
| (Clash)
|
Damage
|
Red Damage
|
Proration
|
Cancel
|
Guard
|
| 500
|
192
|
50%
|
-
|
LHA
|
| First Active
|
Active
|
Recovery
|
Frame Adv
|
Circuit
|
Invuln
|
| 8
|
4
|
19
|
-5
|
0.0%
|
Strike 1-7
|
|
Small hitbox, but good forward movement.
|
| Blockstun
|
Damage
|
Red Damage
|
Proration
|
Cancel
|
Guard
|
| 0
|
0
|
100%
|
-
|
LHA
|
| First Active
|
Active
|
Recovery
|
Frame Adv
|
Circuit
|
Invuln
|
| 19
|
2
|
23
|
-6
|
-100.0%
|
-
|
|
H-moon specific bunker.
|
|
Circuit Spark
In Heat:
Auto during hitstun
A+B+C during blockstun
|
| Ground
|
Damage
|
Red Damage
|
Proration
|
Cancel
|
Guard
|
| 100
|
0
|
100%
|
-
|
U
|
| First Active
|
Active
|
Recovery
|
Frame Adv
|
Circuit
|
Invuln
|
| 11
|
10
|
12
|
-
|
removes all
|
Full
|
| Air
|
Damage
|
Red Damage
|
Proration
|
Cancel
|
Guard
|
| 100
|
0
|
100%
|
-
|
U
|
| First Active
|
Active
|
Recovery
|
Frame Adv
|
Circuit
|
Invuln
|
| 12
|
10
|
15
|
-
|
removes all
|
Full
|
|
Universal burst mechanic. Unlike Crescent/Full Heat activation, the hitbox and frame data doesn't vary between characters. However, you can be thrown out of this move if you input it in the air.
|
|
Special Moves
Grounded Specials
True Ancestor Beam
(EX: Opuba!!)
236A/B/C A A B B EX EX
|
| A
|
Damage
|
Red Damage
|
Proration
|
Cancel
|
Guard
|
| 250*8 (1589)
|
120*8 (729)
|
100%
|
EX
|
LHA
|
| First Active
|
Active
|
Recovery
|
Frame Adv
|
Circuit
|
Invuln
|
| 26
|
16
|
22
|
-9
|
1.4%*8 (11.2%)
|
-
|
|
Primarily a zoning tool. Very slow startup. Significant pushback means it's generally safe on block. Must shield each hit individually.
|
| B
|
Damage
|
Red Damage
|
Proration
|
Cancel
|
Guard
|
| 300*7 (1705)
|
120*7 (651)
|
100%
|
EX
|
LHA
|
| First Active
|
Active
|
Recovery
|
Frame Adv
|
Circuit
|
Invuln
|
| 16
|
14
|
34
|
-21
|
1.4%*7 (9.8%)
|
-
|
|
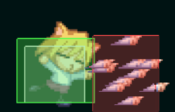
Neco's strongest anti-air option. Use in conjunction with 236A when zoning with beams if they're approaching from the air. Very minus on block, potentially punishable if the opponent is close enough.
|
| EX
|
Damage
|
Red Damage
|
Proration
|
Cancel
|
Guard
|
| 250*26 (3410)
|
150*26 (1949)
|
100%
|
-
|
LHA
|
| First Active
|
Active
|
Recovery
|
Frame Adv
|
Circuit
|
Invuln
|
| 8+22
|
52
|
42
|
-32
|
-100.0%
|
Full 1-9
|
|
Mostly useless. While it does cover an angle 236A/B can't, it's a very small one which makes it negligible.
|
|
EM Wave Ultimate Attack - Necoesthetics
(EX: Super EM Wave Ultimate Attack - Necoesthetics - Stamp Rally East Japan)
623A/B/C A/B A/B EX EX
|
| A
|
Damage
|
Red Damage
|
Proration
|
Cancel
|
Guard
|
| 80*30 (1305)
|
50*6, 32*24 (546)
|
100%
|
-
|
LHA
|
| First Active
|
Active
|
Recovery
|
Frame Adv
|
Circuit
|
Invuln
|
| 6
|
13
|
5
|
5
|
0.7%*6 (4.2%)
|
-
|
|
Very fast forward disjoint.
|
| B
|
Damage
|
Red Damage
|
Proration
|
Cancel
|
Guard
|
| 80*48 (1344)
|
50*6, 32*42 (587 - 629)
|
100%
|
-
|
LHA
|
| First Active
|
Active
|
Recovery
|
Frame Adv
|
Circuit
|
Invuln
|
| 12
|
13
|
3
|
7
|
0.7%*6 (4.2%)
|
-
|
|
A bit slower than 623A, but almost no recovery.
|
| EX
|
Damage
|
Red Damage
|
Proration
|
Cancel
|
Guard
|
| 150*15, 160*105 (2731)
|
120*15, 40*105 (834)
|
100%
|
-
|
LHA
|
| First Active
|
Active
|
Recovery
|
Frame Adv
|
Circuit
|
Invuln
|
| 1+3
|
30
|
12
|
-2
|
-100.0%
|
-
|
|
Causes Circuit Break for 179 frames on hit. Grounded opponents will be pushed out of the move's hitbox halfway through, making it punishable both on block and on hit.
|
|
Cat Back From The Underworld R (Returns)
214A/B/C (No EX)
|
| A
|
Damage
|
Red Damage
|
Proration
|
Cancel
|
Guard
|
| -
|
-
|
-
|
-
|
-
|
| First Active
|
Active
|
Recovery
|
Frame Adv
|
Circuit
|
Invuln
|
| -
|
-
|
57
|
-
|
-
|
Full 12-51
|
|
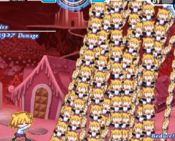
Neco burrows under the ground and reappears alongside 2 fakes. 214A places Neco 216 pixels behind the center of the camera (left of center if facing right, right of center if facing left). The fake Necos appear 64 and 320 pixels in front of the camera's center. Note that all of these positions are relative to where the camera is immediately before the teleport takes place.
|
| B
|
Damage
|
Red Damage
|
Proration
|
Cancel
|
Guard
|
| -
|
-
|
-
|
-
|
-
|
| First Active
|
Active
|
Recovery
|
Frame Adv
|
Circuit
|
Invuln
|
| -
|
-
|
57
|
-
|
-
|
Full 12-51
|
|
214B places Neco at the center of the camera. The fake Necos appear 192 pixels behind and 320 pixels in front of the camera's center. Note that all of these positions are relative to where the camera is immediately before the teleport takes place.
|
| C
|
Damage
|
Red Damage
|
Proration
|
Cancel
|
Guard
|
| -
|
-
|
-
|
-
|
-
|
| First Active
|
Active
|
Recovery
|
Frame Adv
|
Circuit
|
Invuln
|
| -
|
-
|
57
|
-
|
-
|
Full 12-51
|
|
214C places Neco 216 pixels in front of the center of the camera (right of center if facing right, left of center if facing left). The fake Necos appear 192 pixels behind and 64 pixels in front of the camera's center. Note that all of these positions are relative to where the camera is immediately before the teleport takes place.
|
|
Abaddon Flare
Abaddon Force
(EX: Elite Neco Corps Abaddon Paris☆Beret)
22A/B/C
|
| A
|
Damage
|
Red Damage
|
Proration
|
Cancel
|
Guard
|
| 300*11 (555-1270)
|
120*11 (212-485)
|
100%
|
EX
|
LH
|
| First Active
|
Active
|
Recovery
|
Frame Adv
|
Circuit
|
Invuln
|
| 23
|
44
|
20
|
-17 ~ -5
|
1.4%*11 (2.8%-7.0%)
|
-
|
|
Yet another mostly useless move. Slow start up, and doesn't carry the opponent like 236A.
|
| B
|
Damage
|
Red Damage
|
Proration
|
Cancel
|
Guard
|
| Varies
|
Varies
|
100%
|
-
|
LHA
|
| First Active
|
Active
|
Recovery
|
Frame Adv
|
Circuit
|
Invuln
|
| 12
|
1
|
29
|
Varies
|
-
|
-
|
|
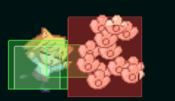
Spits out a Neco-Arc a set distance away that will walk around, crawl, kick, do a launcher, run with a constant hitbox, or jump and turn into a rocket. They'll perform these moves in a random direction, and perform the rocket move at a random height.
|
| EX
|
Damage
|
Red Damage
|
Proration
|
Cancel
|
Guard
|
| 250*24 (250-2594)
|
150*24 (144-1492)
|
100%
|
-
|
LHA
|
| First Active
|
Active
|
Recovery
|
Frame Adv
|
Circuit
|
Invuln
|
| 9+9
|
40
|
2
|
-11 ~ 29
|
-100.0%
|
-
|
|
Shoots out 3 majestic rocket-ing Necos in cone-like pattern. Not useful
|
|
Nyampsey Roll AC
63214C during HEAT
|
| Damage
|
Red Damage
|
Proration
|
Cancel
|
Guard
|
| 200*17 (2302)
|
120*17 (1317)
|
90%
|
-
|
LHA
|
| First Active
|
Active
|
Recovery
|
Frame Adv
|
Circuit
|
Invuln
|
| 4+10
|
66
|
76
|
-60
|
removes all
|
Full 1-128
|
|
Confuses (reversed controls) the opponent on hit, but also always confuses Neco. Fully unburstable.
|
|
Aerial Specials
Air to Ground Opuba
(EX: That was too fast...!)
j.236A/B/C
|
| A
|
Damage
|
Red Damage
|
Proration
|
Cancel
|
Guard
|
| 250*4 (865)
|
120*4 (397)
|
100%
|
-
|
LHA
|
| First Active
|
Active
|
Recovery
|
Frame Adv
|
Circuit
|
Invuln
|
| 14
|
14
|
10
|
-8
|
1.4*4 (5.6%)
|
-
|
|
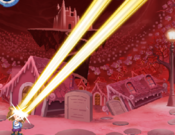
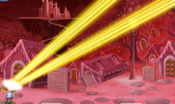
Neco-Arc shoots her eye beams diagonally down at the ground. Stalls Neco in the air and can be used 4 times before landing between her 2 jumps and 2 airdashes. A staple of her ability to play keepaway.
|
| B
|
Damage
|
Red Damage
|
Proration
|
Cancel
|
Guard
|
| 250*7 (1418)
|
120*7 (651)
|
100%
|
-
|
LHA
|
| First Active
|
Active
|
Recovery
|
Frame Adv
|
Circuit
|
Invuln
|
| 21
|
14
|
10
|
-11
|
1.4*7 (9.8%)
|
-
|
|
Same as A version but slower for more damage and more stalling.
|
| EX
|
Damage
|
Red Damage
|
Proration
|
Cancel
|
Guard
|
| 250*15 (2594)
|
150*15 (1492)
|
100%
|
-
|
LHA
|
| First Active
|
Active
|
Recovery
|
Frame Adv
|
Circuit
|
Invuln
|
| 8+26
|
30
|
10
|
-22 ~ 0
|
-100.0%
|
5-34
|
|
Neco-Arc shoots her beams in an arc underneath her, starting behind and moving forward.
|
|
I Want to Go to Crocodile Country
(EX: Six Segment God Cat)
j.214A/B/C
|
| A
|
Damage
|
Red Damage
|
Proration
|
Cancel
|
Guard
|
| 200*8 (1422)
|
100*8 (684)
|
100%
|
-EX-
|
LHA
|
| First Active
|
Active
|
Recovery
|
Frame Adv
|
Circuit
|
Invuln
|
| 6
|
40
|
8
|
-1
|
1.4*8 (11.2%)
|
-
|
|
Neco-Arc turns into a rocket and flies roughly halfway across the screen.
|
| B
|
Damage
|
Red Damage
|
Proration
|
Cancel
|
Guard
|
| 250*10 (1910)
|
120*10 (876)
|
100%
|
-EX-
|
LHA
|
| First Active
|
Active
|
Recovery
|
Frame Adv
|
Circuit
|
Invuln
|
| 8
|
50
|
8
|
-1
|
1.7*10 (17.5%)
|
-
|
|
Neco-Arc travels faster and farther, almost fullscreen. May also function as a pseudo-airdash.
|
| EX
|
Damage
|
Red Damage
|
Proration
|
Cancel
|
Guard
|
| 120, 300*16 (3178)
|
120, 230*16 (2343)
|
100%
|
-
|
LHA
|
| First Active
|
Active
|
Recovery
|
Frame Adv
|
Circuit
|
Invuln
|
| 11
|
3 (3) 80
|
8
|
-9
|
-100.0%
|
5-34
|
|
Neco-Arc splits into 6 parts before flying fullscreen. Common combo ender for damage. Can also be used when landing a stray j.214A/B.
|
|
Arc Drive
Dawn of the Cat
41236C during HEAT
|
| Damage
|
Red Damage
|
Proration
|
Cancel
|
Guard
|
| 400*9, 450 (3315)
|
350*9, 380 (2753)
|
100%
|
-
|
LH
|
| First Active
|
Active
|
Recovery
|
Frame Adv
|
Circuit
|
Invuln
|
| 10+4
|
2
|
129 / 208
|
-102
|
removes all
|
Full 1-137 / 1-147, 152-219
|
|
Full screen air unblockable hitgrab. Even on whiff or block, some opponents might fail to punish as only the final 6 frames of recovery are vulnerable.
|
|
MBAACC Navigation
