|
|
| Line 46: |
Line 46: |
| |} | | |} |
|
| |
|
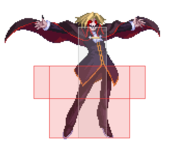
| Warachia is one of the quintessential character of melty that controls space through his normals and movement. He has 2 jumps, an airdash and a command airdash. As if that wasn't enough to his toolkit he also has the C-Moon mechanic "air dodge" to augment his air momentum and becomes elusive to many of the cast that resides in melty. His huge normals for both the ground and air while they may have green before active, because he's rather elusive with movement, allows him to weave through opponent's positioning while having them think they're in the optimal spot vs him. his ability to convert into HKD consistently, whether its an Air stray hit or a ground starter into a strike/throw situation always leaves the constant fear of players not being able to control wara's vectors of approach and with his speed on the ground and air not giving them enough time to formulate a counter attack vs. Wara. a solid high tier character that struggles vs characters above him, other than that struggles as far as the player takes him. With good fundamentals and good game decision you can take this character far. | | Warachia is one of the quintessential characters in Melty Blood that controls space through his normals and movement. He has 2 jumps, an airdash and a command airdash. As if that wasn't already good enough, he also has the C-Moon "air dodge" to augment his air momentum. By combining all these tools, Warachia can be extremely elusive and difficult to reach for to most of Melty Blood's cast. His huge normals, both in the ground and air, allow him to weave through his opponent's positioning while fooling them in to thinking their spacing remains optimal. Despite the fact his normals are relatively slow to activate and have large hurtboxes, his ridiculous mobility and general elusiveness give him the upper hand in neutral. his ability to convert virtually any attack into HKD consistently, whether its a stray hit in the air or a ground starter into a strike/throw situation, always leaves the opponent in constant fear of not being able to control C-Wara's vectors of approach. This, combined with his speed on the ground and air results in the opponent often not having enough time to formulate a counter attack. C-Wara is a solid high tier character that struggles vs. characters above him. Other than that, he only struggles as far as the player takes him. With good fundamentals and good decision-making, you can take C-Warachia far. |
|
| |
|
| == General Gameplan == | | == General Gameplan == |
| The main goal of Warachia is that he uses his above average speed, ground and air combined to make it hard to pin wara down while he uses his large buttons, dash 5B and dash 2B are good when placed well, since dash 2B works when you're around range 2 and the person tries to jump out, 2B will snag them, while 5B works as generally a wall for characters that try to approach from the ground. this is just his ground buttons that's he's famously known for. When he takes to the air has [[#j.22X|j.22X]], a command airdash which in the following order is like: | | The main goal of Warachia is using his above average speed, both on the ground and in the air, to make it hard to pin him down while he uses his large buttons. Dash 5B and dash 2B are good when placed well, since dash 2B works when you're around range 2 and if the person tries to jump out, 2B will snag them, while 5B works as generally a wall for characters that try to approach from the ground. While Warachia is certainly known for these buttons, his air game is even more notable. When he takes to the air, C-Wara has [[#j.22X|j.22X]], a command airdash that can be directed using the following commands: |
| *j.22A: Horizontal airdash | | *j.22A: Horizontal airdash |
| *j.22B: Downwards airdash | | *j.22B: Downwards airdash |
| *j.22C: Upwards airdash | | *j.22C: Upwards airdash |
|
| |
|
| when these are working in part with the likes of his air normals like say j.B/j.C it becomes difficult to not only pin him down but also for to avoid him pinning you down. Any hit that incurs from any encounter can frequently result in an aerial sequence into j.421C. In short mastering his movement and especially his air movement makes him an extremely difficult character to fight not only because of his elusive neutral, but because any hit he gains from neutral then turns into a Knockdown whether its an AT ender or its a 421 ender.
| | When C-Wara combines these with his air normals, such as j.B/j.C, not only does it become difficult for him to be pinned down, it also becomes difficult to avoid getting pinned down. Any hit that incurs from an encounter can result in an aerial sequence ending in j.421C. In short, mastering his movement, especially while he's in the air, makes C-Wara an extremely difficult character to fight, not only because of his elusive neutral, but because any hit he gains while in neutral can be turned into a knockdown. Whether its through an AT ender or a j.421C ender, Warachia's knockdown options are very easy to use. |
|
| |
|
| === Neutral === | | === Neutral === |
| Neutral is where C-Wara shines. Perhaps the most important part about C-Wara is his movement. He has incredible forward movement. His forward dash, airdash, and command airdash all go far fast. His backwards movement is fine, but he really excels at going forward. This leads to a really interesting neutral game where you try to be as slippery as possible. Often dashing under your opponent’s jump or jumping over their dash. Use your 2B/5B/j.B to space them out when you’re in a good position. | | Neutral is where C-Wara shines. The most important part of C-Wara is his movement. He has incredible forward movement, with his forward dash, airdash, and command airdash all going very far, very fast. His backwards movement is adequate, but he really excels at moving forward. This leads to a really interesting neutral game where you try to be as slippery as possible, often dashing under your opponent’s jump or jumping over their dash. You can use your 2B/5B/j.B to space them out when you’re in a good position to maintain proper spacing. |
|
| |
|
| There’s two kinds of MUs for wara, ones where he controls the neutral, and ones where he doesn’t. If you control the neutral, your main goal should be to be evasive and frustrate the opponent into making mad commitments or bad approaches to chase you down, while you fly around and look for crossunders, anti-airs, stray air counter hits, and intercepts. Matchups where you don’t control the neutral normally means that you have to approach and smother the other character. For this, you need to leverage the strength of the jB and jC on approach, make good use of your air options to be unpredictable and adaptable, and use your ability to have a presence in midrange to passively apply pressure until you can force a large opening. Once you get your hit, you can almost always convert it into some form of knockdown, and get an oki situation from it. Wara’s oki isn’t the best, but the good strength of it is he doesn’t really have to commit super hard for a lot of it, and he can keep pressure on even after its blocked. For matchups where you don’t win neutral, this means you probably don’t want to commit to your oki super hard, but instead prioritize position and staying in and being a threat over necessarily winning outright, because if you go for a hard commitment and are wrong, you are back in hell and could lose the round. For matchups where you do win neutral, you can afford to play a bit riskier, because even if the oki doesn’t work out or thing sreset, you are generally still in a good position.
| | C-Wara has two kinds of matchups: Ones where he controls the neutral, and ones where he doesn’t. If you control the neutral, your main goal should be to be evasive and frustrate the opponent into making mad commitments or bad approaches to chase you down while you fly around looking for crossunders, anti-airs, stray air counter hits, and intercepts. Matchups where you don’t control the neutral normally mean that you have to approach and smother the other character. To do this, you need to leverage the strength of j.B and j.C on approach, make good use of your air options to be unpredictable and adaptable, and use your ability to have a presence in midrange to passively apply pressure until you can force a large opening. Once you get your hit, you can almost always convert it into some form of knockdown and often get an okizeme situation from it. C-Wara’s okizeme isn’t the best, but he doesn’t have to commit super hard for a lot of it, and he can keep pressure on even after it's blocked. For matchups where you don’t win neutral, this means you probably don’t want to commit to your oki super hard, but instead prioritize position and staying in and being a threat over necessarily winning outright, because if you go for a hard commitment and mess up, you are back in hell and could lose the round. For matchups where you do win neutral, you can afford to play a bit riskier, because even if the oki doesn’t work out or things reset, you are generally still in a good position. |
|
| |
|
|
| |
|
| === Pressure/Okizeme === | | === Pressure/Okizeme === |
| Most of C-Wara’s offense is mostly just fundamental Melty pressure. He can do really good rebeat pressure where it can be very hard to tell when he’s going to dash or iad back in. He has really good reward off his throw. After a throw you can microwalk back 214B (Nanaya summon) and get a solid strike/throw mixup. Can reset pressure with 63214C (Warc summon) and 22C (Tornado) if you want to spend the meter. His overheads are pretty easily reactable but also plus on block, but you’re in trouble if they shield. The only real mixup he can get is if he does something like 5B 63214C then either IAD j.C(w) 2A or IAD j.B, which is strong but costs a lot of meter and requires you to be really close. | | Most of C-Wara’s offense is mostly just fundamental Melty pressure. He can do really good rebeat pressure where it can be very hard to tell when he’s going to dash or IAD back in. He has really good rewards off his throw. After a throw, you can microwalk back, then input 214B (Nanaya summon) and get a solid strike/throw mixup. You can reset pressure with 63214C (Warc summon) and 22C (Tornado) if you want to spend the meter. His overheads are pretty easily reactable, but are plus on block. However, you’re in trouble if they shield. The only real mixup he can do is if he does something like 5B 63214C then either IAD j.C(w) 2A or IAD j.B, which is strong but costs a lot of meter and requires you to be really close. |
| some example include
| | Some examples: |
|
| |
|
| *2A > 5B(1) > 5A(w) > 2B | | *2A > 5B(1) > 5A(w) > 2B |
| Line 91: |
Line 91: |
|
| |
|
| *'''Throw, 214B (Nanaya summon)''' | | *'''Throw, 214B (Nanaya summon)''' |
| Nanaya summon is basically a personality test in itself and you can then monitor and adjust accordingly to how your opponent reacts for example after throw, (micro walk back) 214B you can do: | | Nanaya summon is basically a personality test in and of itself and you can then monitor your opponent and adjust accordingly to how he reacts. For example after throw, (micro walk back) 214B you can do: |
| ** 66 Throw | | ** 66 Throw |
| ** 66 2B/ 5A, 2B | | ** 66 2B/ 5A, 2B |
| Line 101: |
Line 101: |
| The most safest option after an air throw ender in the corner is falling j.B and while it doesn't net a combo on neutral tech it does ensure a check since you can dash 5B afterwards with the frame advantage to catch a jump out into another aerial sequence. If you're a bit of ways out from the corner or gain the respect that people won't resort to shield among other things you can falling j.B into airdash j.B or even airdash j.C if you're not directly in the corner. | | The most safest option after an air throw ender in the corner is falling j.B and while it doesn't net a combo on neutral tech it does ensure a check since you can dash 5B afterwards with the frame advantage to catch a jump out into another aerial sequence. If you're a bit of ways out from the corner or gain the respect that people won't resort to shield among other things you can falling j.B into airdash j.B or even airdash j.C if you're not directly in the corner. |
|
| |
|
| It is encouraged that you use the match database to study Waras for their creative twists on oki and decipher or ask others for what they about their take for oki and pressure! | | It is encouraged that you use the match database to study other Warachia players for their creative twists on oki and decipher their reasoning, or simply ask others for what they think about C-Wara's oki and pressure! |
|
| |
|
| === Defense === | | === Defense === |
| Defense is the worst place for Wara to be, but he can still do some stuff with it. You have the largest heat in the game and gain meter incredibly quickly, so this is a staple defensive option, but be careful about getting it baited. EX guard is probably your best friend, between restoring your guard bar and creating distance for you to jump out, its incredibly helpful. When its time to escape defense, jumping is almost always the best choice, there are very few chars that can keep up with you in the air, and you have enough air options that they shouldn’t easily be able to pin you as you fall to the ground. 2B and 2A are your go to abare options, but be careful as they are slow. 2B especially is a good multi-purpose defensive tool as it covers all kinds of good spaces, but be careful for its clash box, extended hurtbox, and slow startup. | | Defense is the worst place for C-Wara to be, but he can still do some stuff with it. You have the largest heat in the game and gain meter incredibly quickly, so this is a staple defensive option That being said, be careful about getting it baited. EX guard is probably your best friend, between restoring your guard bar and creating distance for you to jump out, it's incredibly helpful. When it's time to escape defense, jumping is almost always the best choice as there are very few characters that can keep up with you in the air and you have enough air options that they shouldn’t easily be able to pin you down as you fall to the ground. 2B and 2A are your go to abare options, but be careful as they are slow. 2B especially is a good multi-purpose defensive tool as it covers all kinds of good spaces, but be careful for its clash box, extended hurtbox, and slow startup. |
|
| |
|
| == Combos == | | == Combos == |
| Line 114: |
Line 114: |
| === Enders === | | === Enders === |
| *'''<u>j.421C'''</u> | | *'''<u>j.421C'''</u> |
| The way to get a knockdown midscreen, and to get extra damage. | | The primary way to get a knockdown midscreen, and to get extra damage. |
|
| |
|
| *'''<u>Air Throw</u>''' (AT) | | *'''<u>Air Throw</u>''' (AT) |
| Use midscreen to preserve meter, or in the corner. Will sometimes need to use j.22C to reach them. Falling with j.B after will catch techs in the corner. | | Use this midscreen to preserve meter or in the corner to maintain pressure. Will sometimes need to use j.22C to reach them. Falling with j.B after will catch techs in the corner. |
|
| |
|
| *'''<u>j.236C, land 41236C(Arc Drive)</u>''' | | *'''<u>j.236C, land 41236C(Arc Drive)</u>''' |
| Will not work with certain combos (usually ones that require a super jump), but will give great corner carry and you can get a safe heat and a mixup. Do either heat dash 214B/C or sj into a falling j.214C. (falling j.214c gives more advantage) | | Will not work with certain combos (usually ones that require a super jump), but will give great corner carry and can result in safe heat and a mixup. Do either heat dash 214B/C or sj into a falling j.214C. (falling j.214c gives more advantage) |
|
| |
|
| *'''<u>j.236C, land Heat'''</u> | | *'''<u>j.236C, land Heat'''</u> |
| Safe heat | | Safe heat. |
|
| |
|
| *'''<u>j.236A'''</u> | | *'''<u>j.236A'''</u> |
Character Page Progress
This page is almost complete, consider joining as an editor to help expand it. Please update this character's roadmap page when one of the editing goals have been reached. When no main goals are left, please remove this section from this page.
| In Progress
|
- (Additional Ressources/Players to watch/ask):
- (Add any external links to ressources such as video guides or articles.)
- (Add exact discord handles for any player that can be contacted there.)
- Combos:
- Add damage, meter gain/given numbers and video links to the pre-existing combos.
- Move Descriptions:
- Double check/complete frame data for moves which are harder to determinate. (ex: AAD, LA)
|
Additional resources
C-Warachia Match Video Database
Players to watch/ask
JP:
NA:
- Grungah
- Ehrik
- Tyth - located in melty maincord server
- Aligari - located in melty maincord server
- kyros01 - located in melty maincord server
EU:
Overview
Strengths / Weaknesses
| *Strengths
|
- Large normals.
- Fantastic neutral game.
- Fast and very mobile.
- Hard knockdown from every hit thanks to 421C.
- Fantastic meter gain.
- Largest heat hitbox in the game (used as a reversal).
- 2b
|
| Weaknesses
|
- Low health and bad defense modifiers for the first half of his life.
- Large hurtbox.
- No good reversals besides Heat (which can be OS'd).
- Normals are slow, limiting options in scrambles and on defense.
- Zoners are usually hard for him to deal with.
- Needs meter for his best knockdown/ pressure and defensive options.
- C-Nero is free to play
- 2b
|
Warachia is one of the quintessential characters in Melty Blood that controls space through his normals and movement. He has 2 jumps, an airdash and a command airdash. As if that wasn't already good enough, he also has the C-Moon "air dodge" to augment his air momentum. By combining all these tools, Warachia can be extremely elusive and difficult to reach for to most of Melty Blood's cast. His huge normals, both in the ground and air, allow him to weave through his opponent's positioning while fooling them in to thinking their spacing remains optimal. Despite the fact his normals are relatively slow to activate and have large hurtboxes, his ridiculous mobility and general elusiveness give him the upper hand in neutral. his ability to convert virtually any attack into HKD consistently, whether its a stray hit in the air or a ground starter into a strike/throw situation, always leaves the opponent in constant fear of not being able to control C-Wara's vectors of approach. This, combined with his speed on the ground and air results in the opponent often not having enough time to formulate a counter attack. C-Wara is a solid high tier character that struggles vs. characters above him. Other than that, he only struggles as far as the player takes him. With good fundamentals and good decision-making, you can take C-Warachia far.
General Gameplan
The main goal of Warachia is using his above average speed, both on the ground and in the air, to make it hard to pin him down while he uses his large buttons. Dash 5B and dash 2B are good when placed well, since dash 2B works when you're around range 2 and if the person tries to jump out, 2B will snag them, while 5B works as generally a wall for characters that try to approach from the ground. While Warachia is certainly known for these buttons, his air game is even more notable. When he takes to the air, C-Wara has j.22X, a command airdash that can be directed using the following commands:
- j.22A: Horizontal airdash
- j.22B: Downwards airdash
- j.22C: Upwards airdash
When C-Wara combines these with his air normals, such as j.B/j.C, not only does it become difficult for him to be pinned down, it also becomes difficult to avoid getting pinned down. Any hit that incurs from an encounter can result in an aerial sequence ending in j.421C. In short, mastering his movement, especially while he's in the air, makes C-Wara an extremely difficult character to fight, not only because of his elusive neutral, but because any hit he gains while in neutral can be turned into a knockdown. Whether its through an AT ender or a j.421C ender, Warachia's knockdown options are very easy to use.
Neutral
Neutral is where C-Wara shines. The most important part of C-Wara is his movement. He has incredible forward movement, with his forward dash, airdash, and command airdash all going very far, very fast. His backwards movement is adequate, but he really excels at moving forward. This leads to a really interesting neutral game where you try to be as slippery as possible, often dashing under your opponent’s jump or jumping over their dash. You can use your 2B/5B/j.B to space them out when you’re in a good position to maintain proper spacing.
C-Wara has two kinds of matchups: Ones where he controls the neutral, and ones where he doesn’t. If you control the neutral, your main goal should be to be evasive and frustrate the opponent into making mad commitments or bad approaches to chase you down while you fly around looking for crossunders, anti-airs, stray air counter hits, and intercepts. Matchups where you don’t control the neutral normally mean that you have to approach and smother the other character. To do this, you need to leverage the strength of j.B and j.C on approach, make good use of your air options to be unpredictable and adaptable, and use your ability to have a presence in midrange to passively apply pressure until you can force a large opening. Once you get your hit, you can almost always convert it into some form of knockdown and often get an okizeme situation from it. C-Wara’s okizeme isn’t the best, but he doesn’t have to commit super hard for a lot of it, and he can keep pressure on even after it's blocked. For matchups where you don’t win neutral, this means you probably don’t want to commit to your oki super hard, but instead prioritize position and staying in and being a threat over necessarily winning outright, because if you go for a hard commitment and mess up, you are back in hell and could lose the round. For matchups where you do win neutral, you can afford to play a bit riskier, because even if the oki doesn’t work out or things reset, you are generally still in a good position.
Pressure/Okizeme
Most of C-Wara’s offense is mostly just fundamental Melty pressure. He can do really good rebeat pressure where it can be very hard to tell when he’s going to dash or IAD back in. He has really good rewards off his throw. After a throw, you can microwalk back, then input 214B (Nanaya summon) and get a solid strike/throw mixup. You can reset pressure with 63214C (Warc summon) and 22C (Tornado) if you want to spend the meter. His overheads are pretty easily reactable, but are plus on block. However, you’re in trouble if they shield. The only real mixup he can do is if he does something like 5B 63214C then either IAD j.C(w) 2A or IAD j.B, which is strong but costs a lot of meter and requires you to be really close.
Some examples:
- 2A > 5B(1) > 5A(w) > 2B
- 2A > 5B(1) > 5A(w) > 2A
- 2A > 2B > 5A(w) > 5B
- 2A, > 2A(A) > 2B > 5B, 5B
- 2A, (2A >) (5B/2B >) delay 5[C]
- 66 5B, 5B
- 66 5B, 2B > delay 2C/5[C]
- Meter usage
To add on to Warachia's onslaught, in the event you feel you need to keep the pressure going you have the following specials commonly used for the job.
- 63214C - Must be close in order for warc's hitbox to spawn and keep the opponent in blockstun. This is usually used whenever Warachia is in MAX
- 22C
Adding on to the pressure ideas, allows for Warachia try IAD j.C(wh), 2A/IAD j.B to further his attempts of opening up people. Since he is C-moon, he is usually not starved for meter unless he circuit spark(burst while getting hit) or used Heat as a reversal/ to get health back at the end of a combo.
There is quite a lot of ways to make wara's pressure rather hard to separate the decision to challenge to block. A few key things you want to keep mind of is how your opponent reacts to your normals primarily and then from there you can seek to sneak in summon attempts and cover their jump outs with either 2B if they are not reacting fast enough or j7.A/B.Versus opponents that like to ex guard multi hit normals like 5B or 5[C] you may want to rebeat early so the pushback isn't as far, but also so that you can throw off the tempo of your opponent's defensive habits. Feel free to throw in some iad j.B/j.C pressure resets to keep your opponent guessing. Be sure to experiment and watch match videos of various Wara players!
- Okizeme
Typically from either AT ender in the corner or 421C, below is the more prominent ender that you will see.
This is the ender you will generally use any chance you get unless you want to get to max to do j.236C into Arc drive into Heat to recover health. The most common thing you will see after j.421C is 22A meaty which is + and also checks mashing. once they block this, you're now in a strike/throw mixup. Be sure to establish pressure in your staggers and delays and after scouting for a bit you can now attempt throw which leads into the Nanaya summon setup below. Also, after a j.421C ender, if the spinner hits 8 times, you can jump, drift back j.B and that is a safe jump if you feel someone will heat or reversal out. To get the spinner to hit 8 times, you need to make sure there's roughly one Wara's worth of space between you and the opponent when you press j.421C (example).
- Throw, 214B (Nanaya summon)
Nanaya summon is basically a personality test in and of itself and you can then monitor your opponent and adjust accordingly to how he reacts. For example after throw, (micro walk back) 214B you can do:
One thing to note is that if you dash throw while nanaya lunges forward for the slashes it cuts the throw tech window by a considerable amount so it truly enforces the strike/throw mix up.
- Air throw in the corner or near the corner
The most safest option after an air throw ender in the corner is falling j.B and while it doesn't net a combo on neutral tech it does ensure a check since you can dash 5B afterwards with the frame advantage to catch a jump out into another aerial sequence. If you're a bit of ways out from the corner or gain the respect that people won't resort to shield among other things you can falling j.B into airdash j.B or even airdash j.C if you're not directly in the corner.
It is encouraged that you use the match database to study other Warachia players for their creative twists on oki and decipher their reasoning, or simply ask others for what they think about C-Wara's oki and pressure!
Defense
Defense is the worst place for C-Wara to be, but he can still do some stuff with it. You have the largest heat in the game and gain meter incredibly quickly, so this is a staple defensive option That being said, be careful about getting it baited. EX guard is probably your best friend, between restoring your guard bar and creating distance for you to jump out, it's incredibly helpful. When it's time to escape defense, jumping is almost always the best choice as there are very few characters that can keep up with you in the air and you have enough air options that they shouldn’t easily be able to pin you down as you fall to the ground. 2B and 2A are your go to abare options, but be careful as they are slow. 2B especially is a good multi-purpose defensive tool as it covers all kinds of good spaces, but be careful for its clash box, extended hurtbox, and slow startup.
Combos
| Combo Notation Help
|
Disclaimer: Combos are written by various writers, so the actual notation used in pages can differ from the standard one.
For more information, see Glossary and Controls.
|
| X > Y
|
X input is cancelled into Y.
|
| X > delay Y
|
Must wait for a short period before cancelling X input into Y.
|
| X, Y
|
X input is linked into Y, meaning Y is done after X's recovery period.
|
| X+Y
|
Buttons X and Y must be input simultaneously.
|
| X/Y
|
Either the X or Y input can be used.
|
| X~Y
|
This notation has two meanings.
- Use attack X with Y follow-up input.
- Input X then within a few frames, input Y. Usually used for option selects.
|
| X(w)
|
X input must not hit the opponent (Whiff).
|
| j.X
|
X input is done in the air, implies a jump/jump cancel if the previous move was done from the ground.
Applies to all air chain sections:
- Assume a forward jump cancel if no direction is given.
- Air chains such as j.A > j.B > j.C can be shortened to j.ABC.
|
| sj.X
|
X input is done after a super jump. Notated as sj8.X and sj9.X for neutral and forward super jumps respectively.
|
| dj.X
|
X input is done after a double jump.
|
| sdj.X
|
X input is done after a double super jump.
|
| tk.X
|
Stands for Tiger Knee. X motion must be buffered before jumping, inputting the move as close to the ground as possible. (ex. tk.236A)
|
| (X)
|
X is optional. Typically the combo will be easier if omitted.
|
| [X]
|
Input X is held down. Also referred to as Blowback Edge (BE). Depending on the character, this can indicate that this button is held down and not released until indicated by the release notation.
|
| ]X[
|
Input X is released. Will only appear if a button is previously held down. This type of input is referred to as Negative Edge.
|
| {X}
|
Button X should only be held down briefly to get a partially charged version instead of the fully charged one.
|
| X(N)
|
Attack "X" should only hit N times.
|
| (XYZ)xN
|
XYZ string must be performed N times. Combos using this notation are usually referred to as loops.
|
| (XYZ^)
|
A pre-existing combo labelled XYZ is inserted here for shortening purposes.
|
| CH
|
The first attack must be a Counter Hit.
|
| Air CH
|
The first attack must be a Counter Hit on an airborne opponent.
|
| 66
|
Performs a ground forward dash.
|
| j.66
|
Performs an aerial forward dash, used as a cancel for certain characters' air strings.
|
| IAD/IABD
|
Performs an Instant AirDash.
|
| AT
|
Performs an Air Throw. (j.6/4A+D)
|
| IH
|
Performs an Initiative Heat.
|
| AD
|
Performs an Arc Drive.
|
| AAD
|
Performs an Another Arc Drive.
|
Starters
xx = whatever starter, EX: 2A > 5B > 2B
Enders
The primary way to get a knockdown midscreen, and to get extra damage.
Use this midscreen to preserve meter or in the corner to maintain pressure. Will sometimes need to use j.22C to reach them. Falling with j.B after will catch techs in the corner.
- j.236C, land 41236C(Arc Drive)
Will not work with certain combos (usually ones that require a super jump), but will give great corner carry and can result in safe heat and a mixup. Do either heat dash 214B/C or sj into a falling j.214C. (falling j.214c gives more advantage)
Safe heat.
When you want to force an air tech. Used primarily when you don’t have meter.
Only use to kill, is punishable on hit.
Ground Ender
Note: These are after 2C ender
Nero summon that hits meaty
Gives enough time for throw, can be used for other mixups as well
Nanaya will hit meaty
Doesn’t fit in well here but nowhere else to put it. Done when you don’t have enough MAX meter to do j.236c land Arc Drive or the combo wont allow you to do so. Generally you want to do it on the last hit before you jump.
Normal Combos
Refer to Starters and Enders when performing these combos.
| Condition
|
Notation
|
Damage
vs V.Sion
|
Notes
|
|
| Normal starter, grounded opponent
|
- xx 2C > 5C(1-2) > j.CB > dj.C > Ender
|
???
|
| |
| Meter Gained: ??? |
Meter Given (vs C-Moon): ??? |
| The bread and butter you will never stop using. Primary way to confirm from far away. |
|
|
| Normal starter, grounded opponent
|
- xx 2C > 6C > j.C > dj.C > Ender
|
???
|
| |
| Meter Gained: ??? |
Meter Given (vs C-Moon): ??? |
| Basic BnB that you will probably want to phase out with more advanced combos. |
|
|
| Normal starter, grounded opponent
|
- xx 6[C] > j.C > dj.C Ender
|
???
|
| |
| Meter Gained: ??? |
Meter Given (vs C-Moon): ??? |
| Easiest way to confirm 6[C] |
|
|
| Normal starter, grounded opponent
|
- xx 6[C] > 2A > delay 2B > 6C > j8.C > dj.C > Ender
|
???
|
| |
| Meter Gained: ??? |
Meter Given (vs C-Moon): ??? |
| Slightly harder, but much better. The 2A is to continue pressure if they block, it’s not necessary but is good. |
|
|
| 5[C] starter, grounded opponent
|
- 5[C] > 2C > 5[C] > 6[C] > j.2C
|
???
|
| |
| Meter Gained: ??? |
Meter Given (vs C-Moon): ??? |
| Way to confirm off of 5[C] with a j.2C ender. Can also sj j.C j.C for damage. Can be done from halfscreen because 5[C] pushes you forward slightly. |
|
|
| 214A starter, grounded opponent
|
- 214A > j.AB > dj.C > Ender
|
???
|
| |
| Meter Gained: ??? |
Meter Given (vs C-Moon): ??? |
| Basic 214A confirm |
|
|
| 22X starter, grounded opponent
|
- 22X > sj9.B > dj.C > Ender
|
???
|
| |
| Meter Gained: ??? |
Meter Given (vs C-Moon): ??? |
| Basic confirm for random drill hits. You can also arc drive after 22X. |
|
|
| Raw Airthrow starter
|
- Raw AT, land 2C > 6C > j.C > dj.C > Ender
|
???
|
| |
| Meter Gained: ??? |
Meter Given (vs C-Moon): ??? |
| Basic raw AT confirm. |
|
|
| Raw Airthrow starter
|
- Raw AT > j9 > (falling) j.C, 2C(1) > 5[C] > 6[C] > j8.BC > dj.C > Ender
|
???
|
| |
| Meter Gained: ??? |
Meter Given (vs C-Moon): ??? |
| Midscreen advanced, possibly character specific. |
|
|
| CH 214A starter
|
- CH 214A, 2C > 5C > 6C > j8.C > dj.C > Ender
|
???
|
| |
| Meter Gained: ??? |
Meter Given (vs C-Moon): ??? |
| Counterhit 214A confirm, does a lot more than the basic confirm. |
|
|
TK Katto(j.236A) Routes
Note: TK Katto hits certain characters at different ranges. They are mostly universal, but are easier to confirm on some characters.
| Condition
|
Notation
|
Damage
vs V.Sion
|
Notes
|
|
| Normal starter, grounded opponent
|
- xx 2C > j.236A, land 2B > 2C > 22[A], sj.AC > dj.C > Ender
|
???
|
| |
| Meter Gained: ??? |
Meter Given (vs C-Moon): ??? |
| Basic TK Katto combo, you do 2369A to get the jumping version of the special. The super jump is done instead of the dash so you can jump back and do a j.421C ender. Miscreen only. |
|
|
| Normal starter, grounded opponent
|
- xx 2C > j.236A, land 2B > 2C > 5[C] > 6[C] > 2A(w) > j.AB > dj.C > Ender
|
???
|
| |
| Meter Gained: ??? |
Meter Given (vs C-Moon): ??? |
| Midscreen near corner, very high damage for C-Wara. |
|
|
| Normal starter, grounded opponent
|
- xx 2C > j.236A, land 2B > 2C > 5[C] > 22B/[B], 66 j.B > dj.C > Ender
|
???
|
| |
| Meter Gained: ??? |
Meter Given (vs C-Moon): ??? |
| Midscreen near (but a bit too far for 6[C]) corner. |
|
|
| Normal starter, grounded opponent
|
- xx 2C > j.236A, land 2B > 2C > 5[C] > 2A(w) > Heat
|
???
|
| |
| Meter Gained: ??? |
Meter Given (vs C-Moon): ??? |
| Safe heat with only 100 meter. |
|
|
| Normal starter, grounded opponent
|
- xx 2C > j.236A, land 2B > 2C > Ground Ender
|
???
|
| |
| Meter Gained: ??? |
Meter Given (vs C-Moon): ??? |
| Sacrifices a lot of damage for oki. |
|
|
| Normal starter, grounded opponent
|
- xx 2C > j.236A, land 2B > 2C > 5[C] > 2C > Ground Ender
|
???
|
| |
| Meter Gained: ??? |
Meter Given (vs C-Moon): ??? |
| Near corner version that sacrifices less damage for oki. |
|
|
| Normal starter, grounded opponent
|
- xx 2C > j.236A, land 2B > 2C > 22A, 66 sj.AB(2) > j.22C > j.A(A) > dj.AB(2) > j.22C > AT
|
???
|
| |
| Meter Gained: ??? |
Meter Given (vs C-Moon): ??? |
| Optimal meterless corner to corner katto combo. Incredibly hard. |
|
|
Corner Combos
| Condition
|
Notation
|
Damage
vs V.Sion
|
Notes
|
|
| Normal starter, grounded opponent, 100% meter
|
- xx 2C > 236C, 2C > 5[C] > 6[C] > j.2C
|
???
|
| |
| Meter Gained: ??? |
Meter Given (vs C-Moon): ??? |
| Metered corner combo, j.2C ender allows enough time to do 214B and have a fairly strong strike throw mixup. Once you learn your 236A confirms, 236C combos should only be done from far away. |
|
|
| Normal starter, grounded opponent, 100% meter
|
- xx 2C > 236C, 2C > 5[C] > 6[C] > j8.C > dj.C > Ender
|
???
|
| |
| Meter Gained: ??? |
Meter Given (vs C-Moon): ??? |
| Metered corner combo for damage. If you’re in Max and want to Arc Drive, do it after 6[C]. |
|
|
| Normal starter, grounded opponent, 100% meter
|
|
???
|
| |
| Meter Gained: ??? |
Meter Given (vs C-Moon): ??? |
| Corner. Sacrifices a lot of damage for oki. Can do a sandoori by superjumping forward and then you can either land, air backdash j.B, or air backdash land 2A. |
|
|
| Raw Airthrow starter
|
- Raw AT, land 2C > 2B > 5B > sj.C > dj.C > Ender
|
???
|
| |
| Meter Gained: ??? |
Meter Given (vs C-Moon): ??? |
| Corner version, does slightly more damage |
|
|
| Raw Airthrow starter
|
- Raw AT > j.9 (falling) j.C, land 2C(1) > 5[C] > 22B, 66 sj.BC > dj.C > Ender
|
???
|
| |
| Meter Gained: ??? |
Meter Given (vs C-Moon): ??? |
| Very advanced corner version |
|
|
Corner 236A/j.236A routes
Note: Different characters have different ranges you can do this from, and also they determine how good your 2C(1) > 236A has to be. Can’t be too close or 2C won’t hit, can’t be too far away or 5A won’t hit.
| Condition
|
Notation
|
Damage
vs V.Sion
|
Notes
|
|
| Normal starter, grounded opponent
|
- xx 2C(1) > 236A, 5A > 2C > 5[C] > 6[C] > j8.C > dj.B(1) > j.421C, IAD j.C(w)
|
???
|
| |
| Meter Gained: ??? |
Meter Given (vs C-Moon): ??? |
| This sets up a left right mixup in the corner, side is determined by if you delay 6[C] at all. You can also just do j.C > dj.C ender for damage, but you lose minimal damage for the mixup so there's little reason to not go for it. Make sure you do dj.B(1) immediately or you won’t ever switch sides. |
|
|
| Normal starter, grounded opponent
|
- xx 2C(1) > 236A, 5A > 2C > 5[C] > 6[C] > j.2C
|
???
|
| |
| Meter Gained: ??? |
Meter Given (vs C-Moon): ??? |
| Meterless j.2C ender. |
|
|
| Normal starter, grounded opponent
|
- xx 2C(1) > 236A, 5A > 2C(1) > j.236A, land 2B > 623B, j.AB(1) > dj.C > Ender
|
???
|
| |
| Meter Gained: ??? |
Meter Given (vs C-Moon): ??? |
| Meterless damage, but the damage difference is very minor from the first combo. Looks a lot cooler though! |
|
|
| Corner starter, grounded opponent
|
- xx 2C > j.236A, 5A 623B, j.AC > dj7.C > j.421C/j.22C/AT
|
???
|
| |
| Meter Gained: ??? |
Meter Given (vs C-Moon): ??? |
| A TK katto route in the corner. |
|
|
| Normal starter, grounded opponent
|
- xx 2C > j.236A, land (microwalk back) 5A > 2C(1) > 2A(w) > 236A, 5A > 2C > 5[C] > 6[C] > 2A(w) > j.AB > dj.C > Ender
|
???
|
| |
| Meter Gained: ??? |
Meter Given (vs C-Moon): ??? |
| Character specific corner combo for damage. Builds a huge amount of meter. |
|
|
| Normal starter, grounded opponent, 100% meter
|
- xx 2C > j.236A, land (microwalk back) 5A > 2C(1) > 2A(w) > 236A, 5A > 2C > 236C, 2C
|
???
|
| |
| Meter Gained: ??? |
Meter Given (vs C-Moon): ??? |
| Character specific and difficult corner combo. A lot of delays so they are at the perfect height when you do 236C, 2C. |
|
|
Move Descriptions
| Frame Data Help
|
| Header
|
Tooltip
|
| Move Box Colors
|
Light gray = Collision Box (A move lacking one means it can go through the opponent's own collision box).
Green: Hurt Boxes.
Red: Hit(/Grab) Boxes.
Yellow: Clash Boxes (When an active hitbox strikes a clash box, the active hitbox stops being active. Multi-hit attacks can beat clash since they will still progress to the next hitbox.)
Magenta: Projectile-reflecting boxes OR Non-hit attack trigger boxes (usually).
Blue: Reflectable Projectile Boxes.
|
| Damage
|
Base damage done by this attack.
(X) denotes combined and scaled damage tested against standing V. Sion.
|
| Red Damage
|
Damage done to the recoverable red health bar by this attack. The values are inherently scaled and tested against standing V. Sion.
(X) denotes combined damage.
|
| Proration
|
The correction value set by this attack and the way it modifies the scaling during a string. See this page for more details.
X% (O) means X% Overrides the previous correction value in a combo if X is of a lower percentage.
X% (M) means the current correction value in a combo will be Multiplied by X%. This can also be referred to as relative proration.
|
| Circuit
|
Meter gained by this attack on hit.
(X%) denotes combined meter gain.
-X% denotes a meter cost.
|
| Cancel
|
Actions this move can be cancelled into.
SE = Self cancelable.
N = Normal cancelable.
SP = Special cancelable.
CH = Cancelable into the next part of the same attack (Chain in case of specials).
EX = EX cancelable.
J = Jump cancelable.
(X) = Cancelable only on hit.
-X- = Cancelable on whiff.
|
| Guard
|
The way this move must be blocked.
L = Can block crouching
H = Can block standing.
A = Can block in the air.
U = Unblockable.
|
| Startup
|
Amount of frames that must pass prior to reaching the active frames. Also referred to as "True Startup".
|
| Active
|
The amount of frames that this move will have a hitbox.
(x) denotes frame gaps where there are no hitboxes is present. Due to varied blockstuns, (x) frames are difficult to use to determine punish windows. Generally the larger the numbers, the more time you have to punish.
X denotes active frames with a duration separate from its origin move's frame data, such as projectile attacks. In this case, the total length of the move is startup+recovery only.
|
| Recovery
|
Frames that this move has after the active frames if not canceled. The character goes into one frame where they can block but not act afterwards, which is not counted here.
|
| Advantage
|
The difference in frames where you can act before your opponent when this move is blocked (assuming the move isn't canceled and the first active frame is blocked).
If the opponent uses a move with startup that is at least 2 frames less than this move's negative advantage, it will result in the opponent hitting that move.
±x~±y denotes a range of possible advantages.
|
| Invul
|
Lists any defensive properties this move has.
X y~z denotes X property happening between the y to z frames of the animations. If no frames are noted, it means the invincibility lasts through the entire move.
Invicibility:
- Strike = Strike invincible.
- Throw = Throw invincible.
Hurtbox-Based Properties:
- Full = No hurtboxes are present.
- High = Upper body lacks a hurtbox.
- Low = Lower body lacks a hurtbox.
Miscellaneous Properties
- Clash = Frames in which clash boxes are active.
- Reflect = Frames in which projectile-reflecting boxes are active.
- Super Armor = Frames in which the character can take hits without going into hit stun.
|
Normal Moves
Standing Normals
|
|
| Damage
|
Red Damage
|
Proration
|
Cancel
|
Guard
|
| 300
|
176
|
78% (O)
|
-SE-, -N-, -SP-, -EX-, (J)
|
LH
|
| First Active
|
Active
|
Recovery
|
Frame Adv
|
Circuit
|
Invuln
|
| 4
|
3
|
9
|
0
|
3.0%
|
-
|
|
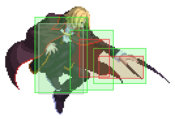
Standard 5A, hits mid. Whiffs all crouching opponents except Nero, so rarely used in pressure except as a whiff rebeat option. Sometimes useful as a fast antiair given the height and range at which it hits.
|
|
|
|
| Damage
|
Red Damage
|
Proration
|
Cancel
|
Guard
|
| 600, 450 (948)
|
(541)
|
80% (O)
|
N, SP, EX, (J)
|
LH
|
| First Active
|
Active
|
Recovery
|
Frame Adv
|
Circuit
|
Invuln
|
| 7
|
8
|
14
|
-5
|
4.0%, 3.0% (7.0%)
|
-
|
|
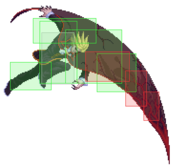
One of Wara's most useful far range pokes. 2 hits. Hits mid.
|
|
|
|
| 5C
|
Damage
|
Red Damage
|
Proration
|
Cancel
|
Guard
|
| 600, 500, 400 (1459)
|
(761)
|
100%
|
N, SP, EX, (J)
|
LH (1), LHA (2)
|
| First Active
|
Active
|
Recovery
|
Frame Adv
|
Circuit
|
Invuln
|
| 14
|
9
|
13
|
2
|
4.0%*3 (12.0%)
|
-
|
|
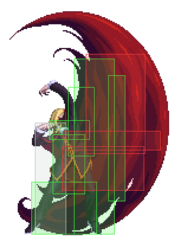
Wara's biggest poke which is useful for catching people off guard from far away. Its main utility however is as a far range combo tool as you can combo from max range 2C 5C on most characters (Few exceptions). First hit is air unblockable, the last two are air blockable. 3 hits. Hits mid.
|
| 5[C]
|
Damage
|
Red Damage
|
Proration
|
Cancel
|
Guard
|
| 600*3 (1342)
|
(656)
|
65%*2 (O), 90% (M)
|
N, SP, EX, (J)
|
LH
|
| First Active
|
Active
|
Recovery
|
Frame Adv
|
Circuit
|
Invuln
|
| 20
|
9
|
12
|
4
|
4.0%*3 (12.0%)
|
-
|
|
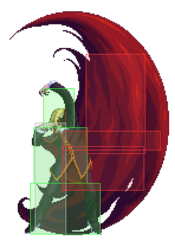
The charged version wallslams on hit and moves Wara forward a bit. Used more as a combo tool but it does have a slightly improved hurtbox. All three hits are air unblockable. 3 hits. Hits mid.
(Interesting to note is that letting 5C recover is actually plus on block)
|
|
Crouching Normals
|
|
| Damage
|
Red Damage
|
Proration
|
Cancel
|
Guard
|
| 300
|
147
|
76% (O)
|
-SE-, -N-, -SP-, -EX-, (J)
|
L
|
| First Active
|
Active
|
Recovery
|
Frame Adv
|
Circuit
|
Invuln
|
| 5
|
3
|
10
|
-1
|
3.0%
|
-
|
|
A somewhat long 2A poke. It's one of the slowest in the game. Needless to say, you don't want to mash out with this move often. Hits low.
|
|
|
|
| Damage
|
Red Damage
|
Proration
|
Cancel
|
Guard
|
| 750
|
470
|
80% (O)
|
N, SP, EX, (J)
|
LH
|
| First Active
|
Active
|
Recovery
|
Frame Adv
|
Circuit
|
Invuln
|
| 7
|
6
|
19
|
-10
|
8.0%
|
Clash 8-13
|
|
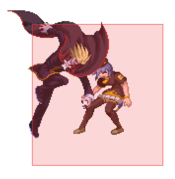
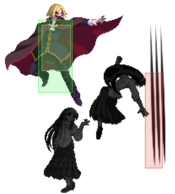
Wara's main anti air. Useful for anti airing people directly above him, not good against people coming in at a angle. There is a clash frame on this move that is useful for OSing against heats and some held shield counters. As of Current Code, it regains its Act Cadenza hitbox where it'll hit behind him as well. Hits mid.
|
|
|
|
| 2C
|
Damage
|
Red Damage
|
Proration
|
Cancel
|
Guard
|
| 800, 400 (1131)
|
(706)
|
65% (O)
|
N, SP, EX, (J)
|
L
|
| First Active
|
Active
|
Recovery
|
Frame Adv
|
Circuit
|
Invuln
|
| 9
|
10
|
21
|
-7
|
7.0%, 5.0% (12.0%)
|
-
|
|
A great tool used for trip anti airing and to poke from long distances. Can be confirmed from any range with 5C or dash 63214C (Red Arc Summon). 2 hits and causes untechable knockdown. Hits low.
|
| 2[C]
|
Damage
|
Red Damage
|
Proration
|
Cancel
|
Guard
|
| 100
|
98
|
100%
|
-
|
LHA
|
| First Active
|
Active
|
Recovery
|
Frame Adv
|
Circuit
|
Invuln
|
| 23
|
X
|
29
|
-9
|
5.0%
|
-
|
|
A fireball that travels in a 45 degree angle. Great as a preemptive anti air against people who like to approach at that angle.
|
|
Aerial Normals
|
|
| Damage
|
Red Damage
|
Proration
|
Cancel
|
Guard
|
| 300
|
98
|
75% (O)
|
SE, N, SP, EX, J
|
LHA
|
| First Active
|
Active
|
Recovery
|
Frame Adv
|
Circuit
|
Invuln
|
| 5
|
4
|
10
|
-
|
3.0%
|
-
|
|
Not a bad air to air poke. Hits mid.
|
|
|
|
| Damage
|
Red Damage
|
Proration
|
Cancel
|
Guard
|
| 600, 400 (967)
|
(473)
|
95%x2 (M)
|
N, SP, EX, J
|
HA
|
| First Active
|
Active
|
Recovery
|
Frame Adv
|
Circuit
|
Invuln
|
| 8
|
10
|
-
|
-
|
6.0%*2 (12.0%)
|
-
|
|
Wara's most useful poke. This is a GREAT air to air move that should beat almost everything at max range. 2 hits. Hits high.
|
|
|
|
| Damage
|
Red Damage
|
Proration
|
Cancel
|
Guard
|
| 400*3 (1162)
|
(682)
|
100%
|
N, SP, EX, J
|
HA
|
| First Active
|
Active
|
Recovery
|
Frame Adv
|
Circuit
|
Invuln
|
| 12
|
8
|
-
|
-
|
6.0%*3 (18.0%)
|
-
|
|
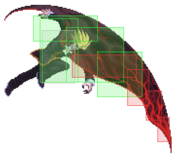
Wara's air to ground move. Great at an angle. It cannot be cancelled until the third hit (You can't even jump cancel it till the third hit!). You can only combo into 2C if you hit with this move at max range. 3 hits. Hits high.
|
|
Command Normals
|
|
| 6C
|
Damage
|
Red Damage
|
Proration
|
Cancel
|
Guard
|
| 1000
|
686
|
75% (O)
|
N, SP, EX, (J)
|
LHA
|
| First Active
|
Active
|
Recovery
|
Frame Adv
|
Circuit
|
Invuln
|
| 15
|
7
|
19
|
-8
|
13.0%
|
-
|
|
One of Wara's main launchers. Air blockable. Hits mid.
|
| 6[C]
|
Damage
|
Red Damage
|
Proration
|
Cancel
|
Guard
|
| 1500
|
980
|
60% (O)
|
N, SP, EX, (J)
|
H
|
| First Active
|
Active
|
Recovery
|
Frame Adv
|
Circuit
|
Invuln
|
| 28
|
7
|
14
|
-3
|
15.0%
|
-
|
|
One of Wara's overheads. Unlike uncharged 6C, it is air unblockable. Normally this overhead would not be scary but it can be partial charged and cancelled into low 2A. On hit causes greater untech time than 6C.
|
|
|
|
| Damage
|
Red Damage
|
Proration
|
Cancel
|
Guard
|
| 1000
|
588
|
60% (O)
|
-
|
HA
|
| First Active
|
Active
|
Recovery
|
Frame Adv
|
Circuit
|
Invuln
|
| 21
|
2
|
-
|
-
|
11.0%
|
-
|
|
Wara stops briefly in the air then does an attack that looks like j.C before falling to the floor. This move is advantage on block if TK'd close enough to the ground. Not very useful as an "instant" overhead because it is so slow, but useful for baiting throw tech OS as well as resetting pressure. 1 hit. Hits high.
|
|
Universal Mechanics
|
|
| Damage
|
Red Damage
|
Proration
|
Cancel
|
Guard
|
| 1300
|
588
|
60%
|
-
|
U
|
| First Active
|
Active
|
Recovery
|
Frame Adv
|
Circuit
|
Invuln
|
| 2
|
1
|
20
|
-
|
0.0%
|
-
|
|
Wara cloaks the opponent and makes them fall from the top of the screen. Untechable knockdown.
|
|
|
|
| Damage
|
Red Damage
|
Proration
|
Cancel
|
Guard
|
| 1600 (Raw)/1200
|
490
|
30%
|
(Any if Raw)
|
U
|
| First Active
|
Active
|
Recovery
|
Frame Adv
|
Circuit
|
Invuln
|
| 1
|
1
|
12
|
-
|
0.0%
|
-
|
|
Standard type of grab and slash air throw.
|
|
|
|
| Bunker
|
Damage
|
Red Damage
|
Proration
|
Cancel
|
Guard
|
| 500
|
196
|
50%
|
-
|
LHA
|
| First Active
|
Active
|
Recovery
|
Frame Adv
|
Circuit
|
Invuln
|
| 25
|
4
|
19
|
-5
|
0.0%
(-50.0% in blockstun)
|
Clash 1-10
|
| (Clash)
|
Damage
|
Red Damage
|
Proration
|
Cancel
|
Guard
|
| 500
|
196
|
50%
|
-
|
LHA
|
| First Active
|
Active
|
Recovery
|
Frame Adv
|
Circuit
|
Invuln
|
| 7
|
4
|
19
|
-5
|
0.0%/-50.0%
|
Strike 1-7
|
|
A 6C with extended hurtboxes.
|
|
|
|
| Damage
|
Red Damage
|
Proration
|
Cancel
|
Guard
|
| 100
|
0
|
100%
|
-
|
U
|
| First Active
|
Active
|
Recovery
|
Frame Adv
|
Circuit
|
Invuln
|
| 20
|
8
|
25
|
-
|
-100.0% (min)
|
Full 1-28
|
|
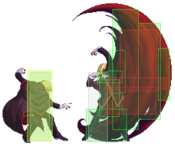
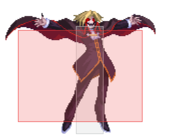
This is the largest Heat hitbox in the game, though most of that reach is behind him. Tied for second longest Heat startup with V.Sion and Aoko.
|
|
|
|
| Ground
|
Damage
|
Red Damage
|
Proration
|
Cancel
|
Guard
|
| 100
|
0
|
100%
|
-
|
U
|
| First Active
|
Active
|
Recovery
|
Frame Adv
|
Circuit
|
Invuln
|
| 10
|
10
|
20
|
-
|
removes all
|
Full 1-39
|
| Air
|
Damage
|
Red Damage
|
Proration
|
Cancel
|
Guard
|
| 100
|
0
|
100%
|
-
|
U
|
| First Active
|
Active
|
Recovery
|
Frame Adv
|
Circuit
|
Invuln
|
| 11
|
10
|
15
|
-
|
removes all
|
Strike 1-30
|
|
Universal burst mechanic. Unlike Crescent/Full Heat activation, the hitbox and frame data doesn't vary between characters. However, you can be thrown out of this move if you input it in the air.
|
|
Special Moves
Grounded Specials
|
|
| A
|
Damage
|
Red Damage
|
Proration
|
Cancel
|
Guard
|
| 500x3 (1452)
|
(711)
|
100%
|
-EX-
|
LHA (1), HA (2, Whiffs vs. Crouch.)
|
| First Active
|
Active
|
Recovery
|
Frame Adv
|
Circuit
|
Invuln
|
| 10
|
3
|
27
|
-6 ~ 8
|
6.0%x3 (18.0%)
|
-
|
- A forward claw move that hits 3 times. Each has its own special property.
A quick forward claw that is even/advantageous on block. However, it whiffs over crouchers completely making it useless except in combos near the corner on standing opponents.
|
| B
|
Damage
|
Red Damage
|
Proration
|
Cancel
|
Guard
|
| 700*3 (2034)
|
(909)
|
100%
|
-EX-
|
LHA
|
| First Active
|
Active
|
Recovery
|
Frame Adv
|
Circuit
|
Invuln
|
| 17
|
3
|
36
|
-7 ~ -1
|
7.5%*3 (22.5%)
|
-
|
|
A larger version of 236A except it hits crouchers. Minus on block but still EX cancelable anytime.
|
| EX
|
Damage
|
Red Damage
|
Proration
|
Cancel
|
Guard
|
| 620*6 (2728)
|
(1507)
|
95%*6 (M)
|
-
|
LHA
|
| First Active
|
Active
|
Recovery
|
Frame Adv
|
Circuit
|
Invuln
|
| 4+14
|
6
|
52
|
1
|
-100.0%
|
Full 1-16
|
|
The most useful version of this move, used primarily as a combo tool near the corner. Causes wallslam and is also advantageous on block; HOWEVER, it is easily bunkerable by all moons. Can be used as a ghetto reversal which pushes opponents away from you. OTG relaunches.
|
|
|
|
| A
|
Damage
|
Red Damage
|
Proration
|
Cancel
|
Guard
|
| 1300
|
980
|
70% (O)
|
-
|
LH
|
| First Active
|
Active
|
Recovery
|
Frame Adv
|
Circuit
|
Invuln
|
| 15
|
4
|
20
|
-6
|
10.0%
|
High 1-16
|
|
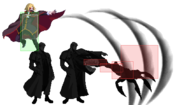
An one hit upwards claw attack that has some upper body invuln. Useful as a situational anti air. 1 Hit. Air unblockable mid.
|
| B
|
Damage
|
Red Damage
|
Proration
|
Cancel
|
Guard
|
| 800*3 (1947)
|
(1190)
|
90%*3 (M)
|
-
|
LHA
|
| First Active
|
Active
|
Recovery
|
Frame Adv
|
Circuit
|
Invuln
|
| 15
|
2 (2) 1
|
21
|
-4
|
8.0%*3 (24.0%)
|
-
|
|
A three hit upwards claw attack that can be combo'd into j.A. Not useful for anything else. 3 hits. Air blockable mid.
|
| EX
|
Damage
|
Red Damage
|
Proration
|
Cancel
|
Guard
|
| 650*6 (2547)
|
(1341)
|
90%*6 (M)
|
-
|
LH
|
| First Active
|
Active
|
Recovery
|
Frame Adv
|
Circuit
|
Invuln
|
| 1+8
|
6
|
38
|
-21
|
-100.0%
|
Full 1-10, High 11-13
|
|
Wara's only "decent" reversal. Heavily minus on block, and frankly, should not be used often. 6 hits. Air unblockable mid.
|
|
|
|
| A
|
Damage
|
Red Damage
|
Proration
|
Cancel
|
Guard
|
| 800
|
441
|
80% (O)
|
-
|
HA
|
| First Active
|
Active
|
Recovery
|
Frame Adv
|
Circuit
|
Invuln
|
| 35
|
2
|
18
|
5
|
7.0%
|
-
|
- Depending on the strength used, will summon either Akiha, Nanaya, or Nero.
Summons Akiha to do her 623B. Hits high and ground bounces on hit.
|
| B
|
Damage
|
Red Damage
|
Proration
|
Cancel
|
Guard
|
| -
|
-
|
-
|
-
|
-
|
| First Active
|
Active
|
Recovery
|
Frame Adv
|
Circuit
|
Invuln
|
| -
|
-
|
36
|
-
|
-
|
-
|
| (Nanaya)
|
Damage
|
Red Damage
|
Proration
|
Cancel
|
Guard
|
| 1200
|
637
|
80% (O)
|
-
|
LHA
|
| First Active
|
Active
|
Recovery
|
Frame Adv
|
Circuit
|
Invuln
|
| 57
|
3
|
-
|
-
|
10.0%
|
-
|
|
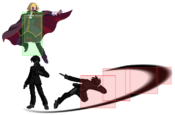
Summons Nanaya to do his 214B. Useful as a zoning tool and for summon mixup. Hits mid and launches on hit.
|
| C
|
Damage
|
Red Damage
|
Proration
|
Cancel
|
Guard
|
| -
|
-
|
-
|
-
|
-
|
| First Active
|
Active
|
Recovery
|
Frame Adv
|
Circuit
|
Invuln
|
| -
|
49
|
-
|
-
|
-
|
-
|
| (Nero)
|
Damage
|
Red Damage
|
Proration
|
Cancel
|
Guard
|
| 1600
|
1176
|
80% (O)
|
-
|
LH
|
| First Active
|
Active
|
Recovery
|
Frame Adv
|
Circuit
|
Invuln
|
| 74
|
3
|
-
|
-
|
14.0%
|
-
|
|
Summons Nero to do a one hit version of his 63214C. Useful as a summon mixup. Hits mid and is air unblockable.
|
|
|
|
| A
|
Damage
|
Red Damage
|
Proration
|
Cancel
|
Guard
|
| -
|
-
|
-
|
-
|
-
|
| First Active
|
Active
|
Recovery
|
Frame Adv
|
Circuit
|
Invuln
|
| -
|
-
|
26
|
-
|
-
|
Full 7-20
|
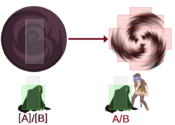
- A teleport with little usage. Should not really be used at all, except in a few mixups.
As of Current Code, this now teleports slightly backwards. Has shortest recovery.
|
| B
|
Damage
|
Red Damage
|
Proration
|
Cancel
|
Guard
|
| -
|
-
|
-
|
-
|
-
|
| First Active
|
Active
|
Recovery
|
Frame Adv
|
Circuit
|
Invuln
|
| -
|
-
|
35
|
-
|
-
|
Full 7-20
|
|
Teleports a little forward.
|
| C
|
Damage
|
Red Damage
|
Proration
|
Cancel
|
Guard
|
| -
|
-
|
-
|
-
|
-
|
| First Active
|
Active
|
Recovery
|
Frame Adv
|
Circuit
|
Invuln
|
| -
|
-
|
41
|
-
|
-
|
Full 7-20
|
|
Teleports far forward. Longest recovery.
|
|
Invite Hell Invite Hell
|
| A
|
Damage
|
Red Damage
|
Proration
|
Cancel
|
Guard
|
| 250*9 (1753)
|
(1375)
|
100%
|
-EX-
|
LHA
|
| First Active
|
Active
|
Recovery
|
Frame Adv
|
Circuit
|
Invuln
|
| 24
|
X
|
18
|
-7
|
2.0%*9 (18.0%)
|
-
|
| [A]
|
Damage
|
Red Damage
|
Proration
|
Cancel
|
Guard
|
| 250*9 (1753)
|
(1375)
|
100%
|
-EX-
|
LHA
|
| First Active
|
Active
|
Recovery
|
Frame Adv
|
Circuit
|
Invuln
|
| 23
|
X
|
21
|
-7
|
2.0%*9 (18.0%)
|
-
|
- One of Wara's most useful zoning tools. Each meterless version creates a tornado at one of four different positions depending on the button and charged/uncharged, with the hitbox starting low to the ground and then growing until it reaches high into the air. A and B version of this move are all EX cancellable, meaning you can also confirm into arc drive knockdown.
If the first hit of meterless 22X connects on hit or block, Wara enters an animation cycle while the remaining hitboxes are active and then recovers. If it whiffs, Wara will enter recovery immediately and become actionable as the active frames end. This leads to very good frame advantage on hit and block (~+15) if 22X hits meaty.
A version summons a tornado right in front of you. The charged version goes ahead a little further. Can also be used as a combo tool during TK j.236A combos. 9 hits. Hits mid.
|
| B
|
Damage
|
Red Damage
|
Proration
|
Cancel
|
Guard
|
| 250*9 (1753)
|
(1375)
|
100%
|
-EX-
|
LHA
|
| First Active
|
Active
|
Recovery
|
Frame Adv
|
Circuit
|
Invuln
|
| 24
|
X
|
20
|
-9
|
2.0%*9 (18.0%)
|
-
|
| [B]
|
Damage
|
Red Damage
|
Proration
|
Cancel
|
Guard
|
| 250*9 (1753)
|
(1375)
|
100%
|
-EX-
|
LHA
|
| First Active
|
Active
|
Recovery
|
Frame Adv
|
Circuit
|
Invuln
|
| 23
|
X
|
23
|
-9
|
2.0%*9 (18.0%)
|
-
|
|
B version summons a tornado a little further than 22[A]. 22[B] hits even further out. Can be used as a combo tool after 5[C]. 9 hits. Hits mid.
|
| EX
|
Damage
|
Red Damage
|
Proration
|
Cancel
|
Guard
|
| 250*N
|
98*N
|
100%
|
-
|
LHA
|
| First Active
|
Active
|
Recovery
|
Frame Adv
|
Circuit
|
Invuln
|
| 6+11
|
X
|
44
|
-8
|
-100.0%
|
-
|
|
Summons a huge tornado that hits up to 12 times while moving forward. Primarily used as a pressure reset tool after 236B. Can be plus on block if spaced. Easily bunkered, but this is risky for the opponent if set up correctly. Hits mid.
|
|
|
|
| EX
|
Damage
|
Red Damage
|
Proration
|
Cancel
|
Guard
|
| -
|
-
|
-
|
-
|
-
|
| First Active
|
Active
|
Recovery
|
Frame Adv
|
Circuit
|
Invuln
|
| -
|
-
|
2+55
|
-
|
-150.0%
|
-
|
| (Red Arcueid)
|
Damage
|
Red Damage
|
Proration
|
Cancel
|
Guard
|
| 200*4, 1800*2 (3550)
|
(2271)
|
100%*4, 80% (M), 60% (M)
|
-
|
LHA
|
| First Active
|
Active
|
Recovery
|
Frame Adv
|
Circuit
|
Invuln
|
| 2+1
|
13 (10) X (17) X
|
-
|
-
|
-
|
-
|
|
Uses 150% meter to summon Red Arcueid to do her 214B attack. However the rings go full screen. At certain ranges can be combo'd into ground throw near the corner. Advantage on block. Some Wara's like to cancel 22X/236B into this summon while in max mode for extra pressure during a blockstring. The initial summon is 4 hits, and the rings afterwards are 2 hits. Hits mid. OTG relaunches.
|
|
Aerial Specials
|
|
| A
|
Damage
|
Red Damage
|
Proration
|
Cancel
|
Guard
|
| 500*3 (1165)
|
(570)
|
70% (O)
|
-
|
LHA (1), HA (2, Whiffs vs. Crouch.)
|
| First Active
|
Active
|
Recovery
|
Frame Adv
|
Circuit
|
Invuln
|
| 15
|
3
|
13
|
2 ~ 14
|
6.0%*3 (18.0%)
|
-
|
- Air version of forward claws. Hits 3 times and mid.
Used as a combo tool in TK j.236A combos.
|
| B
|
Damage
|
Red Damage
|
Proration
|
Cancel
|
Guard
|
| 700*2 (1174)
|
(525)
|
70% (O)
|
-EX-
|
LHA
|
| First Active
|
Active
|
Recovery
|
Frame Adv
|
Circuit
|
Invuln
|
| 16
|
3
|
13
|
-24 (TK)
|
7.5%*2 (15.0%)
|
-
|
|
A great zoning tool that doesn't put Wara in danger. Has great range and is plus on block while falling. This move should never be used as a TK or while rising from a jump.
|
| EX
|
Damage
|
Red Damage
|
Proration
|
Cancel
|
Guard
|
| 620*3 (1326)
|
(732)
|
70% (O), 95%x2 (M)
|
-
|
LHA
|
| First Active
|
Active
|
Recovery
|
Frame Adv
|
Circuit
|
Invuln
|
| 1+15
|
6
|
12
|
18 (TK)
|
-100.0%
|
Full 1-2
|
|
Plus on block and used primarily to combo into Arc Drive. Wall slams on hit.
|
|
|
|
| A
|
Damage
|
Red Damage
|
Proration
|
Cancel
|
Guard
|
| -
|
-
|
-
|
-
|
-
|
| First Active
|
Active
|
Recovery
|
Frame Adv
|
Circuit
|
Invuln
|
| -
|
-
|
20
|
-
|
-
|
-
|
| (Akiha)
|
Damage
|
Red Damage
|
Proration
|
Cancel
|
Guard
|
| 800
|
441
|
80% (O)
|
-
|
LHA
|
| First Active
|
Active
|
Recovery
|
Frame Adv
|
Circuit
|
Invuln
|
| 51
|
2
|
-
|
-
|
7.0%
|
-
|
- Same as the ground version of 214X with slightly different properties and is more plus the lower you do it to the ground. SHOULD NEVER BE TK'D OR DONE WHILE RISING OR YOU WILL BE IN HEAVY RECOVERY.
Same as before but does not hit overhead. It gives a lot of advantage on block if done close to the ground.
|
| B
|
Damage
|
Red Damage
|
Proration
|
Cancel
|
Guard
|
| -
|
-
|
-
|
-
|
-
|
| First Active
|
Active
|
Recovery
|
Frame Adv
|
Circuit
|
Invuln
|
| -
|
-
|
20
|
-
|
-
|
-
|
| (Nanaya)
|
Damage
|
Red Damage
|
Proration
|
Cancel
|
Guard
|
| 1200
|
637
|
80% (O)
|
-
|
LHA
|
| First Active
|
Active
|
Recovery
|
Frame Adv
|
Circuit
|
Invuln
|
| 80
|
3
|
-
|
-
|
10.0%
|
-
|
|
Same as ground version.
|
| C
|
Damage
|
Red Damage
|
Proration
|
Cancel
|
Guard
|
| -
|
-
|
-
|
-
|
-
|
| First Active
|
Active
|
Recovery
|
Frame Adv
|
Circuit
|
Invuln
|
| -
|
-
|
20
|
-
|
-
|
-
|
| (Nero)
|
Damage
|
Red Damage
|
Proration
|
Cancel
|
Guard
|
| 1600
|
1176
|
80% (O)
|
-
|
LHA
|
| First Active
|
Active
|
Recovery
|
Frame Adv
|
Circuit
|
Invuln
|
| 86
|
3
|
-
|
-
|
14.0%
|
-
|
|
Same as ground version but air blockable. Ideal to use after a Arc Drive combo.
|
|
|
|
A
/ [A]
|
Damage
|
Red Damage
|
Proration
|
Cancel
|
Guard
|
| 350*N
|
196*N
|
100%
|
-
|
LHA
|
| First Active
|
Active
|
Recovery
|
Frame Adv
|
Circuit
|
Invuln
|
| 12
|
17~48
|
53~54
/ 73~74
|
-
|
3.0%*N
|
Full 9-X
|
B
/ [B]
|
Damage
|
Red Damage
|
Proration
|
Cancel
|
Guard
|
| 280*N
|
147*N
|
100%
|
-
|
LHA
|
| First Active
|
Active
|
Recovery
|
Frame Adv
|
Circuit
|
Invuln
|
| 12
|
19~66
|
61~62
/ 81~82
|
-
|
1.5%*N
|
Full 9-X
|
- EX is used as a ender in combos; A/B versions should never be used except to kill.
Combo enders. If you do this move by accident and they block it, hold the button after doing it, you will appear at the same horizontal position as you started from instead of directly in front of your opponent. If you combo into it w/o killing someone you will get punished for it. Hits mid.
|
| EX
|
Damage
|
Red Damage
|
Proration
|
Cancel
|
Guard
|
| 500*N
|
392*N
|
100%
|
-
|
LHA
|
| First Active
|
Active
|
Recovery
|
Frame Adv
|
Circuit
|
Invuln
|
| 1+12
|
31~67
|
57~93
|
-
|
-100.0%
|
Full 11-X
|
|
Untechable knockdown, fantastic ender that gives you meaty and in certain cases, even lets you OTG them!
|
|
|
|
| A/B/C
|
Damage
|
Red Damage
|
Proration
|
Cancel
|
Guard
|
| -
|
-
|
-
|
-SE-*, -N-, -SP-, -EX-, -J-
|
-
|
| First Active
|
Active
|
Recovery
|
Frame Adv
|
Circuit
|
Invuln
|
| 11
|
-
|
-
|
-
|
-
|
-
|
- Fantastic neutral tool that lets you airdash forward. Its important to note that you lose your normal airdash if you use this command dash first. This can be cancelled into anything, even into a different version of this special if you haven't used your airdash beforehand.
A: Forward version that goes farther than a normal airdash. Used in some mixups and to keep up pressure.
B: Downward version, similar to F-Wara's airdash. Used as a which way mixup tool after certain enders and after throw.
C: Upward version, similar to F-Wara's normal dash. Used in some mixups and to keep up pressure.
|
|
|
|
| EX
|
Damage
|
Red Damage
|
Proration
|
Cancel
|
Guard
|
| -
|
-
|
-
|
-
|
-
|
| First Active
|
Active
|
Recovery
|
Frame Adv
|
Circuit
|
Invuln
|
| -
|
-
|
20
|
-
|
-150.0%
|
-
|
| (Red Arcueid)
|
Damage
|
Red Damage
|
Proration
|
Cancel
|
Guard
|
| 1800*2 (3194)
|
(2181)
|
80% (M), 60% (M)
|
-
|
LHA
|
| First Active
|
Active
|
Recovery
|
Frame Adv
|
Circuit
|
Invuln
|
| 1+44
|
X (17) X
|
-
|
-
|
-
|
-
|
|
Same as the ground version but does not have the initial 4 hits from the summon.
|
|
Arc Drive
|
|
| Damage
|
Red Damage
|
Proration
|
Cancel
|
Guard
|
| 100, 500*10, 4000 (3284)
|
(2507)
|
50% (O)
|
-
|
LHA
|
| First Active
|
Active
|
Recovery
|
Frame Adv
|
Circuit
|
Invuln
|
| 6+12
|
1 (1) 2 (2) 2 (2) 2 (2) 2 (2) 2 (4) 2
|
48
|
-32
|
removes all
|
Full 1-88
|
|
One of the more useful arc drives in the game. It is a multi-hitting tornado that ends in a large untechable knockdown that gives you time to setup j.214c/heat > 214b/etc. It has full invincibility from start to finish and is great for punishing moves full screen. Is unsafe on block, but it is hard to punish fullscreen.
|
|
Another Arc Drive
|
|
| Damage
|
Red Damage
|
Proration
|
Cancel
|
Guard
|
| 15020 (5014)
|
(3660)
|
-
|
-
|
LHA
|
| First Active
|
Active
|
Recovery
|
Frame Adv
|
Circuit
|
Invuln
|
| 5+11
|
2 (2) 2 (2) 2 (2) 2 (2) 2 (4) 2
|
46
|
-27
|
removes all
|
Full 1-2; 5-81
|
|
Similar to the above, adds various 214X style summons for more damage if this hits on the ground. If the opponent is already airborne, these will whiff and the resulting damage will be less than normal Arc Drive.
|
|
Last Arc
|
|
| Damage
|
Red Damage
|
Proration
|
Cancel
|
Guard
|
| 15410 (3700 ~ 7000)
|
(3000 ~ 5500)
|
50% + 50% * remaining BH time
|
-
|
U
|
| First Active
|
Active
|
Recovery
|
Frame Adv
|
Circuit
|
Invuln
|
| 6+8
|
-
|
-
|
-
|
removes all
|
Full
|
|
Performs an attack similar to j.421C, coming from both sides then finishing with a fullscreen hitbox. Circuit Breaks the opponent. One of the longer, more inescapable Last Arcs in the game. On a technical level, Wara performs two unblockable passes, first forward and then backward. If any hits from those connect, a blockable full screen hitbox comes out. To avoid and even punish, one can maneuver around the first two passes and punish wara before he recovers. Getting hit while armored will trigger the fullscreen ender, but using invulnerability or moving around them will not. The circuit break is unavoidable, however.
|
|
MBAACC Navigation
