Melty Blood/MBAACC/Shiki Nanaya/Half Moon: Difference between revisions

From Mizuumi Wiki
Jump to navigation Jump to search
mNo edit summary
mNo edit summary
Line 138: Line 138:
| width="" style="background:#E8E8E8;"| ''' <font size = "3"> Sensou・Ikka  「閃走・一鹿」 - J214ABC</font>'''
| width="" style="background:#E8E8E8;"| ''' <font size = "3"> Sensou・Ikka  「閃走・一鹿」 - J214ABC</font>'''


* '''(Description)''' - Air versions of the strike kicks. All of them hit mid/air blockable and are generally unsafe to use on hit.
* '''(Description)''' - Air versions of the strike kicks. All of them hit mid/air blockable and are generally unsafe to use on block.
* '''(A version)''' -  On hit, it causes an air tech state, which is mostly a gimmick. Its main use is to run away from pressure and/or the corner.
* '''(B version)''' - Wall bounces on hit and next to air throw is the to-go ender for most air combos. Allows you to possibly harass opponents after the air tech and nets you around 10% meter each hit.  

Revision as of 00:08, 23 June 2013

Combos

Normal Combos

  • First normal midscreen combos, the corner combos, then character specific combos
explanation

(2A) 2B 5C 2C 5B j.BC dj.BC Airthrow(AT)/j.214B/j.214C

(2A) 5B 5C 2C 2B J.BCA DJ.BC AT/j.214B/j.214C

(2A) 5B 2B 5C 2C 236A 5A {5C} J.BC J.BC AT/j.214B/j.214C (the 5C after 5A is character specific)

(2A) 2B 5C 5A-6A-6A 2C 5B J.BC J.BC AT/j.214B/j.214C

(2A) 5B 2B 5C 5A-6A-6A 2A(link)5B 5C J.BC J.BC AT/j.214B/j.214C


Metered Combos

  • ...
...

Strategy

Do what you need to do to extrapolate on the character. Here are example categories below.


Spacing

Pressure

Move Descriptions

Normal Moves

2A
2A [Low]

Startup: 6f | Active: 4f | Recovery: 8f

Nanaya drops down and does his morning leg stretch. It's slightly slower than other 2A's but the extra vertical hitbox can allow you to stabilize some combos or catch jump-outs from the corner.

5A [Mid]

Startup: 4f | Active: 4f | Recovery: 9f

Standing knife-hand. Doesn't hit crouchers, so it's great for setting up tick throws. Also good for twitch anti-air.

6A
6A [Mid]

Startup: 8f | Active: 4f | Recovery: 16f

Second part of the 5A 6AA chain - a palm thrust to the opponent. Moves him forward; this move is a good to use sometimes to stay in during blockstrings. Can also catch jump-outs similar to 2a.

6AA
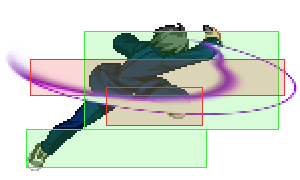
6AA [Mid]

Startup: 10f | Active: 4f | Recovery: 17f

Third part of the 5A 6AA chain - a slice that moves far forward. Air untechable on hit. It's unsafe on block, but since the window to cancel it into a special is unusually long, you could do some gimmicky frametraps every once in a while. This move makes Nanaya's character box disappear for a few frames so if done close to the opponent mid-screen, it will cross-up.

2B [Low]

Startup: 8f | Active: 6f | Recovery: 18f

Long reaching leg shank that also gains a bit of momentum from a dash. It is a staple low to use for its range, speed, and that it moves him forward. At max range, you can really only hit confirm to 236B 214C though.

5B
5B [Mid]

Startup: 8f | Active: 2f | Recovery: 15f

A very good-ranged poke that also moves forward a bit. This and 2B are your usual mid-range pokes, but note that the active frames aren't great. It's +1 on block though, so you'll be safe even if you don't chain or Reverse Beat into something else. The window to cancel into another move is very small though, so it's not very good for staggered blockstrings. Use it to end blockstrings every now and then to gauge reactions from your opponent - best used to set Nanaya back into optimal mid-range after a blockstring.

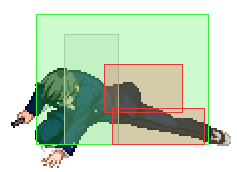
2C [Low]

Startup: 11f | Active: 9f | Recovery: 15f

Overall one of his best moves - a slide sweep kick. It moves very far and goes under a good number of projectiles. Be sure to hit confirm this to make the best of it. Use this in blockstrings to keep in and beat out jump-outs. This and 5C make H-Nanaya's staggered blockstrings truly deadly.

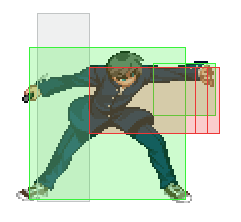
5C
5C [Mid]

Startup: 11f | Active: 8f | Recovery: 13f

A roundhouse kick that has a huge hit box and extends to parts above him. Moves him forward a good amount to keep on the offensive during blockstrings - it also beats mashing out of blockstrings and jump-outs; the latter situation being something H-Nanaya players must learn to hit confirm from on command. Prorates very nicely and has an absurd amount of stun on counter hits - usually leading to very damaging combos. 5C moves forward a crazy amount from a dash, but it's a bit on the slow side so be weary of using it too liberally as an anti-air or approach.

JA [Mid]

Startup: 6f | Active: 4f | Recovery: 30f

Your prime air-air move considering how fast it is coupled with how Nanaya pales in comparison to most of the cast while airborne. Be sure to confirm counter hits off this.

JB [High]

Startup: 8f | Active: 2f | Recovery: 41f

A downward horizontal slash. Unlike Crescent, this move only hits once. The horizontal range makes it okay to use for opponents on-level with you in the air, but the active frames are unimpressive. It's better used sparingly as an air-ground move.

JC [High]

Startup: 10f | Active: 6f | Recovery: 35f

An angled downward stab. The hitbox on this move is massive, making it great as an air-ground, as well as a sparingly used air-air if the opponent is under you. It's a little slow so be careful about aimlessly throwing it out. The start-up can be used to do whiff mix-ups to bait out Shields sometimes.

Special Moves

Sensa・Hattenshou 「閃鞘・八点衝」 - 236ABC
  • (Description) - Nanaya does a series of flurry slashes in front of him.
  • (A version) - The quickest version and the safest on block. Unfortunately, it completely whiffs on crouching opponents. Good for covering space in front of you sometimes, and it can also be used to hit confirm from 2C into a combo.
  • (B version) - Moves forward a bit more than A but is also slower on start-up. Pretty much neutral on block and can be used to zone in front of you, hitting crouchers too unlike A. On hit, if not EX cancelled, 236B is actually at frame disadvantage, so be careful.
  • (EX version) - Advantageous on block, so it's good for continuing pressure. Overall not that great of a move compared to the rest of H-Nanaya's arsenal, but it has situational uses. If you must blow meter to prevent going into HEAT too early, this is the move to use on block. On hit, it launches opponents, so you can do a quick combo into 5A -> air combo string. The damage is quite poor however.
Sensou・Rikuto 「閃走・六兎」 - 623ABC
  • (Description) - H-Nanaya's reversal series. Not as good compared to the other Nanaya moons but when used appropriately are still excellent tools.
  • (A version) - Has some invincibility start-up and a clash on the ground, so you can clash with a low-hitting move and EX cancel into something else. Overall a gimmicky move since it's air blockable and the clash isn't very reliable.
  • (B version) - The go-to reversal on H-Nanaya. Has more invincibility frames than A and is actually air unblockable (no clash trait though). However, miss with it and you're basically a goner.
  • (EX version) - The reversal becomes air blockable again except for the very first active frames. However, the main attraction to this move is that it makes a clone appear behind your opponent no matter where they are - can be used as a fullscreen punish and will setup a tech punish setup if it hits. It does around 3k damage if both you and the clone cleanly hit, so you can get great damage if you time it correctly; careful, it's very slow on start-up so only use it if you're confident it will hit.
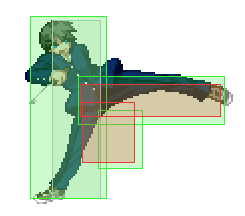
Sensou・Ikka 「閃走・一鹿」 - 214ABC
  • (Description) - A series of kicks that strike horizontally. Not really used outside of combos.
  • (A version) - A fast moving kick that travels a nice distance. Causes techable ground knockdown so be prepared to tech punish after this hits. On block, it's pretty much unsafe unless you hit right at the shoe tip before you land. You can hit confirm the tipped hit with 5A into an air combo string, meaning this is a decent anti-jump move to use.
  • (B version) - Slower kick than 214A. Not exactly useful outside of maybe half-charging it to beat mashing away the charged 214B. It's safe on block but you basically have to block to not get punished out of it.
  • ([B] version) - One of H-Nanaya's two ground overheads. Its safety on block is exactly as 214B. It wall bounces on hit and nets good damage if you do land it.
  • (EX version) - A two part EX move. First part would be a kick like 214A/B with multiple hits. Then the second part makes an angled upwards kick. The second part causes untechable knockdown on a grounded opponent. Note that if you've already wall bounced an opponent, the second part won't connect. Mostly used in the 2B -> 236B -> 214C far-ranged poke hit confirm. This is his second ground overhead, but it's a huge gimmick that's easily blocked and punished afterward.
Sensou・Suigetsu 「閃走・水月」 - 22ABC
  • (Description) - H-Nanaya's teleport moves. Situational, but overall decent for mix-ups and frame traps.
  • (A version) - Does a crouching stance then teleports about half a screen distance. The distance is shortened if you hit the wall. Since your hitbox disappears during this, you can use as a cross-up in some situations including blockstrings. Easily mashed if anticipated though. You're also invincible during the teleport, so get creative.
  • (B version) - Does a crouching stance then teleports a jump height above the same spot. After the teleport, you can use any air option normally available to you after an initial jump.
  • (C version) - Goes into the same crouching stance as 22A/B but after a brief moment will return to normal. Used as a feint for 22A/B or a move to cancel into for less recovery.
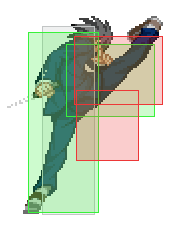
Sensou・Ikka 「閃走・一鹿」 - J214ABC
  • (Description) - Air versions of the strike kicks. All of them hit mid/air blockable and are generally unsafe to use on block.
  • (A version) - On hit, it causes an air tech state, which is mostly a gimmick. Its main use is to run away from pressure and/or the corner.
  • (B version) - Wall bounces on hit and next to air throw is the to-go ender for most air combos. Allows you to possibly harass opponents after the air tech and nets you around 10% meter each hit.
  • (EX version) - A two part EX move. Like the grounded version, it won't fully connect if you've already wall bounced the opponent at least once. This is the move you'll defer meter to as it adds a ridiculous amount of damage to any combo. It's essentially the round ender, and also causes opponents to enter an air tech state. Done really close to the ground, it actually causes hard knockdown like its grounded version, but does much more damage.
Kyuukouka/Fastfall 「急降下」 - J22
  • (Description) - Nanaya's unique fastfall, no button input. It is used in a lot of mix-ups - high/low/throw and cross-ups. Get creative and condition your opponent to get the best mileage out of this.

Arc Drive

Sensa・Meigokushamon 「閃鞘・迷獄沙門」 - 41236C
  • (Description) - An unblockable Arc Drive that includes a clone Nanaya for added vertical range. It is dodgeable - for Full Moon characters, they can just dash through you instead and it will make them backdash the Arc Drive. If used as a punish for a suspected jump out, you can connect into a combo afterward. The cooldown is actually pretty decent even on whiff, but there are usually better uses for meter in HEAT.

MBAACC Navigation

General
FAQ
Advanced
AokoCrescentHalfFull
TohnoCrescentHalfFull
HimeCrescentHalfFull
NanayaCrescentHalfFull
KoumaCrescentHalfFull
MiyakoCrescentHalfFull
CielCrescentHalfFull
SionCrescentHalfFull
RiesbyfeCrescentHalfFull
V.SionCrescentHalfFull
WarachiaCrescentHalfFull
RoaCrescentHalfFull
MaidsCrescentHalfFull
AkihaCrescentHalfFull
ArcueidCrescentHalfFull
Powered CielCrescentHalfFull
Red ArcueidCrescentHalfFull
V.AkihaCrescentHalfFull
Mech-HisuiCrescentHalfFull
SeifukuCrescentHalfFull
SatsukiCrescentHalfFull
LenCrescentHalfFull
RyougiCrescentHalfFull
White LenCrescentHalfFull
NeroCrescentHalfFull
NACCrescentHalfFull
Koha-MechCrescentHalfFull
HisuiCrescentHalfFull
Neco-ArcCrescentHalfFull
KohakuCrescentHalfFull
Neco-MechCrescentHalfFull