Melty Blood/MBAACC/Satsuki Yumizuka: Difference between revisions
< Melty Blood | MBAACC
Jump to navigation
Jump to search
Noradseven (talk | contribs) |
MarisaMage (talk | contribs) mNo edit summary |
||
| (14 intermediate revisions by 9 users not shown) | |||
| Line 1: | Line 1: | ||
[[File:Satsukibanner.png |right]] | [[File:Satsukibanner.png |right]] | ||
'' | ==Introduction== | ||
Poor forgotten kouhai girl who’s turned into a vampire. '''Satsuki is NOT a grappler.''' Satsuki is a powerful mixup character with a great combo game, brutal okizeme, decent footsies and an altogether robust gameplan with some great unique options for neutral in all three moons, especially in her infamous 623C anti air grab. Although she isn't especially reliant on or even especially good at ticking into her grounded command grab, she has more than enough tools to get in and stay in, with huge damage rewards once she gets a hit. C-Satsuki is solidly top tier, F-Satsuki and H-Satsuki are high tier. | |||
'''Stage:''' Battle field | |||
[[File:Battlefield.PNG]] | |||
'''BGM:''' Obscure Zone | |||
=Moon Overview= | ==Moon Overview== | ||
{{Navigation-MB | |||
|Crescent=*With what can easily be considered the best anti-airs in the game with 623C, 5A, and 22A, C-Satsuki is comfortable in almost any situation, with great buttons and a great combo game. | |||
*C-Satsuki is a complete package for someone looking to play a rushdown character, with many good options and ways to get in, great okizeme, high damage, a metered reversal, and just good utility overall. | |||
*Easily top tier, though she requires a dedicated player to master her long combos as well as a good understanding of Melty’s OTG mechanics. | |||
|Half=*A basic rushdown character with high damage off optimal combos. | |||
*Follows normal Melty Blood rules for canceling air attacks. H-Satsuki's basic combos are much simpler than C-Satsuki's or F-Satsuki's. | |||
*Has faster movement and can act faster than the other two moons. | |||
*Interacts very well with Half Moon mechanics | |||
|Full=*This moon is similar to crescent at first glance but it has a few notable differences. | |||
*Extended lockdown pressure. She doesn't have strong ways to mixup like the other two moons, but she makes up for it with advancing specials and plus frames. | |||
*Only Satsuki that does not have an anti-air 5A. She trades it for a plus on block, advancing, disjoint 5B. | |||
*Similar combo structure to C-Satsuki, but the timing is stricter. | |||
}} | |||
==Statistics== | |||
=Statistics= | |||
{| class= cellspacing="8" style="width:500px;border:2px solid silver;" | {| class= cellspacing="8" style="width:500px;border:2px solid silver;" | ||
! style="background-color:#bfff7f;text-align:center;" | | ! style="background-color:#bfff7f;text-align:center;" | Stance | ||
! style="background-color:#bfff7f;text-align:center;" | 100% | ! style="background-color:#bfff7f;text-align:center;" | 100% | ||
! style="background-color:#bfff7f;text-align:center;" | 75% | ! style="background-color:#bfff7f;text-align:center;" | 75% | ||
! style="background-color:#bfff7f;text-align:center;" | 50% | ! style="background-color:#bfff7f;text-align:center;" | 50% | ||
! style="background-color:#bfff7f;text-align:center;" | 25% | ! style="background-color:#bfff7f;text-align:center;" | 25% | ||
! style="background-color:#bfff7f;text-align:center;" | | ! style="background-color:#bfff7f;text-align:center;" | Net Health | ||
|- | |||
| style="background-color:#F8F8F8;" | '''Jump''' | |||
| style="background-color:#F8F8F8;text-align:center;" | 0.880 | |||
| style="background-color:#F8F8F8;text-align:center;" | 0.766 | |||
| style="background-color:#F8F8F8;text-align:center;" | 0.741 | |||
| style="background-color:#F8F8F8;text-align:center;" | 0.638 | |||
| style="background-color:#F8F8F8;text-align:center;" | 15,272 | |||
|- | |||
| style="background-color:#F8F8F8;" | '''Stand''' | |||
| style="background-color:#F8F8F8;text-align:center;" | 1.000 | |||
| style="background-color:#F8F8F8;text-align:center;" | 0.871 | |||
| style="background-color:#F8F8F8;text-align:center;" | 0.750 | |||
| style="background-color:#F8F8F8;text-align:center;" | 0.725 | |||
| style="background-color:#F8F8F8;text-align:center;" | 13,433 | |||
|- | |- | ||
| style="background-color:#F8F8F8;" | ''' | | style="background-color:#F8F8F8;" | '''Crouch''' | ||
| style="background-color:#F8F8F8;text-align:center;" | 1. | | style="background-color:#F8F8F8;text-align:center;" | 1.080 | ||
| style="background-color:#F8F8F8;text-align:center;" | 0. | | style="background-color:#F8F8F8;text-align:center;" | 0.940 | ||
| style="background-color:#F8F8F8;text-align:center;" | 0. | | style="background-color:#F8F8F8;text-align:center;" | 0.910 | ||
| style="background-color:#F8F8F8;text-align:center;" | 0. | | style="background-color:#F8F8F8;text-align:center;" | 0.783 | ||
| style="background-color:#F8F8F8;text-align:center;" | | | style="background-color:#F8F8F8;text-align:center;" | 12,442 | ||
|- | |- | ||
| style="background-color:#F8F8F8;" | '''Average''' | | style="background-color:#F8F8F8;" | '''Average''' | ||
| style="background-color:#F8F8F8;text-align:center;" | | | style="background-color:#F8F8F8;text-align:center;" | | ||
| style="background-color:#F8F8F8;text-align:center;" | | | style="background-color:#F8F8F8;text-align:center;" | | ||
| style="background-color:#F8F8F8;text-align:center;" | | | style="background-color:#F8F8F8;text-align:center;" | | ||
| style="background-color:#F8F8F8;text-align:center;" | | | style="background-color:#F8F8F8;text-align:center;" | | ||
| style="background-color:#F8F8F8;text-align:center;" | | | style="background-color:#F8F8F8;text-align:center;" | '''13,715''' | ||
|} | |} | ||
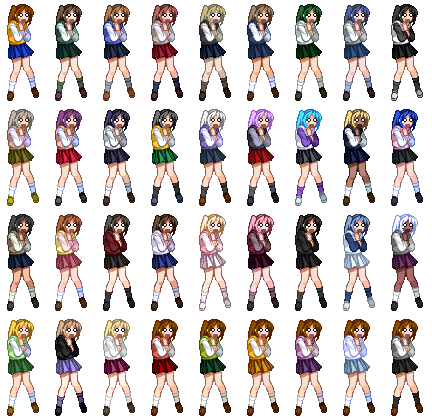
=Palettes= | ==Palettes== | ||
[[File:Satsuki-colors.png]] | [[File:Satsuki-colors.png]] | ||
{{ | ==External Links== | ||
*[http://www.meltybread.com/forums/satsuki-yumizuka-(yumiduka)-119/ {{SUBPAGENAME}} forum at Melty Bread] | |||
{{Navbox-MBAACC}} | |||
[[Category:Melty Blood]] | [[Category:Melty Blood Actress Again Current Code]] | ||
[[Category: Satsuki Yumizuka]] | |||
Latest revision as of 21:07, 19 November 2022
Introduction
Poor forgotten kouhai girl who’s turned into a vampire. Satsuki is NOT a grappler. Satsuki is a powerful mixup character with a great combo game, brutal okizeme, decent footsies and an altogether robust gameplan with some great unique options for neutral in all three moons, especially in her infamous 623C anti air grab. Although she isn't especially reliant on or even especially good at ticking into her grounded command grab, she has more than enough tools to get in and stay in, with huge damage rewards once she gets a hit. C-Satsuki is solidly top tier, F-Satsuki and H-Satsuki are high tier.
Stage: Battle field
BGM: Obscure Zone
Moon Overview
| Moon Style | Description |
|---|---|
| |
| |
|
Statistics
| Stance | 100% | 75% | 50% | 25% | Net Health |
|---|---|---|---|---|---|
| Jump | 0.880 | 0.766 | 0.741 | 0.638 | 15,272 |
| Stand | 1.000 | 0.871 | 0.750 | 0.725 | 13,433 |
| Crouch | 1.080 | 0.940 | 0.910 | 0.783 | 12,442 |
| Average | 13,715 |


