Overview
Playstyle
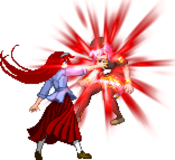
 H-V.Akiha is the fastest character in the game, with full corner carry out of most confirms, and tricky setplay. H-V.Akiha is the fastest character in the game, with full corner carry out of most confirms, and tricky setplay. |
| Pros |
Cons |
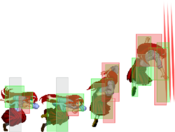
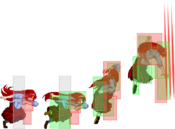
- Speedier than C/F: Increased mobility on Ground Dash and Air Dash, making her ridiculously fast.
- Good Air to air game: She offers the best of both worlds with C-Vaki's j.B and F-Vaki's j.C, incredible air buttons.
- Relatively Easy Execution: Her combos are not that hard to pull off, even the more optimal ones are doable with practice.
- Okizeme: Her tools for this regard are decent, she has Air pits (22x) that, when done correctly, will beat conventional wake up options, while also being able to bait stuff like bunkers and shields, while also having webs (j.236x) that automatically explode and are unshieldable.
- Plays well as an H-Moon: The mechanics of this moon complement her more aggressive playstyle, while still having a couple of ways to manage meter. Autoburst in heat offers more safety on offense, while H-Bunker gives you a much needed defensive option to stay out of trouble that the other moons lack.
|
- Has to play Melty Blood: H-Vaki has no particularly good tools for keepaway or staling, and not only she has very little HP, but she also has mediocre defensive options outside of H-Bunker, so making a single mistake in general can be very unforgiving.
- AT ender: You are fast enough to follow up, but this ender doesn't give you enough Frame advantage to do a meaty button, so your opponent can disrespect you more easily.
- Mix-ups: You will find opening your opponents with good defense difficult, since this moon has weaker mix in relation to the other 2 moons.
- Pressure: Decent enough, problem being, you lack viable ways to extend your offense. Not many options outside of resetting with a Dash or IAD, which is always a commitment.
- Special Moves: These are overall mediocre, some of them are situational, and others are hard to use, or even unpractical for your gameplan.
|
Move Descriptions
| Frame Data Help
|
| Header
|
Tooltip
|
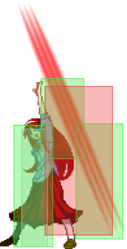
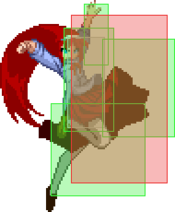
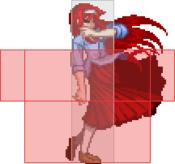
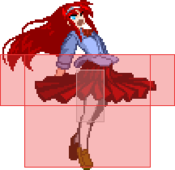
| Move Box Colors
|
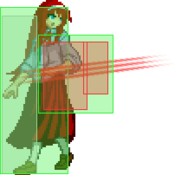
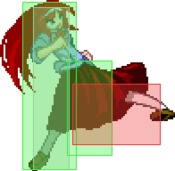
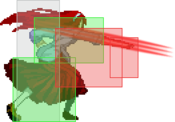
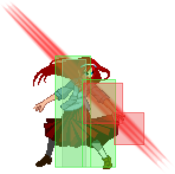
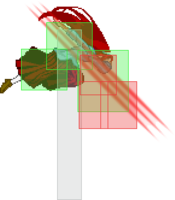
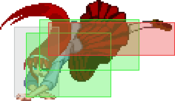
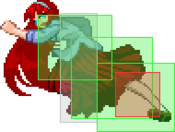
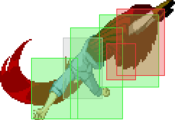
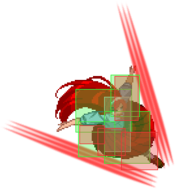
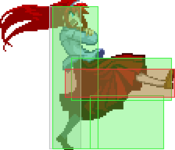
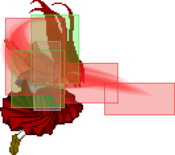
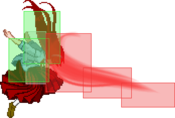
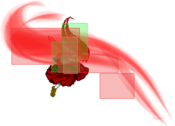
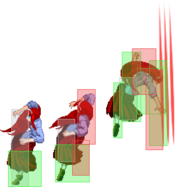
Light gray = Collision Box (A move lacking one means it can go through the opponent's own collision box).
Green: Hurt Boxes.
Red: Hit(/Grab) Boxes.
Yellow: Clash Boxes (When an active hitbox strikes a clash box, the active hitbox stops being active. Multi-hit attacks can beat clash since they will still progress to the next hitbox.)
Magenta: Projectile-reflecting boxes OR Non-hit attack trigger boxes (usually).
Blue: Reflectable Projectile Boxes.
|
| Damage
|
Base damage done by this attack.
(X) denotes combined and scaled damage tested against standing V. Sion.
|
| Red Damage
|
Damage done to the recoverable red health bar by this attack. The values are inherently scaled and tested against standing V. Sion.
(X) denotes combined damage.
|
| Proration
|
The correction value set by this attack and the way it modifies the scaling during a string. See this page for more details.
X% (O) means X% Overrides the previous correction value in a combo if X is of a lower percentage.
X% (M) means the current correction value in a combo will be Multiplied by X%. This can also be referred to as relative proration.
|
| Circuit
|
Meter gained by this attack on hit.
(X%) denotes combined meter gain.
-X% denotes a meter cost.
|
| Cancel
|
Actions this move can be cancelled into.
SE = Self cancelable.
N = Normal cancelable.
SP = Special cancelable.
CH = Cancelable into the next part of the same attack (Chain in case of specials).
EX = EX cancelable.
J = Jump cancelable.
(X) = Cancelable only on hit.
-X- = Cancelable on whiff.
|
| Guard
|
The way this move must be blocked.
L = Can block crouching
H = Can block standing.
A = Can block in the air.
U = Unblockable.
|
| Startup
|
Amount of frames that must pass prior to reaching the active frames. Also referred to as "True Startup".
|
| Active
|
The amount of frames that this move will have a hitbox.
(x) denotes frame gaps where there are no hitboxes is present. Due to varied blockstuns, (x) frames are difficult to use to determine punish windows. Generally the larger the numbers, the more time you have to punish.
X denotes active frames with a duration separate from its origin move's frame data, such as projectile attacks. In this case, the total length of the move is startup+recovery only.
|
| Recovery
|
Frames that this move has after the active frames if not canceled. The character goes into one frame where they can block but not act afterwards, which is not counted here.
|
| Advantage
|
The difference in frames where you can act before your opponent when this move is blocked (assuming the move isn't canceled and the first active frame is blocked).
If the opponent uses a move with startup that is at least 2 frames less than this move's negative advantage, it will result in the opponent hitting that move.
±x~±y denotes a range of possible advantages.
|
| Invul
|
Lists any defensive properties this move has.
X y~z denotes X property happening between the y to z frames of the animations. If no frames are noted, it means the invincibility lasts through the entire move.
Invicibility:
- Strike = Strike invincible.
- Throw = Throw invincible.
Hurtbox-Based Properties:
- Full = No hurtboxes are present.
- High = Upper body lacks a hurtbox.
- Low = Lower body lacks a hurtbox.
Miscellaneous Properties
- Clash = Frames in which clash boxes are active.
- Reflect = Frames in which projectile-reflecting boxes are active.
- Super Armor = Frames in which the character can take hits without going into hit stun.
|
Normal Moves
Standing Normals
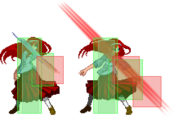
Plus on block. Plus on block. Good for staggers. Good for staggers. BNB filler. BNB filler.
|
| 5A
|
Damage
|
Red Damage
|
Proration
|
Cancel
|
Guard
|
| 300
|
115
|
75% (O)
|
-SE-, -N-, -SP-, -CH-, -EX-, (J)
|
LH
|
| First Active
|
Active
|
Recovery
|
Frame Adv
|
Circuit
|
Invuln
|
| 5
|
3
|
8
|
1
|
2.1%
|
-
|
|
Insane 5A. Fast, large horizontal range, +1 on block, hits crouchers.
Rebeating into it at close range is just as good as whiff cancelling a move for advantage, and you can stagger out of it instead of letting it recover to frametrap people, too, much like a whiff cancel.
Since it's plus, if you let it recover, you can frametrap some characters and reset your available normals at the same time, which is an ideal reset point.
The only bad thing about it is that the hitbox is a bit lower to the ground, so it's not as good for anti airing as other 5A's.
|
| 5A~6A
|
Damage
|
Red Damage
|
Proration
|
Cancel
|
Guard
|
| 600
|
384
|
80% (M)
|
N, SP, -CH-, EX, (J)
|
LH
|
| First Active
|
Active
|
Recovery
|
Frame Adv
|
Circuit
|
Invuln
|
| 8
|
4
|
16
|
-5
|
4.2%
|
-
|
|
Decent 6A that moves VAkiha forward and has very little pushback on block. Useful in combos and stagger pressure.
|
| 5A~6A
|
Damage
|
Red Damage
|
Proration
|
Cancel
|
Guard
|
| 1000
|
768
|
60% (O)
|
(N), SP, EX, (J)
|
LH
|
| First Active
|
Active
|
Recovery
|
Frame Adv
|
Circuit
|
Invuln
|
| 10
|
4
|
15
|
-1
|
7.0%
|
-
|
|
Decent 6AA; mostly used as combo filler. You can use it in pressure, but do note that it can only be cancelled into specials.
|
|
Essential pressure tool. Essential pressure tool. Slow but plus. Slow but plus. Launcher. Launcher.
|
| 5B
|
Damage
|
Red Damage
|
Proration
|
Cancel
|
Guard
|
| 550
|
384
|
100%
|
N, SP, -CH-, EX, (J)
|
LH
|
| First Active
|
Active
|
Recovery
|
Frame Adv
|
Circuit
|
Invuln
|
| 7
|
4
|
12
|
-1 ~ 2
|
4.2%
|
-
|
|
The backbone of H-VAki pressure when you're more pushed out. Trips crouchers on hit.
Moves you forward slightly and has a huge cancel window, and since it's only -1, it allows you to do extremely ambiguous staggers and pressure resets.
The forward momentum 5B has makes it so that, when spaced, the frame advantage can become 0 or up to +2 when it touches your opponent at the last possible active frame.
|
| 5[B]
|
Damage
|
Red Damage
|
Proration
|
Cancel
|
Guard
|
| 500, 400*3 (1624)
|
(1146)
|
100%
|
N, SP, -CH-, EX, (J)
|
LH
|
| First Active
|
Active
|
Recovery
|
Frame Adv
|
Circuit
|
Invuln
|
| 30
|
9
|
8
|
3
|
2.8%*4 (11.2%)
|
-
|
|
Slow, charged version of 5B. Plus on block, but the long startup limits its usefulness. Mostly used to add more variety in your staggers, partially charging 5B.
It's your best punish tool against certain reversals with massive negative frames or long recovery.
|
| ~B
|
Damage
|
Red Damage
|
Proration
|
Cancel
|
Guard
|
| 500
|
240
|
70% (O)
|
N, SP, EX, (J)
|
LH
|
| First Active
|
Active
|
Recovery
|
Frame Adv
|
Circuit
|
Invuln
|
| 8
|
3
|
29
|
-14
|
4.2%
|
-
|
|
H-VAki's launcher follow up; mostly used in combos. Sometimes, it's the only option after awkward pickups, like an unexpected 4C on an opponent that just jumped. On hit, hold 8 to get a command superjump to continue your combo.
Not very useful in pressure due to the significant amount of pushback on block, but it can still be +2 if you rebeat it into 5A.
|
|
|
|
| Damage
|
Red Damage
|
Proration
|
Cancel
|
Guard
|
| 1000
|
624
|
90% (O)
|
N, SP, EX, (J)
|
LH
|
| First Active
|
Active
|
Recovery
|
Frame Adv
|
Circuit
|
Invuln
|
| 10
|
6
|
17
|
-5
|
7.7%
|
-
|
|
Big 5C is a kick that moves you forward. Used for combos most of the time, but can be good to situationally throw this in pressure to try and catch a jump or mashing attempt.
|
|
Crouching Normals
|
|
| Damage
|
Red Damage
|
Proration
|
Cancel
|
Guard
|
| 350
|
144
|
65% (O)
|
-SE-, -N-, -SP-, -EX-, (J)
|
L
|
| First Active
|
Active
|
Recovery
|
Frame Adv
|
Circuit
|
Invuln
|
| 5
|
3
|
10
|
-1
|
2.8%
|
-
|
|
Low-hitting swipe. Not much to say, it's your main combo starter. You also commonly start pressure with this, saving 5A for later.
|
|
Underrated button. Underrated button. Slow overhead. Slow overhead.
|
| 2B
|
Damage
|
Red Damage
|
Proration
|
Cancel
|
Guard
|
| 250*6 (653)
|
(460)
|
85% (O)
|
N, SP, -CH-, EX, (J)
|
LH
|
| First Active
|
Active
|
Recovery
|
Frame Adv
|
Circuit
|
Invuln
|
| 6
|
9
|
13
|
-2
|
2.0%*3 (6.0%)
|
-
|
|
Big, fast 2B with a lot of pushback on hit or block if most of the hits connect.
Not an actual low, but it's a decent abare tool, and your main choice to beat High shield attempts.
Okay in pressure when you are able to rebeat the first hit. Can still be used in combos, but only do it against crouching opponents to avoid tripping them with 5B.
|
| ~2B
|
Damage
|
Red Damage
|
Proration
|
Cancel
|
Guard
|
| 200*3 (580)
|
(279)
|
100% (O)
|
-CH-
|
LA
|
| First Active
|
Active
|
Recovery
|
Frame Adv
|
Circuit
|
Invuln
|
| 1
|
5
|
20
|
-10 ~ -9
|
0.7%*3 (2.1%)
|
-
|
|
2B's sad followup; hits low, but only cancels into 2BBB and trips on hit, so it's pretty useless.
Instantly active if done during 2B's recovery. You can link some normals after it trips, and you may have seen this in combo videos, but there are still no known practical combos that involve this technique.
|
| ~2B~2B
|
Damage
|
Red Damage
|
Proration
|
Cancel
|
Guard
|
| 500
|
576
|
75% (O)
|
J
|
HA
|
| First Active
|
Active
|
Recovery
|
Frame Adv
|
Circuit
|
Invuln
|
| 26
|
5
|
16
|
-3
|
4.2%
|
-
|
|
Very telegraphed overhead that bounces them on hit. Jump cancellable even on block. Dumb knowledge check, don't use it.
|
|
Sweep. Sweep.
|
| Damage
|
Red Damage
|
Proration
|
Cancel
|
Guard
|
| 900
|
480
|
60% (O)
|
N, SP, EX, (J)
|
L
|
| First Active
|
Active
|
Recovery
|
Frame Adv
|
Circuit
|
Invuln
|
| 9
|
5
|
20
|
-7
|
5.6%
|
-
|
|
Good sweep. It's there mostly for combos, but can be an abare button or even an anti air when spaced.
Can also be used to catch jumps, just like 5C, but you will probably be forced to return to neutral even if you rebeat it into 5A.
|
|
Aerial Normals
Fast air poke. Fast air poke.
|
| Damage
|
Red Damage
|
Proration
|
Cancel
|
Guard
|
| 300
|
144
|
72% (O)
|
SE, N, SP, EX, J
|
LHA
|
| First Active
|
Active
|
Recovery
|
Frame Adv
|
Circuit
|
Invuln
|
| 5
|
4
|
10
|
-
|
2.1%
|
-
|
|
Not the best j.A due to it's very tiny hitbox, but it can still make the difference when you really want to get that Air CH.
|
|
|
|
| Damage
|
Red Damage
|
Proration
|
Cancel
|
Guard
|
| 700
|
336
|
90% (O)
|
N, SP, EX, J
|
HA
|
| First Active
|
Active
|
Recovery
|
Frame Adv
|
Circuit
|
Invuln
|
| 7
|
7
|
-
|
-
|
4.9%
|
-
|
|
Fantastic, very active air poke. Main option in air to air approaches, either for opponents above or in front of you, be ready to confirm any air CH's you get with this.
Will whiff on most crouchers after an IAD.
|
|
|
|
| Damage
|
Red Damage
|
Proration
|
Cancel
|
Guard
|
| 1000
|
480
|
90% (O)
|
N, SP, EX, J
|
HA
|
| First Active
|
Active
|
Recovery
|
Frame Adv
|
Circuit
|
Invuln
|
| 10
|
5
|
-
|
-
|
7.0%
|
-
|
|
Very strong j.C, and your high of choice after an IAD.
It has a relative large hitbox in the rear, so it can crossup very easily. Vertical spacing is key for this move. If spaced correctly, it'll basically beat every 5A anti-air.
Can still be used for air to air approaches, but j.B will serve you more for that purpose.
j.C > j.22A can act as a pressure extender when your opponent is not expecting it.
|
|
Command Normals
Good abare tool. Good abare tool.
|
| Damage
|
Red Damage
|
Proration
|
Cancel
|
Guard
|
| 500*2 (984)
|
(661)
|
100%
|
N, SP, EX, (J)
|
LH
|
| First Active
|
Active
|
Recovery
|
Frame Adv
|
Circuit
|
Invuln
|
| 8
|
4
|
26
|
-10
|
3.5%*2 (7.0%)
|
-
|
|
Really good button. Since it's large, fast and disjointed, it can be used for abare, poking, and sometimes whiff punishing, just note that, if you ever whiff it, the massive recovery can get you in trouble against good opponents.
Can also be used in pressure, but preferably at close range.
|
|
Slow overhead. Slow overhead.
|
| Damage
|
Red Damage
|
Proration
|
Cancel
|
Guard
|
| 600
|
288
|
75%
|
=(SP), (EX)
|
H
|
| First Active
|
Active
|
Recovery
|
Frame Adv
|
Circuit
|
Invuln
|
| 26
|
4
|
18
|
-4
|
5.6%
|
-
|
|
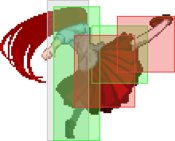
Slow, rich girl kick. On hit, launches the opponent forward into a wallslam, if this happens, you can cancel the recovery of the move into a super command dash pressing 66, which is crucial for your full corner carry combos.
It is also an overhead, but you shouldn't depend on it, since it's not that hard to react to, and there's no way to mix it up.
|
|
Universal Mechanics
|
|
| Damage
|
Red Damage
|
Proration
|
Cancel
|
Guard
|
| 170*7 (1076)
|
(462)
|
100%
|
-
|
U
|
| First Active
|
Active
|
Recovery
|
Frame Adv
|
Circuit
|
Invuln
|
| 3
|
1
|
20
|
-
|
0.0%
|
-
|
|
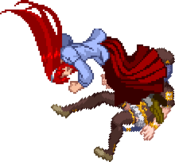
V.Akiha grabs the opponent by the neck and goes into a 7-hit sequence, healing some red health in the process. Untechable knockdown.
|
|
|
|
| Damage
|
Red Damage
|
Proration
|
Cancel
|
Guard
|
1600 (Raw)
1000
|
465
|
100%
|
-
|
U
|
| First Active
|
Active
|
Recovery
|
Frame Adv
|
Circuit
|
Invuln
|
| 2
|
1
|
12
|
-
|
0.0%
|
-
|
|
V.Akiha takes the opponent to the ground with the power of her legs. As a combo ender it will be untechable but will leave you at a distance.
|
|
|
|
| Standing
|
Damage
|
Red Damage
|
Proration
|
Cancel
|
Guard
|
| 500 (345)
|
198
|
50%
|
(SP), (EX), (J)
|
LHA
|
| First Active
|
Active
|
Recovery
|
Frame Adv
|
Circuit
|
Invuln
|
| 9
|
4
|
18
|
-4
|
3.5%
|
-
|
|
Same animation as 5BB.
|
| Crouching
|
Damage
|
Red Damage
|
Proration
|
Cancel
|
Guard
|
| 1500 (1117)
|
714
|
50%
|
(SP), (EX)
|
LA
|
| First Active
|
Active
|
Recovery
|
Frame Adv
|
Circuit
|
Invuln
|
| 9
|
4
|
18
|
-4
|
10.5%
|
-
|
|
Same animation as Shield Bunker.
|
| Aerial
|
Damage
|
Red Damage
|
Proration
|
Cancel
|
Guard
|
| 500 (345)
|
198
|
50%
|
-
|
HA
|
| First Active
|
Active
|
Recovery
|
Frame Adv
|
Circuit
|
Invuln
|
| 9
|
4
|
-
|
-
|
3.5%
|
Full 1-3
|
|
Same animation as C-Moon j.C.
|
|
|
|
| Neutral
|
Damage
|
Red Damage
|
Proration
|
Cancel
|
Guard
|
| 500
|
192
|
50%
|
-
|
LHA
|
| First Active
|
Active
|
Recovery
|
Frame Adv
|
Circuit
|
Invuln
|
| 26
|
4
|
19
|
-5
|
0.0%
|
Clash 1-10
|
| (Clash)
|
Damage
|
Red Damage
|
Proration
|
Cancel
|
Guard
|
| 500
|
192
|
50%
|
-
|
LHA
|
| First Active
|
Active
|
Recovery
|
Frame Adv
|
Circuit
|
Invuln
|
| 8
|
4
|
19
|
-5
|
0.0%
|
Strike 1-7
|
|
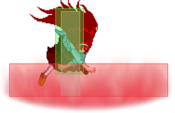
V.Akiha's shield bunker is a special slide with low to the ground hitboxes.
|
| Blockstun
|
Damage
|
Red Damage
|
Proration
|
Cancel
|
Guard
|
| 0
|
0
|
100%
|
-
|
LHA
|
| First Active
|
Active
|
Recovery
|
Frame Adv
|
Circuit
|
Invuln
|
| 19
|
3
|
22
|
-7
|
-100.0%
|
-
|
|
H-Moon specific reversal bunker.
|
|
|
|
| Ground
|
Damage
|
Red Damage
|
Proration
|
Cancel
|
Guard
|
| 100
|
0
|
100%
|
-
|
U
|
| First Active
|
Active
|
Recovery
|
Frame Adv
|
Circuit
|
Invuln
|
| 11
|
10
|
20
|
-
|
removes all
|
Full 1-39
|
| Air
|
Damage
|
Red Damage
|
Proration
|
Cancel
|
Guard
|
| 100
|
0
|
100%
|
-
|
U
|
| First Active
|
Active
|
Recovery
|
Frame Adv
|
Circuit
|
Invuln
|
| 12
|
10
|
15
|
-
|
removes all
|
Strike 1-30
|
|
Universal burst mechanic. Unlike Crescent/Full Heat activation, the hitbox and frame data doesn't vary between characters. However, you can be thrown out of this move if you input it in the air.
|
|
Special Moves
Grounded Specials
|
|
| A
|
Damage
|
Red Damage
|
Proration
|
Cancel
|
Guard
|
| 800
|
480
|
70% (O)
|
-
|
LHA
|
| First Active
|
Active
|
Recovery
|
Frame Adv
|
Circuit
|
Invuln
|
| 41
|
2
|
6
|
13
|
4.2%
|
-
|
|
Akiha jumps a little and throws a flame ribbon.
This would be a good pressure reset tool, but it's just so slow, opponents that have C-moon characters can just Ex-shield on reaction and get out free, or any moon in general can catch your massive startup with a button.
Even with some conditioning, it's just too difficult to use this against good opponents.
|
| B
|
Damage
|
Red Damage
|
Proration
|
Cancel
|
Guard
|
| 800
|
480
|
70% (O)
|
-J-
|
LHA
|
| First Active
|
Active
|
Recovery
|
Frame Adv
|
Circuit
|
Invuln
|
| 41
|
2
|
6
|
3
|
4.2%
|
-
|
|
It's kind of like a super backward jump that leaves a ribbon.
Completely useless, don't use it.
|
| EX
|
Damage
|
Red Damage
|
Proration
|
Cancel
|
Guard
|
| 400*8 (2848)
|
(1368)
|
70% (O)
|
-J-
|
LHA
|
| First Active
|
Active
|
Recovery
|
Frame Adv
|
Circuit
|
Invuln
|
| 13+26
|
28
|
13+31
|
43
|
-100.0%
|
-
|
|
Akiha jumps high enough so that most normals won't even touch her and shoots a lot of flame ribbons.
Hitboxes are not as good as the animation suggest, at close range it will even whiff completely against some STANDING characters. If you do it during blockstrings, opponents can punish you on reaction with a dash and AT.
Even as okizeme after 623B, there's no reason to use it over the pits, just avoid it.
|
|
|
|
|
V.Akiha's "Momiji" DP series. Has different types of invulnerability depending on the version.
|
| A
|
Damage
|
Red Damage
|
Proration
|
Cancel
|
Guard
|
| 600, 800 (1282)
|
(533)
|
100%
|
-
|
LH, LHA
|
| First Active
|
Active
|
Recovery
|
Frame Adv
|
Circuit
|
Invuln
|
| 7
|
3 (7) 4
|
23
|
-9
|
4.2%, 5.6% (9.8%)
|
High 1-9
|
|
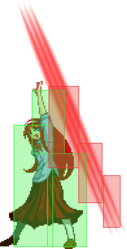
Quick rising attack. Very effective anti-air with passable reward, a hard knockdown.
Only the first hit is air unblockable. Keeps your dash momentum, oddly enough.
|
| B
|
Damage
|
Red Damage
|
Proration
|
Cancel
|
Guard
|
| 300, 200, 500, 400 (1279)
|
(519)
|
70% (O)
|
-
|
LH (1-2), LHA (3-4)
|
| First Active
|
Active
|
Recovery
|
Frame Adv
|
Circuit
|
Invuln
|
| 9
|
32
|
23
|
-9
|
2.45%, 1.4*2, 3.5% (8.7%)
|
Low 1-10
|
|
Similar to 623A, except she dashes with 2 Active hitboxes before jumping.
Exclusively for combos. Momiji loops will give you the damage and okizeme you need to play the game.
|
| EX
|
Damage
|
Red Damage
|
Proration
|
Cancel
|
Guard
|
| 200, 300*2, 400 (1089)
|
(577)
|
60% (M)
|
-
|
LH (1-2), LHA (3-4)
|
| First Active
|
Active
|
Recovery
|
Frame Adv
|
Circuit
|
Invuln
|
| 6+3
|
35
|
23
|
-9
|
-100.0%
|
Full 1-10
|
|
Your only reversal, and a pretty mediocre one.
It's not very hard to counter due to it's slow startup and lack of vertical reach. Mostly ever used to OTG after a 623B on midscreen, just for the corner carry.
|
|
|
|
| A/B
|
Damage
|
Red Damage
|
Proration
|
Cancel
|
Guard
|
| 400*3 (1009)
|
(531)
|
80% (O)
|
-
|
LHA
|
| First Active
|
Active
|
Recovery
|
Frame Adv
|
Circuit
|
Invuln
|
| 21
|
22
|
13
|
-14 ~ 0
|
2.1%*3 (6.3%)
|
-
|
|
A version spawns 3 pillars very close to you, B versions acts the same except the pillars spawn further away.
In pressure, if the 3 pillars are blocked, it is 0 on block, which usually creates some scrambling situations.
|
| [A]/[B]
|
Damage
|
Red Damage
|
Proration
|
Cancel
|
Guard
|
| 400*5 (1578)
|
(830)
|
80% (O)
|
-
|
LHA
|
| First Active
|
Active
|
Recovery
|
Frame Adv
|
Circuit
|
Invuln
|
| 29
|
X (64)
|
35
|
-14 ~ 42
|
2.1%*5 (10.5%)
|
-
|
|
Charged versions of these pillars can be used as a slow pressure reset tool.
Not recommended against characters that have moves to go through it and punish you.
|
| EX
|
Damage
|
Red Damage
|
Proration
|
Cancel
|
Guard
|
| 280*15 (2497)
|
(1716)
|
96% (M)*15
|
-
|
LHA
|
| First Active
|
Active
|
Recovery
|
Frame Adv
|
Circuit
|
Invuln
|
| 2+33
|
X (118)
|
29
|
-8 ~ 90
|
-100.0%
|
Full 1-9
|
|
The pillars now spawn directly in front of you and go forward for a long period of time.
Another completely useless move that you can't even use for okizeme.
|
|
|
|
|
Grounded pits can be used for easy, but questionable okizeme, since they all have a considerable amount of recovery, making them weak against reversals, for that reason, you should check air versions instead.
|
| A
|
Damage
|
Red Damage
|
Proration
|
Cancel
|
Guard
|
| 300*3 (802)
|
(306)
|
100%
|
-
|
LHA
|
| First Active
|
Active
|
Recovery
|
Frame Adv
|
Circuit
|
Invuln
|
| 40
|
3
|
9
|
32
|
2.1%*3 (6.3%)
|
Low 12-33
|
| B
|
Damage
|
Red Damage
|
Proration
|
Cancel
|
Guard
|
| 300*3 (802)
|
(306)
|
100%
|
-
|
LHA
|
| First Active
|
Active
|
Recovery
|
Frame Adv
|
Circuit
|
Invuln
|
| 45
|
3
|
12
|
29
|
2.1%*3 (6.3%)
|
Low 17-41
|
| EX
|
Damage
|
Red Damage
|
Proration
|
Cancel
|
Guard
|
| 300*5 (1270)
|
(813)
|
100%
|
-
|
LHA
|
| First Active
|
Active
|
Recovery
|
Frame Adv
|
Circuit
|
Invuln
|
| 2+37
|
X (17)
|
11
|
50
|
-100.0%
|
Full 1-9, Low 10-31
|
|
Aerial Specials
|
|
|
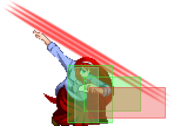
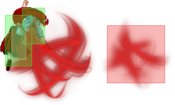
Spawns a red web that explodes after a set time. It's unshieldable, and decently plus, but not very active.
|
| A
|
Damage
|
Red Damage
|
Proration
|
Cancel
|
Guard
|
| 1200
|
960
|
70% (O)
|
-
|
LHA
|
| First Active
|
Active
|
Recovery
|
Frame Adv
|
Circuit
|
Invuln
|
| 56
|
5
|
18
|
21
|
8.4%
|
-
|
|
TK j.236A is not very common to use for okizeme, except in scenarios when you don't want to give your opponent the chance to shield on wake up, like when the're on blood heat.
On block, it gives a reasonable amount of frame advantage for you to even do an IAD j.C.
Not jump cancellable so don't do it high in the air.
|
| B
|
Damage
|
Red Damage
|
Proration
|
Cancel
|
Guard
|
| 1200
|
960
|
70% (O)
|
-
|
LHA
|
| First Active
|
Active
|
Recovery
|
Frame Adv
|
Circuit
|
Invuln
|
| 59
|
5
|
18
|
21
|
8.4%
|
-
|
|
Similar to A version, but keeps your momentum in the startup. After leaving the mine you'll drop in a fixed angle that goes back.
Useful in some autotimed safejump setups.
|
| EX
|
Damage
|
Red Damage
|
Proration
|
Cancel
|
Guard
|
| 2000
|
1344
|
70% (O)
|
-
|
LHA
|
| First Active
|
Active
|
Recovery
|
Frame Adv
|
Circuit
|
Invuln
|
| 2+50
|
5
|
18
|
21
|
-100.0%
|
-
|
|
Slightly faster, larger and does more damage.
|
|
|
|
|
After the pits end, another box appears, which takes away a bit of HP and meter from your opponent, healing yourself and adding extra %'s to your bar.
|
| A/B
|
Damage
|
Red Damage
|
Proration
|
Cancel
|
Guard
|
| 300*3 (802)
|
(306)
|
100%
|
-
|
LHA
|
| First Active
|
Active
|
Recovery
|
Frame Adv
|
Circuit
|
Invuln
|
| 38
|
3
|
1
|
41
|
2.1%*3 (6.3%)
|
Low 10-X
|
|
The real stuff. j.22A is your main option for okizeme, giving you an insane amount of + frames when done lower to the ground, and with barely any recovery, allowing you to block even the fastest reversals, it's also inmune to Kouma's 214C even after you've touched the ground, and there's a lot of ways to bait bunker or shield attempts to your pits.
A and B can also be used in neutral, they are not particularly great, but it will remind your opponent to not freely stay in the ground.
|
| EX
|
Damage
|
Red Damage
|
Proration
|
Cancel
|
Guard
|
| 300*5 (1270)
|
(813)
|
100%
|
-
|
LHA
|
| First Active
|
Active
|
Recovery
|
Frame Adv
|
Circuit
|
Invuln
|
| 2+37
|
X (17)
|
4
|
59
|
-100.0%
|
Full 1-9, Low 10-X
|
|
Ex pit is used as a meter management tool, even in combos, and on block, you have a lot more of frame advantage to play.
|
|
Arc Drive
|
|
| Damage
|
Red Damage
|
Proration
|
Cancel
|
Guard
|
| 650*10 (2813)
|
(1663)
|
50% (O)
|
-
|
LHA
|
| First Active
|
Active
|
Recovery
|
Frame Adv
|
Circuit
|
Invuln
|
| 3+6
|
24
|
62
|
-40
|
removes all
|
Full 1-41
|
|
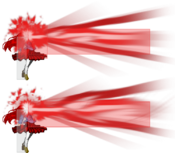
Akiha shoots an almost, but not quite, fullscreen laser from her eyes.
Very rarely comes into play as a reversal or as a long range punish tool, still, H-Vaki will preferably keep being in Heat for the autoburst.
|
|
General Gameplan
This is the most “interactive” V.Akiha available, your goal is to achieve a good hit to do a full corner carry combo, straight into Momiji loops, and run your okizeme, all while managing your meter, since you are an H-Moon character, fortunately, this character doesn't have a lot of problems with that.
Neutral
H-Vaki's neutral is nowhere near bad, but you can't play a lame game as well as C/F-Vaki. Opponents won't struggle as much since you are entirely reliant on your mobility and air buttons to play the game, and while these are very good, you will always have to be very careful, since you are made of paper and you don't have the best defensive options.
- j.B: This thing is active for a significant amount of time, has a bit of disjoint, and it's particularly good when your opponents are above you, this will give you a lot of the air CH's that you need.
- j.C: Good button as well, okay for air to air, but it's mostly useful for air to ground approaches, it also has the ability to hit crossup which is always nice to have.
- j.A: Easily overlooked when compared to the other two, but it's still your fastest option in the air, knowing how to use it can save you from a lot of bad situations.
While in the ground, you are not as strong obviously, but you still have okay tools to play around, like a fast dash, and a button like 4C, it's excellent for poking thanks to it's massive disjoint, just be careful to not whiff it. If you are not too far away, you can get a combo out of a single hit 4C if you rebeat into 6AAA.
In terms of anti-airs, you don't have the best options, 5A is a bit lower to the ground so i would suggest only using it in emergency cases. Your best Anti-Air options is 623A, it doesn't give a lot of reward on regular hit, but you are fast enough to dash and put a button in your opponent's wake up.
Pressure
While in the corner, pressure is Ok, it will be mostly based around Standard stagger pressure, with some frametraps, and IAD resets.
2AA > delay 2A > 5B
2A > 5B > delay 5A
2A > small delay 2A > 5B > dash 5A
5AA > 5B > delay 5C
2AAA > IAD j.A/C
5B > 5B > 2A
These are just basic examples to get started, after that, you gotta be a bit creative, since you don't have particularly good ways to extend your pressure. As you play, you will find situations to use 6AAA series in your offense, and once you condition your opponents to block more often, you can start throwing. 5C, 2C, and 4C are mostly reserved to be able to confirm into a combo once you get a hit.
The only recommended special to use in pressure is 214A/B, the pillars, uncharged versions are 0 on block when they block the 3 hits, while charged versions can give you a guaranteed reset pressure reset, but these have slow startup.
Defense
Inevitably, you will be in these situations, and unfortunately you don't have the best options to play a defensive game, specially with very little health.
623C is your only reversal, but it's not that good, easily shielded post super flash, so if you have meter, you should just try to do H-Bunker.
If you don't have meter, then just block, your Automatic shield counter can sometimes work but you will get punished hard against opponents who know to OS.
Mashing is always an option, but you have to know when to do it. 4C can be a particularly good button for abare, but you need to be a bit further away from your opponent.
The less risky option when you don't want to block is to simply find a gap to jump, your fast air dashes can guarantee you a reset to neutral.
Okizeme
- Post AT: Not much to do, you are only +11, very susceptible to reversals and other wake up options, you can try to put a 5B/2B depending on which shield you are trying to bait, otherwise just do dash 5A.
- Post Throw: Gives a bit more frame advantage to work with, you can do more Option selecting and stuff. TK j.22C after grabbing is really good, worth learning since it will also give you another option to manage your meter, the recovery is fast enough for you to block any possible reversal.
- Post Momiji: Setplay after 623B is pretty straightforward, 99% of the time you will use j.22A. It has to be done low to the ground, in a way that your opponent is unable to jump the pit, and that in case they wake up with a DP or something, you can block, but for that you gotta know about the wake up timings.

623B puts opponents
head first, here are the wake up timings for reference.
Against V.Sion for example, 4C > 2C > 623B gives you 66~ frame advantage, you can increase it by correctly doing 4C > 2C > 5B~B > 623B, for +69 instead.
For the ones that wake up faster, you can do IAD > j.22A, the lower to the ground possible, but you will gotta change up your timings the more it takes for the character to wake up, for example, against Roa, instead of doing IAD > j.22A, you simply do Forward jump > j.22A, once again, do it as low to the ground as you can.
TK j.236A is an alternative to the pit, a bit rare to use, but if will prevent your opponent from waking up with shield or bunker, as it is unshieldable, just note that it's not as plus, so if they block it, you will have more limited options than if you were to do j.22A.
- Post 2C: Sometimes you gotta skip 623B in your combos just for the sake of managing your meter, and to do that, you just
jump back > j.22C after the 2C. This special gives you more time to do something while your opponent is blocking, you can even put a j.22A for extra chip. You can also use j.236C , not as good for managing meter except if you really don't want to deal with shield or bunker.
Combos
| Combo Notation Help
|
Disclaimer: Combos are written by various writers, so the actual notation used in pages can differ from the standard one.
For more information, see Glossary and Controls.
|
| X > Y
|
X input is cancelled into Y.
|
| X > delay Y
|
Must wait for a short period before cancelling X input into Y.
|
| X, Y
|
X input is linked into Y, meaning Y is done after X's recovery period.
|
| X+Y
|
Buttons X and Y must be input simultaneously.
|
| X/Y
|
Either the X or Y input can be used.
|
| X~Y
|
This notation has two meanings.
- Use attack X with Y follow-up input.
- Input X then within a few frames, input Y. Usually used for option selects.
|
| X(w)
|
X input must not hit the opponent (Whiff).
|
| j.X
|
X input is done in the air, implies a jump/jump cancel if the previous move was done from the ground.
Applies to all air chain sections:
- Assume a forward jump cancel if no direction is given.
- Air chains such as j.A > j.B > j.C can be shortened to j.ABC.
|
| sj.X
|
X input is done after a super jump. Notated as sj8.X and sj9.X for neutral and forward super jumps respectively.
|
| dj.X
|
X input is done after a double jump.
|
| sdj.X
|
X input is done after a double super jump.
|
| tk.X
|
Stands for Tiger Knee. X motion must be buffered before jumping, inputting the move as close to the ground as possible. (ex. tk.236A)
|
| (X)
|
X is optional. Typically the combo will be easier if omitted.
|
| [X]
|
Input X is held down. Also referred to as Blowback Edge (BE). Depending on the character, this can indicate that this button is held down and not released until indicated by the release notation.
|
| ]X[
|
Input X is released. Will only appear if a button is previously held down. This type of input is referred to as Negative Edge.
|
| {X}
|
Button X should only be held down briefly to get a partially charged version instead of the fully charged one.
|
| X(N)
|
Attack "X" should only hit N times.
|
| (XYZ)xN
|
XYZ string must be performed N times. Combos using this notation are usually referred to as loops.
|
| (XYZ^)
|
A pre-existing combo labelled XYZ is inserted here for shortening purposes.
|
| CH
|
The first attack must be a Counter Hit.
|
| Air CH
|
The first attack must be a Counter Hit on an airborne opponent.
|
| 66
|
Performs a ground forward dash.
|
| j.66
|
Performs an aerial forward dash, used as a cancel for certain characters' air strings.
|
| IAD/IABD
|
Performs an Instant AirDash.
|
| AT
|
Performs an Air Throw. (j.6/4A+D)
|
| IH
|
Performs an Initiative Heat.
|
| AD
|
Performs an Arc Drive.
|
| AAD
|
Performs an Another Arc Drive.
|
Outside of midscreen, you should always do a corner carry combo in order to properly run your setplay and pressure, never go into the air combo unless more damage is needed to finish a round, or if you catch a jump and you have no choice but to go for an AT ender.
Corner carry with this character can be achieved with 6C after 6AAA, pretty simple, but if you want more damage, it has to get a little more complicated than that.
For the Momiji loops, you need to know about a few sequences:
4C > 2C > 623B
5B > 2C > 2A(w) > 4C > 623B
2B(1) > 2C > 2A(w) > 4C > 5B~B > 623B
You will be the one to decide which one to use, the first sequence is the most basic and reliable, the second gives the most damage, and the third gives the most meter.
These are not fixed however, there are variations like 5B > 2C > 623B or 4C > 2C > delay 5B~B, it all depends on what you want, even ending your combos with 2C is good enough, allowing you to put a j.22A pit.
- 5B~B can give you more frame advantage.
- During your combo, if you hit your opponent with 623B low to the ground, a 5B or 4C link is impossible, you have to do 2B in order to save the combo.
- Momiji loops in high hitcount combos are not recommended, you can gain up to 160% meter, but you will also give a ton of meter to your opponent.
- 5B trips crouching opponents, which is really annoying when you're trying to go for corner carry, you can save the combo with
5C > 2C > 5A(w)6AA, but you lose damage, to prevent this, you either substitute 5B with 2B(1) or skip it entirely, add more 2A's and confirm it directly with 5C > 4C > 6AAA.
| Condition
|
Notation
|
Damage
vs V.Sion
|
Notes
|
|
| Normal starter, grounded opponent, midscreen
|
- 2A > 5B > 5C > 4C > 2C > 623B > 4C > 2C > 623B > 4C > 2C > delay 623B
|
4434
|
| |
| Meter Gained: 76,3% |
Meter Given (vs C-Moon): 32,7% |
| Your BnB midscreen to get meterless oki. |
|
|
| Normal starter, grounded opponent, midscreen
|
- 2A > 5B > 5C > 4C > 2C > 623B > 4C > 2C > 623B > 4C > 2C > 5B~B > sj.BC > sdj.ABC > AT
|
4869
|
| |
| Meter Gained: 101,8% |
Meter Given (vs C-Moon): 49% |
| Optimal damage route of the previous combo when you want to end the round. |
|
|
| Normal starter, grounded opponent
|
- 2A > 5B > 5C > 4C > 6AAA > 6C > 66 > 4C > 2C > 623B > 4C > 2C > 623B > 4C > 2C > delay 623B
|
4387
|
| |
| Meter Gained: 100,4% |
Meter Given (vs C-Moon): 52% |
| The most basic corner carry you can do, decent damage and meter gain, works perfectly on everyone as long as you delay the last 623B. |
|
|
| Normal starter, grounded opponent
|
- 2A > 5B > 5C > 4C > 6AAA > 5B > 5C > 2C > 5A(w)6AA > delay 6C > 66 > 2C > delay 623B > 5B > 2C > 5C > 623B
|
4619
|
| |
| Meter Gained: 110,2% |
Meter Given (vs C-Moon): 57,2% |
| More difficult corner carry combo. Increased damage and meter gain. 5A(w)6AA should hit as late as possible, otherwise is impossible to connect a 6C.
The combo could've continued instead of doing a 5C wallbounce, but at that point you are giving your opponent too much meter. |
|
|
| Normal starter, grounded opponent
|
- 2A > 5B > 5C > 4C > 6AAA > 5B > 5C > 2C > 5A(w)6AA > 6C > 66 > 2C > 5C > 4C > 5B~B > sj.BC > sdj.BC > AT
|
4838
|
| |
| Meter Gained: 121,8% |
Meter Given (vs C-Moon): 66,8% |
| More damaging version of the above, once again, only for when you want to end the round. |
|
|
| Normal starter, grounded opponent
|
- 2A > 5B > 5C > 4C > 6AAA > 5B > 5C > 2C > 5A(w)6AA > 2C > delay 5C > 4C > 623B > 5B > 2C > delay 623B
|
4808
|
| |
| Meter Gained: 111,3% |
Meter Given (vs C-Moon): 61% |
| The 2C after 5A(w)6AA can be a quite difficult link, but worth learning, since this is the most optimal combo you can do while still keeping a good knockdown with 623B. |
|
|
| AT Starter
|
- Raw AT > 2A > 5C > 2C > 5A(w)6AA > 6C > 66 > 2C > 623B > 4C > 2C > 623B > 4C > 2C > delay 623B
|
3296
|
| |
| Meter Gained: 87,7% |
Meter Given (vs C-Moon): 37,3% |
| Corner carry out of golden AT.
Instead of 2A, you can do 2B or 5B, these are much tighter links, but give better damage. |
|
|
| Shield counter starter
|
- Shield Counter > 5B > 5C > 2C > 5A(w)6AA > delay 6C > 66 > 2C > 623B > 4C > 2C > 623B > 4C > 2C > delay 623B
|
3265
|
| |
| Meter Gained: 96,2% |
Meter Given (vs C-Moon): 42% |
| Corner carry out of shield counter, if you ever get one, same combo can apply to any air CH you get. |
|
|
Notable Players
| Name |
Color
|
Region |
Common Venues |
Status |
Details
|
Tsubasa
(翼) |

|
Japan |
Play Spot BIG ONE 2nd |
Inactive |
Original H-Vaki player. Technical, and with great fundamentals, watch him if you really want to learn the character.
|
Additional Resources
H-V.Akiha Match Video Database
@DRK_Player: Playing H-VAkiha. A PDF mirror of the document is available here.
MBAACC Navigation
