Melty Blood/MBAACC/Neco & Mech/Crescent Moon: Difference between revisions
(→Combos) |
m (→Combos) |
||
| Line 56: | Line 56: | ||
*6C ch j.[C] land ~ 214C sj.[C] dj.[C]B land j.ABC dj.BC AT [https://youtu.be/wsLNfyGD7Ik?t=77 (Video)] | *6C ch j.[C] land ~ 214C sj.[C] dj.[C]B land j.ABC dj.BC AT [https://youtu.be/wsLNfyGD7Ik?t=77 (Video)] | ||
:Her most damaging 6C counter hit combo, although getting the exact height for 214C can be tricky. | :Her most damaging 6C counter hit combo, although getting the exact height for 214C can be tricky. Note: you don't have to superjump for this combo, but it can make it a little bit easier if you're not close enough. | ||
*6C ch j.[C] land 214A j.[C] dj.[C]B land j.ACB dj.BC AT [https://youtu.be/wsLNfyGD7Ik?t=86 (Video)] | *6C ch j.[C] land 214A j.[C] dj.[C]B land j.ACB dj.BC AT [https://youtu.be/wsLNfyGD7Ik?t=86 (Video)] | ||
Revision as of 09:10, 26 August 2019
Overview
C-Neco Mech is a setplay oriented character with strong oki and pressure tools, although she has a fairly low damage ceiling without a counter hit starter. 214x resets is what her pressure is all about, ambiguously using it in blockstrings to keep your opponent guessing if they should jump out or not during the resets, many of which are not easy to pin point the exact points where they can jump out, along side a number of frametraps and throw/low mixups. If you can force respect you can guard break your opponent very fast with her pressure, however her pressure can be accidentally ended if you're not careful and hit neco during it, as you can not use any neco summons when neco is knocked down.
C-Neco Mech has one of the best air dashes in the game and is a considerably fast character. She does not have the best neutral with her normals, but you will mostly be controlling space with the threat of the air unblockable neco, which can be activated with either 623x, 6C, 6[C], or j.[C], however you can be counterhit during it if you are not careful. The best way to use the AUB neco is from a safe position (when the opponent is knocked down or a distance away) or to punish something the opponent does from across the screen if they are not ready for it. You can hit neco during scrambles to force favorable trades if you're feeling brave, but it's high risk medium reward at best. She also has some of the better anti air options in the game with her 5A, 22A(has clash frames and is top body invul on startup), 5C/[C], and 6C/[C](usually hitting neco at the same time for the AUB since 6C is not AUB).
Combos
Alternatively, here's a video javashige has on C-Neco Mech(with arguably more optimized versions of combos): https://www.nicovideo.jp/watch/sm30275898
Normal Combos
Note: Optional parts of a combo will be surrounded by parentheses, for example: (5C(3)). Numbers with parentheses around them simply indicate the number of times that move hits.
- 2A 2B(2) (5C(3)) 2C 6C j.BC dj.BC AT (Video)
- Standard bnb, using 5C may cause 6C to whiff if they are not close enough.
- 2A 2B(2) 2C 6C j.CB 66 j.B dj.AC AT (Video)
- Universal bnb that works on all characters(except necos), and is not height specific.
- 2A 2B(2) 2C 5C(2) 6C j.CB 66 j.B dj.BC AT (Video)
- Height specific combo that needs to be adjusted to work on ryougi and nero by doing 5C(1) 6C instead. Can also use dj.AC if you don't want to deal with it being height specific.
Note: Any of the previous three air bnb portions of the combos can be used instead of the standard j.BC dj.BC AT for some other combos, although they may not always work. You are free to use the air bnb of your choice on combos with > air bnb on the ends of them.
- 2A 2B(2) 2C 5C(2) 5B 6C > air bnb (Video)
- Same as previous combo but also corner specific, and is only really used to add a little extra damage.
- 2A 2B(2) (5C(3)) 2C 214A j.[C] (dj.[C]A or dj.[C]B) land 623A (Video)
- Corner carry combo from midscreen into hard knockdown. Careful not to hit neco before 214A.
- 2A 2B(2) (5C(3)) 2C 214A j.[C] (dj.[C]A or dj.[C]B) land 5B 6C > air bnb (Video)
- Same as previous combo, but for damage instead of hard knockdown.
- AT 5B 6C > air bnb (Video)
- Standard AT combo.
- AT 2C 214A (j.[C]A or j.[C]B) 5B 6C land j.CB dj.BC AT (Video)
- Does similar damage as the previous combo. Not much of a reason to be using this, unless you want to do 623A ender after j.[C]A/B for hard knockdown.
- 2A 5B 2B(2) (2C) 623C
- Meter dump combo for when you're in MAX or if you want hard knockdown.
Counter Hit & j.[C] Combos
- 6C ch (2B(2)) 5B 6C > air bnb
- 6C counter hit combo if you forget you can jump for double j.[C] combos.
- 6C ch j.[C] dj.[C]B land j.ACB dj.BC AT (Video)
- Standard 6C counter hit combo.
- 6C ch j.[C] dj.[C] 66 j.CB land j.BC dj.BC AT (Video)
- 6C counter hit combo with a bit more damage, although j.CB may whiff if you airdash too far.
- 6C ch j.[C] dj.[C] land (2B(2) 623C) 2B(2) 623A (Video)
- For hard knockdown.
- 6C ch j.[C] land ~ 214C sj.[C] dj.[C]B land j.ABC dj.BC AT (Video)
- Her most damaging 6C counter hit combo, although getting the exact height for 214C can be tricky. Note: you don't have to superjump for this combo, but it can make it a little bit easier if you're not close enough.
- 6C ch j.[C] land 214A j.[C] dj.[C]B land j.ACB dj.BC AT (Video)
- Corner specific 6C counter hit combo that doesn't have to use meter.
- 6C ch ~ j.[C] dj.[C] (2B(2)) 5B 6C > air bnb (Video)
- Only works when counter hitting a jumping opponent in order to let 6C fully recover. Her most damaging meterless 6C counter hit combo.
- 6C ch ~ j.[C] land ~ 214C j.[C] dj.[C]B land 5B 6C > air bnb
- Metered version of an aerial 6C counter hit.
- 236A j.[C] dj.[C] (2B(2)) 5B 6C > air bnb (Video)
- You probably won't ever pull this off in a match unless your opponent doesn't block 236A on wakeup.
- 6[C] neco hit ch j.[C] (dj.[C]A or dj.[C]B) land 5B 6C > air bnb (Video)
- Corner specific wall slam combo, can be tricky to pull off if you're not ready for the counter hit. Does not work unless it is a counter hit or your opponent doesn't air tech.
- 6[C] neco hit ch j.[C] (dj.[C]A or dj.[C]B) land 623A (Video)
- Previous combo but with hard knockdown.
- j.B ch land 5B 6C > air bnb (Video)
- Standard aerial counter hit combo.
- j.B ch land ~ 214C j.[C] dj.[C] (2B(2)) 5B 6C > air bnb (Video)
- This is realistically going to be your most damaging combo off of an aerial counter hit.
- j.B ch dj.[C] land ~ 214C j.[C] (dj.[C]A or dj.[C]B) land 5B 6C > air bnb (Video)
- This combo requires a hard commitment after pressing j.B if you know you're going to get a counter hit off of it and you're at the right height. C-Neco Mech's most damaging combo.
- 41236C ~ j.[C] dj.[C] land 2B(2) 5B 6C > air bnb (Video)
- Arc Drive combo for big damage.
Strategy
Do what you need to do to extrapolate on the character. Here are example categories below.
Crescent
Spacing
Pressure
Move Descriptions
Normal Moves
| 2A [Mid]
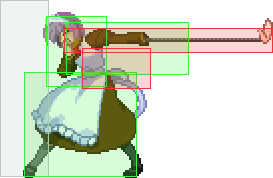
Startup: 5f | Active: 3f | Recovery: 9f A crouching jab that hits mid. Range is average. For combo starters or tick throws. |
| 5A [Mid]
Startup: 5f | Active: 3f | Recovery: 9f A decent ranged 5A slap that whiffs crouchers. Will mostly be used as an anti air against IAD's or during 5[C] charges in blockstrings to purposefully whiff and then tick throw. |
| 2B [Low]
Startup: 8f (1st hit) / 12 (2nd hit) | Active: 3f / 2f | Recovery: 19f A crouching extended push with good range. |
| 5B [Mid]
Startup: 6f | Active: 2f | Recovery: 18f A good ranged 5B that hits crouchers when up close. Good for catching jumpouts on wakeup. Does not hit Neco. |
| 2C [Low]
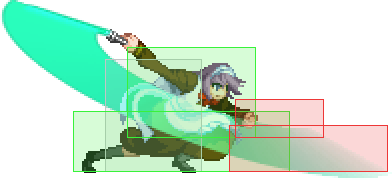
Startup: 13f | Active: 2f | Recovery: 28f A laser sword sweep. Has deceptively good range and can catch people off guard with it, especially if you use it as a meaty from a distance away. |
| 5C [Mid]
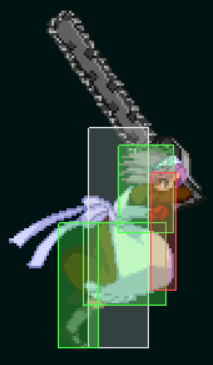
Startup: 15f | Active: 7f | Recovery: 21f Multi hit chainsaw swing that can function as an anti air, but won't be used in neutral very often otherwise. |
| 5[C] [Mid]
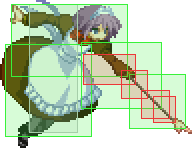
Startup: 15f | Active: 17f | Recovery: 21f Neco Mech charges forward with her chainsaw. The first hit has 10 extra active frames and propels her really far forward, and the later hits have a great hitbox for contesting both air and ground approaches(the speed from the charge can catch people off guard). Should be used minimally however, since it is very easy to punish on whiff. |
| 6C [Mid]
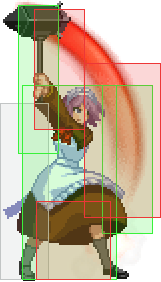
6C - Startup: 7f | Active: 3f | Recovery: 22f 6[C] - Startup: 21f | Active: 3f | Recovery: 22f Neco Mech swings her hammer in a half circle, covering all of her front and above. Turns Neco into a hitbox on hit, which can function as a delayed anti air. Can also serve as a means of protecting you from enemies crossing you up, as the 6C can anti air behind from both the top of the swing and the neco being flung backwards, as neco being hit autocorrects towards the opponent's location. 6[C] version: Same deal with 6C, except the launch on hit from it is a bit lower, and hitting neco makes her fly with greater speed and distance, wallslamming the opponent. |
| j.A [Mid]
Startup: 7f | Active: 3f | Recovery: --f A diagonal downward pointing air jab that hits mid. This move is not that great for most neutral situations and you're really better off using j.B or j.C. |
| j.B [High]
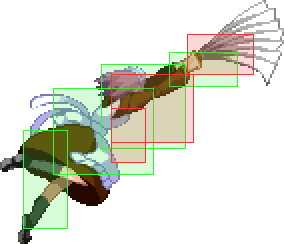
Startup: 6f | Active: 3f | Recovery: --f A diagonal upward pointing fan swing with good range. You'll be fishing for tons of counter hits with this move. j.C > j.B also serves as a double overhead against opponents on the ground. |
| j.C [High]
Startup: 15f | Active: 6f | Recovery: --f A hammer swing covering horizontal and a bit of diagonal downward space. Your main air to ground move, as well as covering spots where j.B can not. |
| j.[C] [High]
Startup: 27f | Active: 7f | Recovery: --f Charged hammer swing with less green that is hard bounce on aerial hit, and sends Neco flying up into the air on hit. You'll be using this move a lot to hit Neco in order to control air space, so be wary of being counter hit out of it as it does have considerable start up. However, you can also play around this by using j.C instead to hit your opponent earlier if they expect j.[C]. Because of it's long start up, you can also whiff this move on landing for tick throws. |
Special Moves
Staring Cat's Eye 「JP name」 - 236ABC
|
Jumping Cat's Love 「」 - 214ABC
|
EM Net Wire「」 - 28ABC
|
Anti-Neco Field 「」 - 22ABC
|
Arc Drive
L.S.O. (Superhuman Sister Alliance)「」41236C
|
Another Arc Drive
L.S.O. (Superhuman Sister Alliance)「」41236C
|
Last Arc
Saturday Night Forever「」
|
