Melty Blood/MBAACC/Shiki Ryougi/Half Moon: Difference between revisions
m (→Combos) |
|||
| Line 59: | Line 59: | ||
<tr> | <tr> | ||
<td bgcolor="#fefef0"> Midscreen, Overhead </td> | <td bgcolor="#fefef0"> Midscreen, Overhead </td> | ||
<td> 4C 22A | <td> 4C > 22A > 5B > 5B > j.5B > j.5C > dj.5B > dj.5C > (AT)/(dj.236B) </td> | ||
<td bgcolor="#fefef0"> UNK </td> | <td bgcolor="#fefef0"> UNK </td> | ||
<td> 0% </td> | <td> 0% </td> | ||
| Line 72: | Line 72: | ||
<tr> | <tr> | ||
<td bgcolor="#fefef0"> Midscreen, Overhead </td> | <td bgcolor="#fefef0"> Midscreen, Overhead </td> | ||
<td> 4C 22A 2C 3C 623B 2C | <td> 4C > 22A > 2C > 3C > 623B > 2C > 5B > 5B > j.5B > j.5C > dj.5B > dj.5C > AT </td> | ||
<td bgcolor="#fefef0"> UNK </td> | <td bgcolor="#fefef0"> UNK </td> | ||
<td> 0% </td> | <td> 0% </td> | ||
| Line 84: | Line 84: | ||
<tr> | <tr> | ||
<td bgcolor="#fefef0"> Midscreen, Overhead </td> | <td bgcolor="#fefef0"> Midscreen, Overhead </td> | ||
<td> 4C 236A 236A 236A </td> | <td> 4C > 236A~236A~236A </td> | ||
<td bgcolor="#fefef0"> UNK </td> | <td bgcolor="#fefef0"> UNK </td> | ||
<td> 0% </td> | <td> 0% </td> | ||
| Line 99: | Line 99: | ||
<table cellspacing=1> | <table cellspacing=1> | ||
<tr> | <tr> | ||
<td bgcolor="#fefef0"> Midscreen, Antiair | <td bgcolor="#fefef0"> Midscreen, Antiair </td> | ||
<td> | <td> 5B > 5B > j.5B > j.5C > dj.5B > dj.5C > AT </td> | ||
<td bgcolor="#fefef0"> UNK </td> | <td bgcolor="#fefef0"> UNK </td> | ||
<td> 0% </td> | <td> 0% </td> | ||
| Line 111: | Line 111: | ||
</tr> | </tr> | ||
<tr> | <tr> | ||
<td bgcolor="#fefef0"> Midscreen, Antiair | <td bgcolor="#fefef0"> Midscreen, Antiair </td> | ||
<td> 5A | <td> 5A > 6A~6A > j.5B > j.5C > dj.5B > dj.5C > AT </td> | ||
<td bgcolor="#fefef0"> UNK </td> | <td bgcolor="#fefef0"> UNK </td> | ||
<td> 0% </td> | <td> 0% </td> | ||
| Line 123: | Line 123: | ||
</tr> | </tr> | ||
<tr> | <tr> | ||
<td bgcolor="#fefef0"> Midscreen, | <td bgcolor="#fefef0"> Midscreen, Air CH </td> | ||
<td> j.X (CH) land | <td> j.X(CH) land (623B Loop^) </td> | ||
<td bgcolor="#fefef0"> UNK </td> | <td bgcolor="#fefef0"> UNK </td> | ||
<td> 0% </td> | <td> 0% </td> | ||
| Line 136: | Line 136: | ||
</tr> | </tr> | ||
<tr> | <tr> | ||
<td bgcolor="#fefef0"> Midscreen, | <td bgcolor="#fefef0"> Midscreen, Air CH </td> | ||
<td> j.X (CH) land 2C 3C | <td> j.X(CH) land 2C > 3C > 5B > 5B > 63214A > 2C > 3C > tk.236B > 5A > (22A)/(22A > 2C > 3C > 22A > 2A > 2C delay 5C)xN > 5A > 6A~6A > 214A > j.5B > j.5C > dj.5B > dj.5C > AT </td> | ||
<td bgcolor="#fefef0"> UNK </td> | <td bgcolor="#fefef0"> UNK </td> | ||
<td> 0% </td> | <td> 0% </td> | ||
| Line 145: | Line 145: | ||
</tr> | </tr> | ||
<tr> | <tr> | ||
<td colspan="7" bgcolor="#EEEEFF"> Air-to-air counterhits near the corner, can also be varied with 214C after 214A for 2C 3C 22X oki. </td> | <td colspan="7" bgcolor="#EEEEFF"> Air-to-air counterhits near the corner, can also be varied with 214C after 214A for 2C > 3C > 22X oki. </td> | ||
</tr> | |||
</table> | |||
<table cellspacing=1> | |||
<tr> | |||
<td colspan="7" bgcolor="#EEEEFF"> This loop works both midscreen and in the corner. However, 623B crosses through midscreen, and 2C may cross under midscreen depending on spacing and character. Builds a decent bit of meter, and is easier than the Knife Pickup Loop in addition to not being corner-specific. </td> | |||
</tr> | |||
<tr> | |||
<td bgcolor="#fefef0"> Anywhere, 623B Loop </td> | |||
<td> ~2C > 3C > 22A > 2C > 3C > 623B (2C 623B)xN 5B > 5B > j.5B > j.5C > dj.5B > dj.5C > AT </td> | |||
<td bgcolor="#fefef0"> UNK </td> | |||
<td> 0% </td> | |||
<td bgcolor="#fefef0"> UNK% </td> | |||
<td> UNK% </td> | |||
<td bgcolor="#fefef0"> N/A </td> | |||
</tr> | |||
<tr> | |||
<td colspan="7" bgcolor="#EEEEFF"> In most circumstances it is possible to do 2-3 reps of 2C 623B. Can also end the air combo with j.236B. </td> | |||
</tr> | |||
<tr> | |||
<td bgcolor="#fefef0"> Anywhere, 623B Loop </td> | |||
<td> ~2C > 3C > 22A > 2C > 3C > 623B (2C 623B)xN 5B > 5B > j.5B > l.5C > dj.BC > AT</td> | |||
<td bgcolor="#fefef0"> UNK </td>> | |||
<td> 0% </td> | |||
<td bgcolor="#fefef0"> UNK% </td> | |||
<td> UNK% </td> | |||
<td bgcolor="#fefef0"> N/A </td> | |||
</tr> | |||
<tr> | |||
<td colspan="7" bgcolor="#EEEEFF"> Sweep loop variant ending in rekkas. Provides stronger oki than either aircombo-ender variant. </td> | |||
</tr> | </tr> | ||
</table> | </table> | ||
Revision as of 02:39, 20 January 2020
Combos
Be sure to check this article about H-Ryougi: https://drunkardshade.com/2015/10/17/melty-bits-h-ryougi-shiki/
Note: Ryougi may end almost any air combo with either Air Throw or j.236B, favoring positioning and damage respectively.
Meterless Combos
| Conditions | Input | V.Sion Damage | Meter Cost | Meter Generated | Opposing Meter | Video Link |
|---|---|---|---|---|---|---|
| Midscreen, Standard | |2A| > 5B > 5B > 2B > 2C > 5C > j.5B > j.5C > dj.B > dj.C > (AT)/(dj.236B) | N/A | 0% | 0% | 0% | N/A |
| Basic midscreen BnB. Ending with j.236B nets ~200 more damage, but this forfeits post-airthrow oki. | ||||||
| Midscreen, Standard | |2A| > 5B > 5B > 2B > 5C > 2C > 6A~6A|~6A| > j.B > j.C > dj.B > dj.C > (AT)/(dj.236B) | N/A | 0% | 0% | 0% | (Video) |
| A slightly more damaging version of the basic midscreen BnB. j.236B is used over Air Throw if damage is preferred over oki. On some characters, in order to connect with all three hits of the 6A auto follow ups, you may need to slightly delay it after the 2C. Otherwise, simply omit the third hit and jump cancel the second hit. If using all three hits of 6AAA, you must delay the first j.B in order to connect an air throw at the end of the combo on most if not all characters. | ||||||
| Midscreen, Standard | |2A| > 2B > 5B > 5B > 5C > 2C > 5A > 236B~236A(whiff)~214A > 2A > 2C > 5C > 22A > 2C > 3C > 623B > 236A~236A~236A | N/A | 0% | 0% | 0% | N/A |
| One of her most damaging midscreen BnBs, 236A also works on some characters. 214A input is reversed during the rekkas; original input is 236A. Timing is variant depending on the character. Works on: Warachia, Akiha, P.Ciel, Nero. | ||||||
| Midscreen, Overhead | 4C > 22A > 5B > 5B > j.5B > j.5C > dj.5B > dj.5C > (AT)/(dj.236B) | UNK | 0% | UNK% | UNK% | N/A |
| Basic meterless combo off of Ryougi's ground overhead. The airthrow can be replaced with j.236B. | ||||||
| Midscreen, Overhead | 4C > 22A > 2C > 3C > 623B > 2C > 5B > 5B > j.5B > j.5C > dj.5B > dj.5C > AT | UNK | 0% | UNK% | UNK% | N/A |
| Advanced midscreen overhead combo. It may be possible to lead into the 623B loop instead of 5BB, but this has not yet been tested. | ||||||
| Midscreen, Overhead | 4C > 236A~236A~236A | UNK | 0% | UNK% | UNK% | N/A |
| Knifeless, meterless overhead combo. Other rekka strings connect, but do less damage. At extremely close range, the the third 236A may cross up, giving 214A instead. At this range, inputting 236A 236A 214A gives the normal rekka sequence. | ||||||
| Midscreen, Antiair | 5B > 5B > j.5B > j.5C > dj.5B > dj.5C > AT | UNK | 0% | UNK% | UNK% | N/A |
| Generic antiair combo. | ||||||
| Midscreen, Antiair | 5A > 6A~6A > j.5B > j.5C > dj.5B > dj.5C > AT | UNK | 0% | UNK% | UNK% | N/A |
| Does more damage than the 5BB antiair combo above, and 5A is safer. Requires the enemy to be very close to the ground and/or significant delays between each hit in the 5A 6AA series. This is the standard meterless midscreen combo to confirm into after an air-to-air counterhit. | ||||||
| Midscreen, Air CH | j.X(CH) land (623B Loop^) | UNK | 0% | UNK% | UNK% | N/A |
| Air-to-air counterhits can also be confirmed into the 623B loop. | ||||||
| Midscreen, Air CH | j.X(CH) land 2C > 3C > 5B > 5B > 63214A > 2C > 3C > tk.236B > 5A > (22A)/(22A > 2C > 3C > 22A > 2A > 2C delay 5C)xN > 5A > 6A~6A > 214A > j.5B > j.5C > dj.5B > dj.5C > AT | UNK | 0% | UNK% | UNK% | N/A |
| Air-to-air counterhits near the corner, can also be varied with 214C after 214A for 2C > 3C > 22X oki. | ||||||
| This loop works both midscreen and in the corner. However, 623B crosses through midscreen, and 2C may cross under midscreen depending on spacing and character. Builds a decent bit of meter, and is easier than the Knife Pickup Loop in addition to not being corner-specific. | ||||||
| Anywhere, 623B Loop | ~2C > 3C > 22A > 2C > 3C > 623B (2C 623B)xN 5B > 5B > j.5B > j.5C > dj.5B > dj.5C > AT | UNK | 0% | UNK% | UNK% | N/A |
| In most circumstances it is possible to do 2-3 reps of 2C 623B. Can also end the air combo with j.236B. | ||||||
| Anywhere, 623B Loop | ~2C > 3C > 22A > 2C > 3C > 623B (2C 623B)xN 5B > 5B > j.5B > l.5C > dj.BC > AT | UNK | 0% | UNK% | UNK% | N/A |
| Sweep loop variant ending in rekkas. Provides stronger oki than either aircombo-ender variant. | ||||||
623B Loop
- This loop works both midscreen and in the corner. However, 623B crosses through midscreen, and 2C may cross under midscreen depending on spacing and character. Builds a decent bit of meter, and is easier than the Knife Pickup Loop in addition to not being corner-specific.
- ~2C 3C 22A 2C 3C 623B [2C 623B]xN 5BB j.BC dj.BC dj.4/6A+D
- In most circumstances it is possible to do 2-3 reps of 2C 623B. Can also end the air combo with j.236B.
- ~2C 3C 22A 2C 3C 623B [2C 623B]xN 2C 236A 236A 236A
- Sweep loop variant ending in rekkas. Provides stronger oki than either aircombo-ender variant.
Corner
Standard
- (2A) 2B 5BB 5C 2C (delay) 6AAA 214A (5BB) j.BC dj.BC dj.4A+D (Video)
- A meterless, knifeless corner combo that provides airthrow oki. Like the combo above, you may need to slightly delay the 6AAA on some characters. Back air throw is required in order to keep the opponent in the corner.
- (2A) 2B 5BB 5C 2C TKj.236B 5BB 214A 2C (delay) 5C 22A 2C 3C 236A 236A 236A
- A meterless corner combo that uses knife and keeps the opponent in the corner, in addition to providing good oki and knife pick-up. The rekka ender can be replaced with 623A for oki as well. This is Ryougi's best meterless corner combo in terms of both oki and damage, but the timings differ greatly from character to character, making it one of her hardest.
- (2A) 2B 5BB 5C 2C TKj.236B 5BB 214A ~4 5A 22A 2C 3C 623B 236A 236A 236A
- Not as much damage as the above combo but much easier to execute and consistent on the entire cast.
Overhead Starter
- 4C 22A 5BB 214A j.BC dj.BC dj.4/6A+D
- A meterless corner combo off of her ground overhead. Provides air throw oki, but doesn't put you right on top of the knife. Midscreen, you simply omit the 214A and jump cancel 5BB into the air combo. If you don't have the knife, you can simply go into 236A 236A 236A off of the overhead.
Knife Pickup Loop
- 2A 2B 5BB 5C 2C TKj.236B 5A [22A 2C 3C 22A 2A 2C delay 5C]xN 2C 3C 623B 236Ax3.
- More than two loops may be possible depending on the character.
- Works on Aoko, Riesbyfe, V.Sion, Warachia, Akiha, P.Ciel, and S.Akiha
- Possible with very strict timing and / or lots of delays on T. Shiki, Nanaya, Sion, Hisui, Arc, and Kohaku
- 2A 2B 5BB 5C 2C TKj.236B 5BB 214A ~4 5A [22A 2C 3C 22A 2A 2C delay 5C]x2 2C 3C 623B 236Ax3 (Video)
- Slightly more damaging variant
- Still character specific.
- 2A 2B 5BB 5C 2C TKj.236B 5A 22A [2C 3C 22A 5B 22A]xN [2C 3C 22A 2A 2C delay 5C 22A]xN 2C 3C 623B 236Ax3
- Less damage than either of the above but universal on entire cast. Try to go into the 2A 2C 5C loop as soon as you build enough gravity for it to work since it deals way more damage than the 5B version.
- 2B can be used instead of 5B. Makes no real difference, use whatever is easier for you.
- 2A 2C may be impossible or at least very difficult on some characters. However, 2A 5C will always work so long as you have built up enough gravity.
Metered Combos
- (2A) 5BB 2B 5C 2C 6AA(A) j.BC dj.BC dj.22C 2C 3C 236A 236A 236A
- An extension of the basic midscreen BnB using H-Ryougi's EX Aerial Knife Throw. Provides good oki and allows for knife pick-up in addition to the extra damage. Uses 100 circuit. Requires being close to the corner in order for the 2C to connect after the EX Aerial knife throw.
- (2A) 5BB 2B 5C 2C 236A 236A 236A 236C j.BC dj.BC dj.4/6A+D
- A metered combo that works anywhere on the screen. The timing of the jump cancel on the last hit of her EX rekka is odd, but not too difficult once you get used to it. As with most of her air combo enders, you can replace the air throw with j.236B if damage is preferred over oki or if they are too high to get air grabbed, however it only adds around ~100 or so more to the combo.
- (2A) 2B 5BB 5C 2C TKj.236B 5A 22A 2C 3C 22A 2A 5C 22C [22A 2C 3C 22A 2A 2C delay 5C]x2 2C 3C 623B 236Ax3 (Video)
- Metered variant of the Sweep Loop. Unlike meterless versions, this is universal.
Strategy
Work in Progress.
Half
Half-moon Ryougi lacks the unblockables of Crescent and Full Moon. However, her normals have better reach than Crescent's, while retaining the ability to Reverse Beat. Additionally, Half is the only moon capable of catching the knife in the air, allowing for an extremely tricky mixup and some additional options.
Neutral Spacing
Since Ryougi doesn't have great ground-to-air or air-to-ground tools, you should usually try to approach aerial opponents from the air, and grounded opponents from the ground. With good spacing, you can discourage jumps with her air-unblockable 5B. Her 5A 6AA series also serves as a decent anti-air due to hitbox and startup buffs.
Pressure
Use 2A and 421C as whiff cancels in blockstrings. 22A can also be used if you have the knife, but the knife is usually better saved for her guard crush string.
Pressure String Components
- (2A) 5BB 2B 5C 2C 3C
- Generic string. +3 on block.
- 2B 5A (whiff) 6A
- Frametrap
- 5A 6A 4C 22A
- Overhead attempt, made safe by the knife. Does not work off of 5A 6AA; you must cancel the second hit in the series. Additionally if the 4C connects, 22A will confirm the combo.
- 5A 6A 5BB
- Delay 5BB slightly to avoid Reverse Beat. Use this to condition the opponent to not expect the overhead after 5A 6A.
- 22A 2A/5B/2B
- 22A is a ridiculous +9 on block; walk forward 2A will be airtight while dash 2A or raw 5B/2B will frametrap. The disadvantage is that you lose the knife, but there are ways around this...
- (in corner) Close starter > 3C 22A (throw)
- In corner, if you don't do 5C or 2C (which pushes you out too far), a 22A knife throw will bounce back and land right on top of you. You get a free blockstring reset and then you can do...
- (on top of knife) ... 3C 22X (pickup) 2A/5B/2C etc.
- Picking up the knife after a 3C will give you extra frame advantage, which you can use to do an airtight 2A or frametrap with a 2B or 5B.
- (in corner) 22C (throw)
- There are a couple of advantages to using 22C over 22A. First, if you are not smack in the corner, the knife will hit multiple times, giving you huge frame advantage and time to do basically anything you want. Second, it comes out faster than 22A, which means you can do 2C 22C without suffering from 2C's pushback, meaning you can use this to close the distance mid-blockstring. You can use this as a safe way to reset distance in a pressure string if you don't want to risk getting poked out of a dash.
Okizeme
- 22A j.7 6A+B ~
- Knife catch mixup. Throw the knife, jump back, and immediately airdash forwards to catch the knife. Ryougi will then fall ambiguously on the left/right of the opponent. In the corner, you instead get a j.C / 2A / 6A+D sandoori. Air knife catch has some recovery in Current Code, so cancel the catch into a whiffed jumping normal if you want to go low.
Move Descriptions
Normal Moves
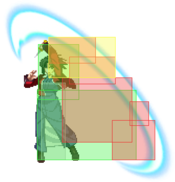
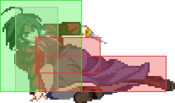
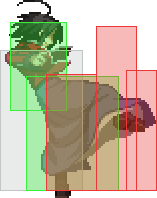
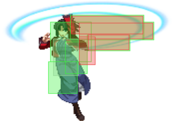
2A
|
|---|
5A
|
|---|
5A6A
|
|---|
5A6AA
|
|---|
2B
|
|---|
5B
|
|---|
5BB
|
|---|
2C
|
|---|
3C
|
|---|
4C
|
|---|
5C
|
|---|
j.A
|
|---|
j.B
|
|---|
j.6B
|
|---|
j.C
|
|---|
Special Moves
Kasane Shouro 「双ね鐘楼」 - 236ABC
Can be followed up with:
Which can then be followed up with:
Note: If you do 236A 236A on an airborne opponent (i.e. after 2C), you will cross them up midscreen sometimes. The directions for the last hit of the rekka will be switched as well so adjust accordingly. |
Hari no Tsuki 「玻璃の月」 - j.236ABC
|
Mogaribue 「虎落笛」 - 623ABC
|
Mumyou no Tsuki 「無明の月」 - 214ABC
|
Onyou Raden 「陰陽螺鈿」 - 421ABC
|
Kakushi Naifu 「隠しナイフ」 - 22ABC (air also)
|
Naifu Hiroi 「ナイフ拾い」 - 22ABC
|
Hari no Tsuki Tobi 「玻璃の月鳶」 - 63214ABC
|
Tenpyo 「転貓」 - 44/22/66ABC during air tech
|
Arc Drive
Chokushi no Magan Gokei Houraku 「直死の魔眼 五景崩落」
|
