Melty Blood/MBAACC/Neco & Mech/Crescent Moon: Difference between revisions
mNo edit summary |
mNo edit summary |
||
| Line 35: | Line 35: | ||
:Same as previous combo, but for damage instead of hard knockdown. | :Same as previous combo, but for damage instead of hard knockdown. | ||
*AT (2B) 5B 6C > air bnb [https://youtu.be/wsLNfyGD7Ik?t=43 (Video)] | *AT (2B(2)) 5B 6C > air bnb [https://youtu.be/wsLNfyGD7Ik?t=43 (Video)] | ||
:Standard AT combo. | :Standard AT combo. | ||
Revision as of 18:45, 21 January 2020
Overview
C Neco Mech is a setplay oriented character with strong oki and pressure tools, although she has a fairly low damage ceiling without a counter hit starter. 214x resets is what her pressure is all about, ambiguously using it in blockstrings to keep your opponent guessing if they should jump out or not during the resets, many of which are not easy to pin point the exact points where they can jump out, along side a number of frametraps and throw/low mixups. If you can force respect you can guard break your opponent very fast with her pressure, however her pressure can be accidentally ended if you're not careful and hit neco during it, as you can not use any neco summons when neco is knocked down.
C Neco Mech has one of the best forward air dashes in the game and is a considerably fast character. She has the fastest walk speed in the game, but her back walk speed, back dash, and air back dash are considerably slower than average. She does not have the best neutral with her normals, but you will mostly be controlling space with the threat of the air unblockable neco, which can be activated with either 623x, 6C, 6[C], or j.[C], however you can be counterhit during it if you are not careful. The best way to use the AUB neco is from a safe position (when the opponent is knocked down or a distance away) or to punish something the opponent does from across the screen if they are not ready for it. You can hit neco during scrambles to force favorable trades if you're feeling brave, but it's high risk medium reward at best. She also has some of the better anti air options in the game with her 5A, 22A(has clash frames and is top body invul on startup), 5C/[C], and 6C/[C](usually hitting neco at the same time for the AUB since 6C is not AUB).
Combos
Alternatively, here's a video javashige has on C Neco Mech(with arguably more optimized versions of combos): https://www.nicovideo.jp/watch/sm30275898
Normal Combos
Note: Optional parts of a combo will be surrounded by parentheses, for example: (5C(3)). Numbers with parentheses around them simply indicate the number of times that move hits.
- 2A 2B(2) (5C(3)) 2C 6C j.BC dj.BC AT (Video)
- Standard bnb, using 5C may cause 6C to whiff if they are not close enough.
- 2A 2B(2) 2C 6C j.CB 66 j.B dj.AC AT (Video)
- Universal bnb that works on all characters(except necos), and is not height specific. Be sure to forward jump after the airdash to not whiff.
- 2A 2B(2) 2C 5C(2) 6C j.CB 66 j.B dj.BC AT (Video)
- Height specific combo that needs to be adjusted to work on ryougi and nero by doing 5C(1) 6C instead. Can also use dj.AC if you don't want to deal with it being height specific. Be sure to forward jump after the airdash to not whiff.
Note: Any of the previous three air bnb portions of the combos can be used instead of the standard j.BC dj.BC AT for some other combos, although they may not always work. You are free to use the air bnb of your choice on combos with > air bnb on the ends of them.
- 2A 2B(2) 2C 5C(2) 5B 6C > air bnb (Video)
- Same as previous combo but also corner specific, and is only really used to add a little extra damage.
- 2A 2B(2) (5C(3)) 2C 214A j.[C] (dj.[C]A or dj.[C]B) land 623A (Video)
- Corner carry combo from midscreen into hard knockdown. Careful not to hit neco before 214A.
- 2A 2B(2) (5C(3)) 2C 214A j.[C] land 66 2B(2) 623A
- More consistent version of previous combo for midscreen oki.
- 2A 2B(2) (5C(3)) 2C 214A j.[C] (dj.[C]A or dj.[C]B) land 5B 6C > air bnb (Video)
- Same as previous combo, but for damage instead of hard knockdown.
- AT (2B(2)) 5B 6C > air bnb (Video)
- Standard AT combo.
- AT 2C 214A (j.[C]A or j.[C]B) 5B 6C land j.CB dj.BC AT (Video)
- Does similar damage as the previous combo. Not much of a reason to be using this, unless you want to do 623A ender after j.[C]A/B for hard knockdown.
- 2A 5B 2B(2) (2C) 623C
- Meter dump combo for when you're in MAX or if you want hard knockdown.
Counter Hit & j.[C] Combos
- 6C ch (2B(2)) 5B 6C > air bnb
- 6C counter hit combo if you forget you can jump for double j.[C] combos.
- 6C ch j.[C] dj.[C]B land j.ACB dj.BC AT (Video)
- Standard 6C counter hit combo.
- 6C ch j.[C] dj.[C] land j.ACB dj.BC AT
- Same as previous combo, but easier.
- 6C ch j.[C] dj.[C] 66 j.CB land j.BC dj.BC AT (Video)
- 6C counter hit combo with a bit more damage, although j.CB may whiff if you airdash too far.
- 6C ch j.[C] dj.[C] land (2B(2) 623C) 2B(2) 623A (Video)
- For hard knockdown.
- 6C ch j.[C] land ~ 214C sj.[C] dj.[C]B land j.ABC dj.BC AT (Video)
- Her most damaging 6C counter hit combo, although getting the exact height for 214C can be tricky. Note: you don't have to superjump for this combo, but it can make it a little bit easier if you're not close enough.
- 6C ch j.[C] land 214A j.[C] dj.[C]B land j.ACB dj.BC AT (Video)
- Corner specific 6C counter hit combo that doesn't have to use meter.
- 6C ch ~ j.[C] dj.[C] (2B(2)) 5B 6C > air bnb (Video)
- Only works when counter hitting a jumping opponent in order to let 6C fully recover. Her most damaging meterless 6C counter hit combo.
- 6C ch ~ j.[C] land ~ 214C j.[C] dj.[C]B land 5B 6C > air bnb
- Metered version of an aerial 6C counter hit.
- 236A j.[C] dj.[C] (2B(2)) 5B 6C > air bnb (Video)
- You probably won't ever pull this off in a match unless your opponent doesn't block 236A on wakeup.
- 6[C] neco hit ch j.[C] (dj.[C]A or dj.[C]B) land 5B 6C > air bnb (Video)
- Corner specific wall slam combo, can be tricky to pull off if you're not ready for the counter hit. Does not work unless it is a counter hit or your opponent doesn't air tech.
- 6[C] neco hit ch j.[C] (dj.[C]A or dj.[C]B) land 623A (Video)
- Previous combo but with hard knockdown.
- j.B ch land 5B 6C > air bnb (Video)
- Standard aerial counter hit combo.
- j.B ch land ~ 214C j.[C] dj.[C] (2B(2)) 5B 6C > air bnb (Video)
- This is realistically going to be your most damaging combo off of an aerial counter hit.
- j.B ch dj.[C] land ~ 214C j.[C] (dj.[C]A or dj.[C]B) land 5B 6C > air bnb (Video)
- This combo requires a hard commitment after pressing j.B if you know you're going to get a counter hit off of it and you're at the right height. C Neco Mech's most damaging combo.
- 41236C ~ j.[C] dj.[C] land 2B(2) 5B 6C > air bnb (Video)
- Arc Drive combo for big damage.
Strategy
Neutral
Spacing the neco
- Many players trying to play C Neco Mech often are unsure of how to keep neco positioned properly in neutral to fully take advantage of her. Realistically, the easiest way for one to understand how to position neco is through experience alone. However, there are a number of things to keep in mind to expedite the process of learning how to manage her positioning. Firstly, you must recognize neco as an extension of your normals/specials and not just a disjointed hitbox. Neco can be activated with 623x, 6C, 6[C], or j.[C], and each of these have a unique use for various scenarios (detailed further in Defense and anti air options). Secondly, you are to let the opponent come to the neco's current position in an opportunistic way. Think of neco as an occasional anchor to base your movements and neutral decisions around.
Setting up expectations
- With that being said, if you base all your neutral decisions around neco, you will start to become predictable. It is very easy to get counter hit in trying to hit neco with a j.[C] for example, as it has a very long start and your path towards the neco can be very predictable. However that doesn't mean you shouldn't ever try to hit neco, you just have to condition your opponent into expecting neco. For example, moving in a way that makes the opponent think you are going to hit neco with a j.[C] so they preemptively move to counter hit your start up. But instead of you doing j.[C], you do a normal j.C(or j.A/B) and you counter hit their attempt to hit you. Another example is doing an empty neutral jump above the neco, and then suddenly airdashing forward or landing to hit neco with 6C, or double jumping to then hit the neco, etc. The key thing to note is to make your opponent expect certain things regarding neco and then mix up your options around it. With the implicit threat of neco being established it allows you to control a portion of the screen without needing to do anything (Of course, be sure to actually hit neco from time to time to remind them it exists).
Learning to not depend on neco
- It is also important to know how to play neutral with her normals alone, as neco will not always be in the right position. As a general rule (this also applies to any character you play) you shouldn't use up all your movement options right away. Don't double jump in the air and then airdash to meet your opponent who's a full screen away. It is very tempting to just air dash at your opponent all the time, as her airdash carries you very far. Focus on approaching with dashing(her dash allows her to hold [1] during, which is useful against certain zoners), walking, neutral jumping and drifting forward to see what your opponent will do, basically not doing anything committal unless you have a clear line to approach.
Defense and anti air options
Defense
- In addition to heat, ex shield, and bunker, Neco Mech also has access to 22x. 22A is top body invul on start up with clash frames and is best used in conjunction with shield, very powerful against moves like h len j.2C or nero j.B. 22B is not invul on start up, but is fully invul shortly after with a clash frame. Whatever you do, do NOT use 22B to contest jump ins. 22B does not have as fast of a start up as 22A, so what often happens with 22B is that you clash their jump in, and they are able to block once they land. 22B is unsafe on block, and should be used as a reversal to resets in pressure(dash ins) or when the opponent can't get a proper meaty. 22C is fully invul on start up, but has no clash frame. It doesn't have a very fast start up(comes out frame 13), but it is a reversal nonetheless.
Anti air
- Neco Mech has access to some fairly decent anti air options with her 5A, 5C/[C], 6C/[C], 623A and j.[C]. 5A is a self explanatory anti air, best used in conjunction with ex shield. 5C/[C] is bit more of a niche anti air option as it does have a good hitbox disjoint above Neco Mech, but its slow start up, long recovery, and momentum from being charged makes it awkward to use solely as an anti air. The most realistic application of 5[C] as an anti air is dashing under someone in the air, and using it to charge towards their position. 6C/[C] is your best anti air option overall, as the ability to trade with this move is phenomenal. It covers a large area in front and above Neco Mech, and as long as you aren't late to use it, it trades very often or even outright beats many air normals. When used in conjuction with hitting neco, it allows you to anti air various kinds of approaches. Note that 6C is not AUB, but 6[C] is AUB. 6[C] is useful for catching predictable landing trajectories, such as a neutral air tech near the corner. 6C/[C] also allows you to target enemies who cross over you in the air, as hitting neco when the enemy is behind you enables neco's trajectory to auto correct and fly towards their current position. 623A has many of the same applications as 6C when it comes to hitting neco, but the main feature of 623A over 6C is that it has less recovery, and is +0 on block. 623A by itself is not a great anti air however. j.[C] being used to hit neco is a very strong as a preemptive anti air zoning tool, but converting into a combo isn't possible more often than not since the opponent can often air tech out before you get close enough for a confirm. It is very easy to confirm on counter hit however.
Offense
Pressure
- Refer to the following video: https://www.youtube.com/watch?v=h9Pr3WPghKE
Note: Every time you hit neco with j.[C] and it flies directly above the opponent, you can do either do 2B(beats fuzzy jumping/attempting to jump, since 2B hits two times), walk/dash up throw either early or late(beats throw OS), Dash up IAD(beats opponent using 4E to throw), dashing up then neutral super jump j.[C] as the neco hits(beats heat and throw OS), and simply crouching and waiting from where you landed(beats heat and DP)
Mixups, setplay, and gimmicks
- Refer to the following video: https://www.youtube.com/watch?v=degFhktwp8s
- j.C fuzzy on tall characters: https://streamable.com/8r9ea
Note: You can also do 2C 5A(whiff) for the j.[C] set ups after 623C knockdown.
Move Descriptions
Normal Moves
| 2A [Mid]
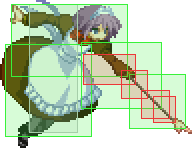
Startup: 5f | Active: 3f | Recovery: 9f A crouching jab that hits mid. Range is average. For combo starters or tick throws. |
| 5A [Mid]
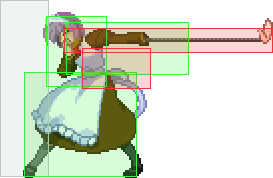
Startup: 5f | Active: 3f | Recovery: 9f A decent ranged 5A slap that whiffs crouchers. Will mostly be used as an anti air against IAD's or during 5[C] charges in blockstrings to purposefully whiff and then tick throw. |
| 2B [Low]
Startup: 8f (1st hit) / 12 (2nd hit) | Active: 3f / 2f | Recovery: 19f A crouching extended push with good range. |
| 5B [Mid]
Startup: 6f | Active: 2f | Recovery: 18f A good ranged 5B that hits crouchers when up close. Good for catching jumpouts on wakeup. Does not hit Neco. |
| 2C [Low]
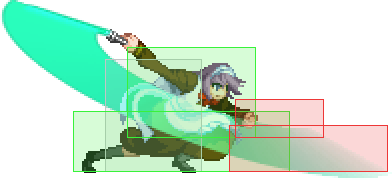
Startup: 13f | Active: 2f | Recovery: 28f A laser sword sweep. Has deceptively good range and can catch people off guard with it, especially if you use it as a meaty from a distance away. |
| 5C [Mid]
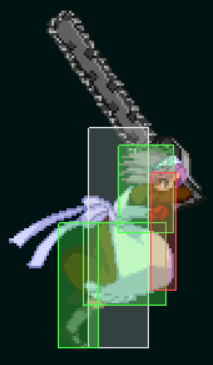
Startup: 15f | Active: 7f | Recovery: 21f Multi hit chainsaw swing that can function as an anti air, but won't be used in neutral very often otherwise. |
| 5[C] [Mid]
Startup: 15f | Active: 17f | Recovery: 21f Neco Mech charges forward with her chainsaw. The first hit has 10 extra active frames and propels her really far forward, and the later hits have a great hitbox for contesting both air and ground approaches(the speed from the charge can catch people off guard). Should be used minimally however, since it is very easy to punish on whiff. |
| 6C [Mid]
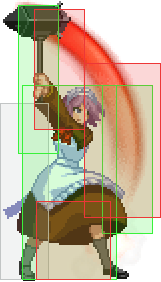
6C - Startup: 7f | Active: 3f | Recovery: 22f 6[C] - Startup: 21f | Active: 3f | Recovery: 22f Neco Mech swings her hammer in a half circle, covering all of her front and above. Turns Neco into a hitbox on hit, which can function as a delayed anti air. Can also serve as a means of protecting you from enemies crossing you up, as the 6C can anti air behind from both the top of the swing and the neco being flung backwards, as neco being hit autocorrects towards the opponent's location. 6[C] version: Same deal with 6C, except the launch on hit from it launches in an arc, is AUB, and hitting neco makes her fly with greater speed and distance, wallslamming the opponent. |
| j.A [Mid]
Startup: 7f | Active: 3f | Recovery: --f A diagonal downward pointing air jab that hits mid. This move is not that great for most neutral situations and you're really better off using j.B or j.C. |
| j.B [High]
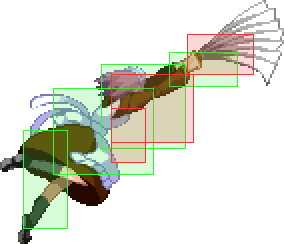
Startup: 6f | Active: 3f | Recovery: --f A diagonal upward pointing fan swing with good range. You'll be fishing for tons of counter hits with this move. j.C > j.B also serves as a double overhead against opponents on the ground. |
| j.C [High]
Startup: 15f | Active: 6f | Recovery: --f A hammer swing covering horizontal and a bit of diagonal downward space. Your main air to ground move, as well as covering spots where j.B can not. |
| j.[C] [High]
Startup: 27f | Active: 7f | Recovery: --f Charged hammer swing with less green that is hard bounce on aerial hit, and sends Neco flying up into the air on hit. You'll be using this move a lot to hit Neco in order to control air space, so be wary of being counter hit out of it as it does have considerable start up. However, you can also play around this by using j.C instead to hit your opponent earlier if they expect j.[C]. Because of its long start up, you can also whiff this move on landing for tick throws. |
Special Moves
Staring Cat's Eye 「JP name」 - 236ABC
|
Jumping Cat's Love 「」 - 214ABC
|
EM Net Wire「」 - 623ABC
|
Anti-Neco Field 「」 - 22ABC
|
Arc Drive
L.S.O. (Superhuman Sister Alliance)「」41236C
|
Another Arc Drive
L.S.O. (Superhuman Sister Alliance)「」41236C
|
Last Arc
Saturday Night Forever「」
|
