Melty Blood/MBAACC/Riesbyfe Stridberg: Difference between revisions
< Melty Blood | MBAACC
Jump to navigation
Jump to search
HakuNoKaemi (talk | contribs) |
m (→Introduction) |
||
| (14 intermediate revisions by 7 users not shown) | |||
| Line 1: | Line 1: | ||
[[File:Riesbanner.png |right]] | [[File:Riesbanner.png |right]] | ||
==Introduction== | |||
Sent by the church to hunt evil with her big cello pilebunker. The heavy hitter character, and Melty’s obligatory “religious girl with a big weapon”. She’s slow, but each hit hurts, and although her normals tend to have some really bad hurtbox problems they cover a lot of space. Cumbersome and momentum-dependent, she requires some finesse in neutral to really shine. Low tier but of course can give almost any character a run for their money, and once she gets you in the corner her pressure and damage are some of the best. | |||
'''Stage:''' stranger | |||
[[File:stranger.PNG]] | |||
'''BGM:''' Raven's Nest | |||
=Moon Overview= | ==Moon Overview== | ||
{{Navigation-MB | |||
|Crescent=*A heavy hitter with relatively weak frame data on her normals. | |||
*She’s all about using her shield specials. | |||
*Her 236x series can bypass projectiles and if charged, can create frame trap situations. 63214x can go through opponent’s moves and launch them away. | |||
*Frame traps are decent but very weak mix-up. | |||
*Her normals also have large hurtboxes on start-up, unfortunately. | |||
*She doesn’t have to sacrifice damage to go for okizeme (and she gets a somewhat decent 50/50 mix-up afterwards). | |||
|Half=*The best moon for high momentum match-ups. | |||
*Like C, she has large hurtboxes before active frames, so she can get hit out of her frametraps in silly ways sometimes. | |||
*She has knockdown and a corner loop with 63214x, which can also reflect some projectiles. The loop builds a lot of meter and gives you a strong okizeme ender. | |||
|Full=*The most common moon and arguably the best all-purpose moon. | |||
*Her normals are extremely good now and her most basic combo of 2A>5A>5B>6B>5C>236A nets you ~3.5k damage and sends the foe to the corner. | |||
*6C is both an overhead and your pressure reset move. She’s dependent on winning neutral, doing huge damage, and opening up the foe in the corner until they die - her pressure against cornered opponents is extremely oppressive if you can get them there. | |||
*Has one of the lowest execution requirements to play competently. Extremely simple power character. | |||
}} | |||
==Statistics== | |||
=Statistics= | |||
{| class= cellspacing="8" style="width:500px;border:2px solid silver;" | {| class= cellspacing="8" style="width:500px;border:2px solid silver;" | ||
! style="background-color:#bfff7f;text-align:center;" | | ! style="background-color:#bfff7f;text-align:center;" | Stance | ||
! style="background-color:#bfff7f;text-align:center;" | 100% | ! style="background-color:#bfff7f;text-align:center;" | 100% | ||
! style="background-color:#bfff7f;text-align:center;" | 75% | ! style="background-color:#bfff7f;text-align:center;" | 75% | ||
! style="background-color:#bfff7f;text-align:center;" | 50% | ! style="background-color:#bfff7f;text-align:center;" | 50% | ||
! style="background-color:#bfff7f;text-align:center;" | 25% | ! style="background-color:#bfff7f;text-align:center;" | 25% | ||
! style="background-color:#bfff7f;text-align:center;" | | ! style="background-color:#bfff7f;text-align:center;" | Net Health | ||
|- | |||
| style="background-color:#F8F8F8;" | '''Jump''' | |||
| style="background-color:#F8F8F8;text-align:center;" | 0.897 | |||
| style="background-color:#F8F8F8;text-align:center;" | 0.766 | |||
| style="background-color:#F8F8F8;text-align:center;" | 0.741 | |||
| style="background-color:#F8F8F8;text-align:center;" | 0.638 | |||
| style="background-color:#F8F8F8;text-align:center;" | 15,211 | |||
|- | |- | ||
| style="background-color:#F8F8F8;" | ''' | | style="background-color:#F8F8F8;" | '''Stand''' | ||
| style="background-color:#F8F8F8;text-align:center;" | 1. | | style="background-color:#F8F8F8;text-align:center;" | 1.020 | ||
| style="background-color:#F8F8F8;text-align:center;" | 0. | | style="background-color:#F8F8F8;text-align:center;" | 0.871 | ||
| style="background-color:#F8F8F8;text-align:center;" | 0. | | style="background-color:#F8F8F8;text-align:center;" | 0.843 | ||
| style="background-color:#F8F8F8;text-align:center;" | 0. | | style="background-color:#F8F8F8;text-align:center;" | 0.725 | ||
| style="background-color:#F8F8F8;text-align:center;" | | | style="background-color:#F8F8F8;text-align:center;" | 13,378 | ||
|- | |||
| style="background-color:#F8F8F8;" | '''Crouch''' | |||
| style="background-color:#F8F8F8;text-align:center;" | 1.101 | |||
| style="background-color:#F8F8F8;text-align:center;" | 0.940 | |||
| style="background-color:#F8F8F8;text-align:center;" | 0.910 | |||
| style="background-color:#F8F8F8;text-align:center;" | 0.783 | |||
| style="background-color:#F8F8F8;text-align:center;" | 12,392 | |||
|- | |- | ||
| style="background-color:#F8F8F8;" | '''Average''' | | style="background-color:#F8F8F8;" | '''Average''' | ||
| style="background-color:#F8F8F8;text-align:center;" | | | style="background-color:#F8F8F8;text-align:center;" | | ||
| style="background-color:#F8F8F8;text-align:center;" | | | style="background-color:#F8F8F8;text-align:center;" | | ||
| style="background-color:#F8F8F8;text-align:center;" | | | style="background-color:#F8F8F8;text-align:center;" | | ||
| style="background-color:#F8F8F8;text-align:center;" | | | style="background-color:#F8F8F8;text-align:center;" | | ||
| style="background-color:#F8F8F8;text-align:center;" | | | style="background-color:#F8F8F8;text-align:center;" | '''13,660''' | ||
|} | |} | ||
=Palettes= | ==Palettes== | ||
[[File:Riescolor2.PNG]] | [[File:Riescolor2.PNG]] | ||
22) Gilgamesh(Fate/Stay Night) | |||
23) Saber(Fate/Stay Night) | |||
28) Archer(Fate/Stay Night) | |||
==External Links== | |||
*[http://www.meltybread.com/forums/riesbyfe-stridberg-123/ {{SUBPAGENAME}} forum at Melty Bread] | |||
{{ | {{Navbox-MBAACC}} | ||
[[Category:Melty Blood]] | [[Category:Melty Blood Actress Again Current Code]] | ||
[[Category:Riesbyfe Stridberg]] | |||
Latest revision as of 21:11, 11 September 2020
Introduction
Sent by the church to hunt evil with her big cello pilebunker. The heavy hitter character, and Melty’s obligatory “religious girl with a big weapon”. She’s slow, but each hit hurts, and although her normals tend to have some really bad hurtbox problems they cover a lot of space. Cumbersome and momentum-dependent, she requires some finesse in neutral to really shine. Low tier but of course can give almost any character a run for their money, and once she gets you in the corner her pressure and damage are some of the best.
Stage: stranger
BGM: Raven's Nest
Moon Overview
| Moon Style | Description |
|---|---|
| |
| |
|
Statistics
| Stance | 100% | 75% | 50% | 25% | Net Health |
|---|---|---|---|---|---|
| Jump | 0.897 | 0.766 | 0.741 | 0.638 | 15,211 |
| Stand | 1.020 | 0.871 | 0.843 | 0.725 | 13,378 |
| Crouch | 1.101 | 0.940 | 0.910 | 0.783 | 12,392 |
| Average | 13,660 |
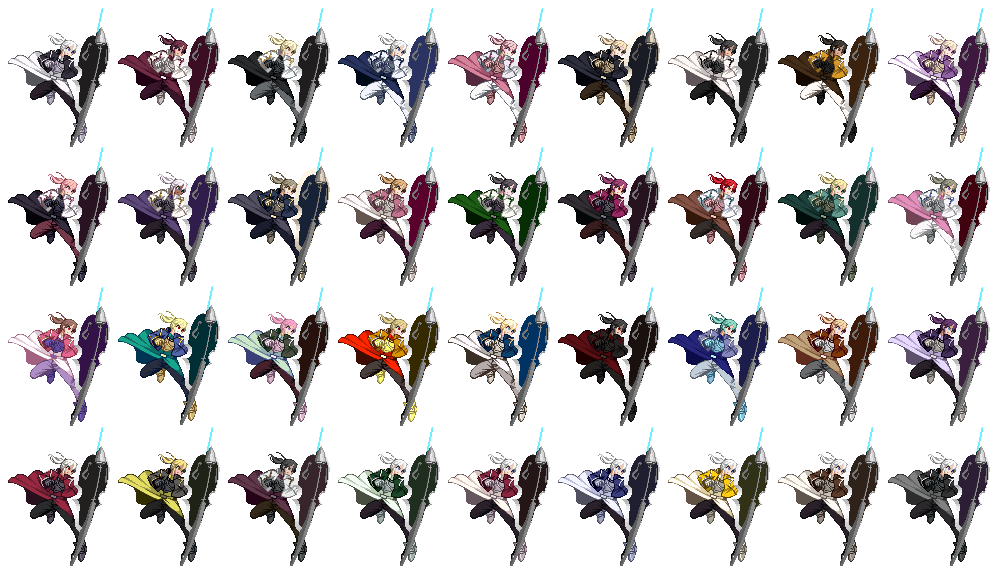
Palettes
22) Gilgamesh(Fate/Stay Night)
23) Saber(Fate/Stay Night)
28) Archer(Fate/Stay Night)


