|
|
| Line 81: |
Line 81: |
| |condition=Normal starter, grounded opponent | | |condition=Normal starter, grounded opponent |
| |character= | | |character= |
| |damage= | | |damage=2957 (using 2AA>2B>5C>2C) |
| |metergen= | | |metergen= |
| |metero= | | |metero= |
Revision as of 19:17, 14 February 2022
Character Page Progress
This page is still a work in progress, consider joining as an editor to help expand it. Please update this character's roadmap page when one of the editing goals have been reached.
| In Progress |
To-do
|
- Combos:
- Add damage and meter gain/given numbers to the pre-existing combos.
|
- Additional Ressources/Players to watch/ask
- If you know any players in particular that can be helpful for learning this character, please add them with, if possible a way to contact them (such as a Discord handle) and a name that can be searched in the match video database.
- Overview/General Gameplan:
- Add a short summary of this character with a list of strengths and weaknesses
- Write the Neutral and Defense sections.
- (Feel free to add sections based on the advice you want to give.)
- (Combos:)
- (If necessary, add Starters/Enders/OTG Pickup combo sections)
|
Additional Resources
C-V.Sion Match Video Database
"How To Use the "My Character Is Bad" OS - A C-Vsion Combo and Setup Guide" by ScrawtVermillion
Players to watch/ask
| Name |
Color
|
Region |
Common Venues |
Status |
Details
|
Yume
(夢) |

|
Japan |
A-Cho |
Active |
Their mix-ups are wacky and WILL open you up.
|
ScrawtVermillion
(ScrawtV#7952) |

|
NA |
Locals & Netplay |
Active |
Best C-Sion in NA. Very solid play.
|
Overview
Strengths / Weaknesses
| Strengths
|
- Text goes here after asterisk
- Text goes here after asterisk
|
| Weaknesses
|
- Place text here be sure to use "*" for each point*
- Is the base training mode character
|
General Gameplan
C-VSion is meter hungry. Her Ciel Summon super and her vampire bite super both cost 150% each. Not to mention she bleeds at average (but fairly unimpressive) health and doesn't do much damage, yet needs okizeme. So she needs HEAT for Red Health regen and meter for the occasional 623C. Not to mention she doesn't generate it very fast, so do be considerate about your meter usage.
Neutral
Place text here*
Pressure
Carry the enemy to the corner and setplay them to death there. It becomes harder to defy VSion, her damage gets better, and there's no backwards space to move against Akiha summon.
Hey check this cool thing you can do on corner pressure:
- Blockstring > 236B > 63214C (Ciel Summon) > 421C > Run > 2AA, Run > Dodge 421C(blocked) > Wow you crossed the enemy up unexpectedly
Use throws and vampire bite super to throw off your opponent on top of blockstrings they must respect during summon oki.
Check the video in additionnal ressources for a bit more detail.
Okizeme
Use 214C on okizeme. It's good because summons don't leave when VSion is hit, it goes through most DPs, and the enemy can't pass through, making it her best one.
Defense
place text here*
Combos
| Combo Notation Help
|
Disclaimer: Combos are written by various writers, so the actual notation used in pages can differ from the standard one.
For more information, see Glossary and Controls.
|
| X > Y
|
X input is cancelled into Y.
|
| X > delay Y
|
Must wait for a short period before cancelling X input into Y.
|
| X, Y
|
X input is linked into Y, meaning Y is done after X's recovery period.
|
| X+Y
|
Buttons X and Y must be input simultaneously.
|
| X/Y
|
Either the X or Y input can be used.
|
| X~Y
|
This notation has two meanings.
- Use attack X with Y follow-up input.
- Input X then within a few frames, input Y. Usually used for option selects.
|
| X(w)
|
X input must not hit the opponent (Whiff).
|
| j.X
|
X input is done in the air, implies a jump/jump cancel if the previous move was done from the ground.
Applies to all air chain sections:
- Assume a forward jump cancel if no direction is given.
- Air chains such as j.A > j.B > j.C can be shortened to j.ABC.
|
| sj.X
|
X input is done after a super jump. Notated as sj8.X and sj9.X for neutral and forward super jumps respectively.
|
| dj.X
|
X input is done after a double jump.
|
| sdj.X
|
X input is done after a double super jump.
|
| tk.X
|
Stands for Tiger Knee. X motion must be buffered before jumping, inputting the move as close to the ground as possible. (ex. tk.236A)
|
| (X)
|
X is optional. Typically the combo will be easier if omitted.
|
| [X]
|
Input X is held down. Also referred to as Blowback Edge (BE). Depending on the character, this can indicate that this button is held down and not released until indicated by the release notation.
|
| ]X[
|
Input X is released. Will only appear if a button is previously held down. This type of input is referred to as Negative Edge.
|
| {X}
|
Button X should only be held down briefly to get a partially charged version instead of the fully charged one.
|
| X(N)
|
Attack "X" should only hit N times.
|
| (XYZ)xN
|
XYZ string must be performed N times. Combos using this notation are usually referred to as loops.
|
| (XYZ^)
|
A pre-existing combo labelled XYZ is inserted here for shortening purposes.
|
| CH
|
The first attack must be a Counter Hit.
|
| Air CH
|
The first attack must be a Counter Hit on an airborne opponent.
|
| 66
|
Performs a ground forward dash.
|
| j.66
|
Performs an aerial forward dash, used as a cancel for certain characters' air strings.
|
| IAD/IABD
|
Performs an Instant AirDash.
|
| AT
|
Performs an Air Throw. (j.6/4A+D)
|
| IH
|
Performs an Initiative Heat.
|
| AD
|
Performs an Arc Drive.
|
| AAD
|
Performs an Another Arc Drive.
|
- Note that there are no throw combos midscreen.
- 623C sacrifices 100 meter but can be used after every 2C for damage and hard knockdown for okizeme.
- 2[C] OTG combos DO NOT WORK ON RIESBYFE. If you must fight her with C-VSion, keep that in mind. Otherwise, H is suggested for that matchup instead.
Normal Combos
| Condition
|
Notation
|
Damage
vs V.Sion
|
Notes
|
|
| Normal starter, grounded opponent
|
- (Etc. >) 5C > 2C > 5A(w), 2[C], 2[C] > Summon
|
2957 (using 2AA>2B>5C>2C)
|
|
| Meter Gained: ??? |
Meter Given (vs C-Moon): ??? |
(Video) |
The absolute most staple of your C-VSion combos. Summon is any 214/421X, but most preferably 214C.
The trick to this combo is that the hits must push back far enough before 2C so that 5A will actually whiff. 5C by itself can accomplish this. Single A and B normals cannot. So as far as those go, stack multiple if you won't use 5C before 2C for that ender. |
|
|
| Normal starter, grounded opponent
|
- (Etc. >) 2C > 3C > sj8.BC > j.66 > j.BC > dj.BC > AT
|
???
|
|
| Meter Gained: ??? |
Meter Given (vs C-Moon): ??? |
(Video) |
| Use if you wanna optimize damage instead of going for setplay. Unlike most airdash combos in this game, this one has rather lenient timing. |
|
|
| Normal starter, grounded opponent
|
- (About 5 hits) > 2C > 3C > 623B(2), j8.C > sdj.BC > j.66 > dj.C > AT
|
???
|
|
| Meter Gained: ??? |
Meter Given (vs C-Moon): ??? |
(Video) |
| Tight link. Used to gain a little bit of meter more than usual in trade for equally as little damage. |
|
|
| Normal starter, grounded opponent
|
- 5C > 2C > 5A(w) > 214A, 6[C] > 66 > 2C > j.2B, 2C > Summon
|
???
|
|
| Meter Gained: ??? |
Meter Given (vs C-Moon): ??? |
(Video) |
| Near-full corner carry combo that's harder to do but gives more damage and even okizeme. |
|
|
| Normal starter, grounded opponent
|
- 2C > 5C > j.ABC (delayed in between each normal), land j8.C > sdj.BC > j.66 > j.C > AT
|
???
|
|
| Meter Gained: ??? |
Meter Given (vs C-Moon): ??? |
(Video) |
Carries halfscreen and puts the opponent in the corner after airthrow, does more damage than the above.
However, is not as full of a corner carry, nor does it give okizeme. |
|
|
| Normal starter, grounded opponent
|
- 2C > IAD > j.2B, land 2C > 2A(w), 2[C] > Summon
|
???
|
|
| Meter Gained: ??? |
Meter Given (vs C-Moon): ??? |
(Video) |
| Used to get out of the corner and sideswap. Make sure the IAD crosses over slightly. The divekick will still hit. |
|
|
| 2[C] ender followup, 100% meter
|
- 2[C] (OTG, once), 66 > 2A > 5AA > 5B > 623C
|
???
|
|
| Meter Gained: ??? |
Meter Given (vs C-Moon): ??? |
(Video) |
| If you can afford it, metered OTG for extra damage before okizeme |
|
|
Summon Combos
Oh boy, the fun part! Most of these are going to be the frontal Akiha summon (214C), so if another summon is used, it will be noted. Also please keep in mind that you have time to hitconfirm while summons are active, but should not be hitting the same time the summons do so that you don't combo wrong. Furthermore, the Akiha summon goes through a vast majority of this game's DPs, and cannot pass through her, which are extra helpful as no summon goes away once VSion is hit.
| Condition
|
Notation
|
Damage
vs V.Sion
|
Notes
|
|
| 214C starter, grounded opponent,
|
- 214C(hit), (66 >) 4B > j.BC > dj.BC > j.66 > j.C > AT
|
???
|
|
| Meter Gained: ??? |
Meter Given (vs C-Moon): ??? |
(Video) |
| Basic summon combo. The Akiha summon's kick can corner carry fully, so run to catch up to the opponent if it hits and you're midscreen when it does. |
|
|
| 214C setup + 6C starter, grounded opponent
|
- 214C(summon), 6C - 214C(hit), 66 > 5A > 5B > j.BC > dj.BC > j.66 > j.BC > AT
|
???
|
|
| Meter Gained: ??? |
Meter Given (vs C-Moon): ??? |
(Video) |
| Confirm off an overhead attempt into hit. |
|
|
| 214C setup + Ground throw starter, grounded opponent
|
- 214C(summon), 66 > delay Throw - 214C(hit), (66 >) j.BC > j.66 > j.C > dj.BC > AT
|
???
|
|
| Meter Gained: ??? |
Meter Given (vs C-Moon): ??? |
(Video) |
| Confirm off a midscreen summon hit and throw. Tough to time and space, however. |
|
|
| 421C back-summon setup + normal starter, grounded opponent
|
- 421C(summon), 2B > 5B - 421C(hit) > 5AA > 4B > j.BC > j.66 > j.C > dj.BC > AT, j.2B
|
???
|
|
| Meter Gained: ??? |
Meter Given (vs C-Moon): ??? |
(Video) |
| Normal confirm off of a back-summon. j.2B Ender can tech punish after airthrow if corner carried. |
|
|
| 421C back-summon setup + 6C starter, grounded opponent
|
- 421C(summon), 6C > 2A - 421C(hit) > j.66 > 5B > j.BC > j.66 > j.B > dj.BC > AT
|
???
|
|
| Meter Gained: ??? |
Meter Given (vs C-Moon): ??? |
(Video) |
| Overhead confirm off of a back-summon. |
|
|
Corner Combos
| Condition
|
Notation
|
Damage
vs V.Sion
|
Notes
|
|
| Normal starter, grounded opponent
|
- 5C > 236C, 66 > 3C > sj8.C > sdj.BC > j.66 > j.C > AT
|
???
|
|
| Meter Gained: ??? |
Meter Given (vs C-Moon): ??? |
(Video) |
| Damage-optimized meter corner combo. |
|
|
| Ground throw starter, grounded opponent
|
- Throw, 2C > j.2B, 2C > 2A(w), 2[C], 2[C]
|
???
|
|
| Meter Gained: ??? |
Meter Given (vs C-Moon): ??? |
(Video) |
| Corner throw combo. |
|
|
| Ground throw starter, grounded opponent
|
- Throw, 5B > j.BC > j.66 > j.BC > dj.BC > AT
|
???
|
|
| Meter Gained: ??? |
Meter Given (vs C-Moon): ??? |
(Video) |
| Only about 100 more damage than the above route, no setplay. Therefore recommended you don't use this unless you desperately need to close out that round with that smidge of damage. |
|
|
| Ground throw starter, grounded opponent
|
- Throw, 2C > j.2B, j.A > j.2B, j.A > j.2B, j.ABC (delayed in between each normal), land j.C > sdj.BC > AT
|
???
|
|
| Meter Gained: ??? |
Meter Given (vs C-Moon): ??? |
(Video) |
| Best in terms of damage from corner throws. |
|
|
| Ground throw starter, grounded opponent, 100% meter
|
- Throw, 2C > j.2B, j.A > j.2B, j.A > j.2B, 623C
|
???
|
|
| Meter Gained: ??? |
Meter Given (vs C-Moon): ??? |
(Video) |
| Metered combo that gives you both okizeme and damage, though less damage than the above. |
|
|
Summon Combos
Corner summon combos follow suit similar to the aforementioned, so not every route will be rewritten. At this point it should be clear what the routes are good for and what you can convert into, and what you can start from.
| Condition
|
Notation
|
Damage
vs V.Sion
|
Notes
|
|
| 214C starter, grounded opponent
|
- 214C(hit), 2[C] > j.2B, 2C > 2A(w), 2[C] > Summon
|
???
|
|
| Meter Gained: ??? |
Meter Given (vs C-Moon): ??? |
(Video) |
| Staple conversoin off of 214C in the corner for oki setup. |
|
|
| 214C starter, grounded opponent
|
- 214C(hit), 6[C] > 2[C] > j.2B, 2C
|
???
|
|
| Meter Gained: ??? |
Meter Given (vs C-Moon): ??? |
(Video) |
| Cool thing about this is that 6[C] is safe on block AND safe to try to confirm into a combo, while 6C is only the former |
|
|
| 214B starter, grounded opponent
|
- Hitconfirm - 214B(hit) > 6[C], 6[C] > 2[C] > j.2B,2C
|
???
|
|
| Meter Gained: ??? |
Meter Given (vs C-Moon): ??? |
(Video) |
| Confirm for Satsuki summon in the corner. |
|
|
Move Descriptions
| Frame Data Help
|
| Header
|
Tooltip
|
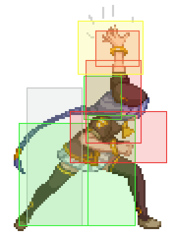
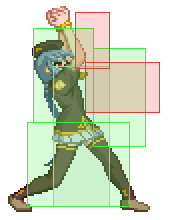
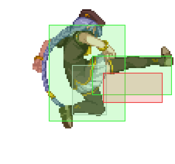
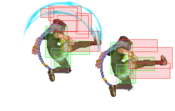
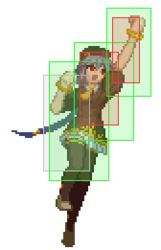
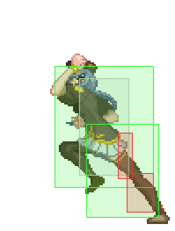
| Move Box Colors
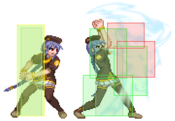
|
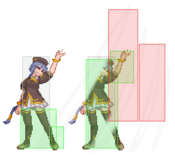
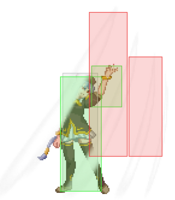
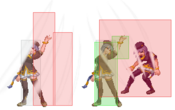
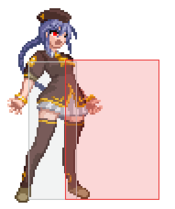
Light gray = Collision Box (A move lacking one means it can go through the opponent's own collision box).
Green: Hurt Boxes.
Red: Hit(/Grab) Boxes.
Yellow: Clash Boxes (When an active hitbox strikes a clash box, the active hitbox stops being active. Multi-hit attacks can beat clash since they will still progress to the next hitbox.)
Magenta: Projectile-reflecting boxes OR Non-hit attack trigger boxes (usually).
Blue: Reflectable Projectile Boxes.
|
| Damage
|
Base damage done by this attack.
(X) denotes combined and scaled damage tested against standing V. Sion.
|
| Red Damage
|
Damage done to the recoverable red health bar by this attack. The values are inherently scaled and tested against standing V. Sion.
(X) denotes combined damage.
|
| Proration
|
The correction value set by this attack and the way it modifies the scaling during a string. See this page for more details.
X% (O) means X% Overrides the previous correction value in a combo if X is of a lower percentage.
X% (M) means the current correction value in a combo will be Multiplied by X%. This can also be referred to as relative proration.
|
| Circuit
|
Meter gained by this attack on hit.
(X%) denotes combined meter gain.
-X% denotes a meter cost.
|
| Cancel
|
Actions this move can be cancelled into.
SE = Self cancelable.
N = Normal cancelable.
SP = Special cancelable.
CH = Cancelable into the next part of the same attack (Chain in case of specials).
EX = EX cancelable.
J = Jump cancelable.
(X) = Cancelable only on hit.
-X- = Cancelable on whiff.
|
| Guard
|
The way this move must be blocked.
L = Can block crouching
H = Can block standing.
A = Can block in the air.
U = Unblockable.
|
| Startup
|
Amount of frames that must pass prior to reaching the active frames. Also referred to as "True Startup".
|
| Active
|
The amount of frames that this move will have a hitbox.
(x) denotes frame gaps where there are no hitboxes is present. Due to varied blockstuns, (x) frames are difficult to use to determine punish windows. Generally the larger the numbers, the more time you have to punish.
X denotes active frames with a duration separate from its origin move's frame data, such as projectile attacks. In this case, the total length of the move is startup+recovery only.
|
| Recovery
|
Frames that this move has after the active frames if not canceled. The character goes into one frame where they can block but not act afterwards, which is not counted here.
|
| Advantage
|
The difference in frames where you can act before your opponent when this move is blocked (assuming the move isn't canceled and the first active frame is blocked).
If the opponent uses a move with startup that is at least 2 frames less than this move's negative advantage, it will result in the opponent hitting that move.
±x~±y denotes a range of possible advantages.
|
| Invul
|
Lists any defensive properties this move has.
X y~z denotes X property happening between the y to z frames of the animations. If no frames are noted, it means the invincibility lasts through the entire move.
Invicibility:
- Strike = Strike invincible.
- Throw = Throw invincible.
Hurtbox-Based Properties:
- Full = No hurtboxes are present.
- High = Upper body lacks a hurtbox.
- Low = Lower body lacks a hurtbox.
Miscellaneous Properties
- Clash = Frames in which clash boxes are active.
- Reflect = Frames in which projectile-reflecting boxes are active.
- Super Armor = Frames in which the character can take hits without going into hit stun.
|
Normal Moves
Standing Normals
|
|
| Damage
|
Red Damage
|
Proration
|
Cancel
|
Guard
|
| 350
|
147
|
78% (O)
|
-SE-, -N-, -SP-, -EX-, (J)
|
LH
|
| First Active
|
Active
|
Recovery
|
Frame Adv
|
Circuit
|
Invuln
|
| 3
|
4
|
9
|
-1
|
3.0%
|
-
|
|
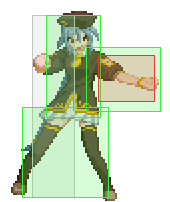
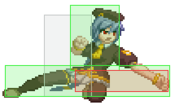
A waist-height punch that hits mid. Is only -1 on block, and is thus useful for tick throws. Usually this move is used in whiff cancels, and also in guard breaks.
|
|
|
|
| Damage
|
Red Damage
|
Proration
|
Cancel
|
Guard
|
| 600
|
392
|
100%
|
N, SP, EX, (J)
|
LH
|
| First Active
|
Active
|
Recovery
|
Frame Adv
|
Circuit
|
Invuln
|
| 5
|
3
|
13
|
-1
|
6.0%
|
-
|
|
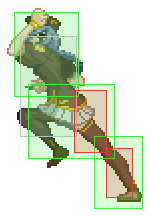
A knee attack that hits mid. Has a bit of forwards motion, and is -1 on block. Can be cancelled very late, and is core to her rushdown.
|
|
|
|
| Damage
|
Red Damage
|
Proration
|
Cancel
|
Guard
|
| 400, 900 (1009)
|
(660)
|
70% (O)
|
N, SP, EX, (J)
|
LH, LHA
|
| First Active
|
Active
|
Recovery
|
Frame Adv
|
Circuit
|
Invuln
|
| 12
|
5
|
15
|
-3
|
4.0%, 9.0% (13.0%)
|
-
|
|
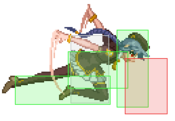
A two hit mid hitting claw smash that is mainly used as combo filler. Can be cancelled into normals and specials on block. Has a lot of forwards movement. Better than it was in MBAC, as one doesn't need to worry about bara cancels anymore. Often used to cancel into 236B or 236A xx 236C to reset pressure.
|
|
Crouching Normals
|
|
| Damage
|
Red Damage
|
Proration
|
Cancel
|
Guard
|
| 350
|
117
|
75% (O)
|
-SE-, -N-, -SP-, -EX-, (J)
|
L
|
| First Active
|
Active
|
Recovery
|
Frame Adv
|
Circuit
|
Invuln
|
| 3
|
4
|
9
|
-1
|
2.0%
|
-
|
|
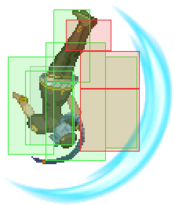
A low-hitting kick. Has fairly long range for a 2A, and a low hitbox to duck under higher moves, and is fairly fast.
|
|
|
|
| Damage
|
Red Damage
|
Proration
|
Cancel
|
Guard
|
| 500
|
294
|
80% (O)
|
N, SP, EX, (J)
|
L
|
| First Active
|
Active
|
Recovery
|
Frame Adv
|
Circuit
|
Invuln
|
| 7
|
3
|
11
|
1
|
5.0%
|
-
|
|
A low-hitting punch that will go under high moves. Has forwards motion, and is +1 on block, which leads to it being one of the core moves of her rushdown.
|
|
|
|
| 2C
|
Damage
|
Red Damage
|
Proration
|
Cancel
|
Guard
|
| 1200
|
784
|
55% (O)
|
N, SP, EX, (J)
|
L
|
| First Active
|
Active
|
Recovery
|
Frame Adv
|
Circuit
|
Invuln
|
| 9
|
3
|
20
|
-8
|
12.0%
|
-
|
|
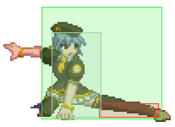
A low hitting swipe that knocks down on hit. Comes out fairly quick. Used primarily in combos right before a launcher, or as a way to set up a summon.
|
| 2[C]
|
Damage
|
Red Damage
|
Proration
|
Cancel
|
Guard
|
| 1600
|
1176
|
65% (M)
|
N, SP, EX, (J)
|
L
|
| First Active
|
Active
|
Recovery
|
Frame Adv
|
Circuit
|
Invuln
|
| 21
|
4
|
12
|
2
|
12.0%
|
-
|
|
Adds forwards movement and makes it safe on block. The charged version also OTG relaunches. The charged version can also come in handy with counter hit combos.
|
|
Aerial Normals
|
|
| Damage
|
Red Damage
|
Proration
|
Cancel
|
Guard
|
| 300
|
176
|
75% (O)
|
SE, N, J
|
LHA
|
| First Active
|
Active
|
Recovery
|
Frame Adv
|
Circuit
|
Invuln
|
| 5
|
4
|
10
|
-
|
3.0%
|
-
|
|
A downward kick that hits mid. Not bad as a jump-in, comes out fast, but isn't the greatest air-to-air move. Can be used as combo filler.
|
|
|
|
| Damage
|
Red Damage
|
Proration
|
Cancel
|
Guard
|
| 560
|
392
|
90% (O)
|
N, J
|
HA
|
| First Active
|
Active
|
Recovery
|
Frame Adv
|
Circuit
|
Invuln
|
| 6
|
4
|
-
|
-
|
5.6%
|
-
|
|
A two handed swipe that hits high. Comes out quickly, but slower than her other air normals. Tends to be mostly used in combos, can be used as a jump-in. Decent air-to-air, but usually j.C is better.
|
|
|
|
| Damage
|
Red Damage
|
Proration
|
Cancel
|
Guard
|
| 900
|
441
|
90% (M)
|
N, J
|
HA
|
| First Active
|
Active
|
Recovery
|
Frame Adv
|
Circuit
|
Invuln
|
| 5
|
3
|
-
|
-
|
9.0%
|
-
|
|
A flip kick with an absurdly good hitbox. One of the best air moves in the game, extremely fast, huge hitbox, just deadly. Will beat things like Kohaku j.B and make people furious about it. Multiplicative prorate though on it, so it can actually hurt combo damage.
|
|
Command Normals
|
|
| Damage
|
Red Damage
|
Proration
|
Cancel
|
Guard
|
| 550
|
392
|
70% (O)
|
N, SP, EX, (J)
|
LH
|
| First Active
|
Active
|
Recovery
|
Frame Adv
|
Circuit
|
Invuln
|
| 8
|
6
|
11
|
-2
|
6.0%
|
Clash 9-14
|
|
A mid hitting claw swipe that can be used as an anti-air, and has some clash frames for that purpose. Cannot be cancelled very late, is mostly combo filler and an anti-air. Has a small amount of forwards movement, which actually hurts its anti-air capacities.
|
|
|
|
| Damage
|
Red Damage
|
Proration
|
Cancel
|
Guard
|
| 700
|
392
|
80% (O)
|
(SP), (EX), (J)
|
LH
|
| First Active
|
Active
|
Recovery
|
Frame Adv
|
Circuit
|
Invuln
|
| 9
|
4
|
19
|
-5
|
7.0%
|
-
|
|
A volleyball style launcher used in combos. Hits mid, is unsafe on block, not really a good anti-air, so it has few other uses.
|
|
|
|
| 6C
|
Damage
|
Red Damage
|
Proration
|
Cancel
|
Guard
|
| 800
|
490
|
65% (O)
|
-
|
H
|
| First Active
|
Active
|
Recovery
|
Frame Adv
|
Circuit
|
Invuln
|
| 26
|
5
|
12
|
-2
|
8.0%
|
-
|
|
Overhead kick! A flip kick with lower body invulnerability, that hits high. When it connects, normals are linked after, not cancelled into, so there are no reverse beat penalties. Fairly safe on block.
|
| 6[C]
|
Damage
|
Red Damage
|
Proration
|
Cancel
|
Guard
|
| 1500
|
980
|
65% (O)
|
-
|
H
|
| First Active
|
Active
|
Recovery
|
Frame Adv
|
Circuit
|
Invuln
|
| 33
|
9
|
8
|
1 ~ 8
|
15.0%
|
-
|
|
Charged version increases damage, range, and hitboxes, along with making it + on block.
|
|
|
|
| Damage
|
Red Damage
|
Proration
|
Cancel
|
Guard
|
| 320
|
186
|
76% (O)
|
SE, N, J
|
LHA
|
| First Active
|
Active
|
Recovery
|
Frame Adv
|
Circuit
|
Invuln
|
| 4
|
4
|
-
|
-
|
3.8%
|
-
|
|
A weird little uppercut punch in the air. Comes out quickly, but really isn't used often. On occasion, whiffing it can be useful in throw setups, but not often.
|
|
j.2B
|
| Damage
|
Red Damage
|
Proration
|
Cancel
|
Guard
|
| 800
|
588
|
60% (O)
|
-
|
LHA
|
| First Active
|
Active
|
Recovery
|
Frame Adv
|
Circuit
|
Invuln
|
| 10
|
X
|
9
|
1 ~ -4
|
8.0%
|
-
|
|
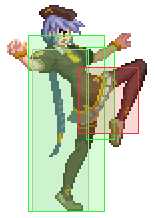
A dive kick with a minimum height. Very powerful in pressure, useful in tech punishes, and is plus frames at minimum height. Extremely useful and powerful move. Relaunches.
|
|
Universal Mechanics
|
|
| Damage
|
Red Damage
|
Proration
|
Cancel
|
Guard
|
| 1000
|
392
|
35%
|
-
|
U
|
| First Active
|
Active
|
Recovery
|
Frame Adv
|
Circuit
|
Invuln
|
| 2
|
1
|
20
|
-
|
0.0%
|
-
|
|
V. Sion grabs the opponent and launches them. Ground techable but you can combo from it in the corner.
|
|
|
|
| Damage
|
Red Damage
|
Proration
|
Cancel
|
Guard
|
| 1600 (Raw)/1200
|
490
|
30%
|
(Any if Raw)
|
U
|
| First Active
|
Active
|
Recovery
|
Frame Adv
|
Circuit
|
Invuln
|
| 1
|
1
|
12
|
-
|
0.0%
|
-
|
|
Works about the same as Sion's airthrow. Ground bounces the opponent if done raw, ground techable if done as a combo ender.
|
|
|
|
| Bunker
|
Damage
|
Red Damage
|
Proration
|
Cancel
|
Guard
|
| 500
|
196
|
50%
|
-
|
LHA
|
| First Active
|
Active
|
Recovery
|
Frame Adv
|
Circuit
|
Invuln
|
| 25
|
4
|
19
|
-5
|
0.0%
(-50.0% in blockstun)
|
Clash 1-10
|
| (Clash)
|
Damage
|
Red Damage
|
Proration
|
Cancel
|
Guard
|
| 500
|
196
|
50%
|
-
|
LHA
|
| First Active
|
Active
|
Recovery
|
Frame Adv
|
Circuit
|
Invuln
|
| 7
|
4
|
19
|
-5
|
0.0%/-50.0%
|
Strike 1-7
|
|
A fancier-looking 3C.
|
|
|
|
| Damage
|
Red Damage
|
Proration
|
Cancel
|
Guard
|
| 100
|
0
|
100%
|
-
|
U
|
| First Active
|
Active
|
Recovery
|
Frame Adv
|
Circuit
|
Invuln
|
| 20
|
5
|
23
|
-
|
-100.0% (min)
|
Full 1-25
|
|
Tied for second longest Heat startup in the game with Aoko and Warachia.
|
|
|
|
| Ground
|
Damage
|
Red Damage
|
Proration
|
Cancel
|
Guard
|
| 100
|
0
|
100%
|
-
|
U
|
| First Active
|
Active
|
Recovery
|
Frame Adv
|
Circuit
|
Invuln
|
| 10
|
10
|
20
|
-
|
removes all
|
Full 1-39
|
| Air
|
Damage
|
Red Damage
|
Proration
|
Cancel
|
Guard
|
| 100
|
0
|
100%
|
-
|
U
|
| First Active
|
Active
|
Recovery
|
Frame Adv
|
Circuit
|
Invuln
|
| 11
|
10
|
15
|
-
|
removes all
|
Strike 1-30
|
|
Universal burst mechanic. Unlike Crescent/Full Heat activation, the hitbox and frame data doesn't vary between characters. However, you can be thrown out of this move if you input it in the air.
|
|
Special Moves
|
|
| A
|
Damage
|
Red Damage
|
Proration
|
Cancel
|
Guard
|
| 900
|
441
|
100%
|
-EX-
|
LH
|
| First Active
|
Active
|
Recovery
|
Frame Adv
|
Circuit
|
Invuln
|
| 13
|
2
|
30
|
-8
|
5.0%
|
-
|
|
A forwards claw attack that really isn't useful except for being EX-cancelled into 236C in pressure which isn't even as useful as it used to be. Can catch people flinching as well.
|
| B
|
Damage
|
Red Damage
|
Proration
|
Cancel
|
Guard
|
| 600*3 (1743)
|
(853)
|
100%
|
-EX-
|
LHA
|
| First Active
|
Active
|
Recovery
|
Frame Adv
|
Circuit
|
Invuln
|
| 22
|
3
|
30
|
5
|
6.0%*3 (18.0%)
|
Clash 6-15
|
|
A slow, forwards claw attack that is + on block. If you are point blank, this is powerful, but it's slow, and if they're watching for this, you'll get hit. Be careful using it, do it rarely and unpredictably.
|
| [B]
|
Damage
|
Red Damage
|
Proration
|
Cancel
|
Guard
|
| 600*3 (1743)
|
(853)
|
100%
|
-EX-
|
LHA
|
| First Active
|
Active
|
Recovery
|
Frame Adv
|
Circuit
|
Invuln
|
| 36
|
4
|
24
|
10
|
6.0%*3 (18.0%)
|
Clash 6-29
|
|
An extremely slow, forwards claw attack that is significantly + on block. Useful as a meaty. Too slow to use in pressure.
|
| EX
|
Damage
|
Red Damage
|
Proration
|
Cancel
|
Guard
|
| 850*3 (2124)
|
(1713)
|
93%*3 (M)
|
-
|
LHA
|
| First Active
|
Active
|
Recovery
|
Frame Adv
|
Circuit
|
Invuln
|
| 5+11
|
3
|
27
|
8
|
-100.0%
|
Full 1-12
|
|
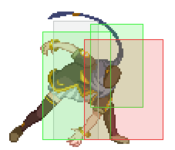
A fast three hit claw attack that launches. Used to be good for damage in combos, but it has been nerfed to absurd amounts and is now much less useful. Use it rarely, it's not often worth 100% meter to get +8 frames with this character. It does add like 100-200 damage in a full bnb.
|
|
|
|
| A
|
Damage
|
Red Damage
|
Proration
|
Cancel
|
Guard
|
| 1200
|
882
|
70% (O)
|
-
|
LH
|
| First Active
|
Active
|
Recovery
|
Frame Adv
|
Circuit
|
Invuln
|
| 10
|
2
|
29
|
-7
|
13.0%
|
High 1-10
|
|
An upwards claw attack. Useful as anti-air with startup upper body invincibility. It's not great, though, so try not to use it often. Air unblockable.
|
| B
|
Damage
|
Red Damage
|
Proration
|
Cancel
|
Guard
|
| 800*2 (1379)
|
(843)
|
85%*2 (M)
|
-
|
LHA
|
| First Active
|
Active
|
Recovery
|
Frame Adv
|
Circuit
|
Invuln
|
| 10
|
2
|
32
|
-3
|
8.0%*2 (16.0%)
|
-
|
|
An upwards energy claw that hits twice. Air blockable.
|
| EX
|
Damage
|
Red Damage
|
Proration
|
Cancel
|
Guard
|
| 300, 500*6 (2969)
|
(2260)
|
100%
|
-
|
LH
|
| First Active
|
Active
|
Recovery
|
Frame Adv
|
Circuit
|
Invuln
|
| 6+3
|
2
|
41
|
-25
|
-100.0%
|
Full 1-13
|
|
A quick EX anti-air hitgrab reversal and powerful combo tool. Many many frames + on hit, punishable on block. Air unblockable. Cannot counterhit.
|
|
|
|
| A
|
Damage
|
Red Damage
|
Proration
|
Cancel
|
Guard
|
| 400*4 (1353)
|
(828)
|
94%*4 (M)
|
-
|
LHA
|
| First Active
|
Active
|
Recovery
|
Frame Adv
|
Circuit
|
Invuln
|
| 35
|
2 (2) 2 (2) 2
|
19
|
18 (vs. Stand)
8 ~ -4 (vs. Crouch)
|
3.0%*4 (12.0%)
|
-
|
|
Arcueid summon. She does a 22A/B style attack. Comes out kind of quick and is + on block, but can be hit out of at the start and the summon won't stay. Relaunches.
|
| B
|
Damage
|
Red Damage
|
Proration
|
Cancel
|
Guard
|
| -
|
-
|
-
|
-
|
-
|
| First Active
|
Active
|
Recovery
|
Frame Adv
|
Circuit
|
Invuln
|
| -
|
-
|
43
|
-
|
-
|
-
|
| (Satsuki)
|
Damage
|
Red Damage
|
Proration
|
Cancel
|
Guard
|
| 1000
|
686
|
50% (O)
|
-
|
LH
|
| First Active
|
Active
|
Recovery
|
Frame Adv
|
Circuit
|
Invuln
|
| 122
|
2
|
-
|
-
|
10.0%
|
-
|
|
Satsuki summon. She winds up and does her 214B, but it doesn't hit high. Useful in oki setups. Ground techable knockdown on hit.
|
| C
|
Damage
|
Red Damage
|
Proration
|
Cancel
|
Guard
|
| -
|
-
|
-
|
-
|
-
|
| First Active
|
Active
|
Recovery
|
Frame Adv
|
Circuit
|
Invuln
|
| -
|
-
|
45
|
-
|
-
|
-
|
| (Akiha)
|
Damage
|
Red Damage
|
Proration
|
Cancel
|
Guard
|
| 1500
|
1078
|
80% (M)
|
-
|
LH
|
| First Active
|
Active
|
Recovery
|
Frame Adv
|
Circuit
|
Invuln
|
| 96
|
2
|
-
|
-
|
10.0%
|
-
|
|
Akiha summon. Walks up and does 6C. Solid in the sense it will push people around and you can't walk through it. Probably her most useful oki setup. Wallslams on hit.
|
|
|
|
| A
|
Damage
|
Red Damage
|
Proration
|
Cancel
|
Guard
|
| -
|
-
|
-
|
-
|
-
|
| First Active
|
Active
|
Recovery
|
Frame Adv
|
Circuit
|
Invuln
|
| -
|
-
|
58
|
-
|
-
|
-
|
| (Arcueid)
|
Damage
|
Red Damage
|
Proration
|
Cancel
|
Guard
|
| 400*4 (1353)
|
(828)
|
94%x4 (M)
|
-
|
LHA
|
| First Active
|
Active
|
Recovery
|
Frame Adv
|
Circuit
|
Invuln
|
| 56
|
2 (2) 2 (2) 2
|
-
|
-
|
3.0%x4 (12.0%)
|
-
|
- A version of her 214 unique to Crescent Moon. The summons appear farther away and will turn around to face the opponent if done close enough to them. Those can be completely hidden if done near the corner, but the attacks are still performed.
Unlike 214A, V. Sion can fully recover while the Arcueid summon is still active.
|
| B
|
Damage
|
Red Damage
|
Proration
|
Cancel
|
Guard
|
| -
|
-
|
-
|
-
|
-
|
| First Active
|
Active
|
Recovery
|
Frame Adv
|
Circuit
|
Invuln
|
| -
|
-
|
40
|
-
|
-
|
-
|
| (Satsuki)
|
Damage
|
Red Damage
|
Proration
|
Cancel
|
Guard
|
| 1000
|
686
|
50% (O)
|
-
|
LH
|
| First Active
|
Active
|
Recovery
|
Frame Adv
|
Circuit
|
Invuln
|
| 121
|
2
|
-
|
-
|
10.0%
|
-
|
|
Satsuki summon.
|
| C
|
Damage
|
Red Damage
|
Proration
|
Cancel
|
Guard
|
| -
|
-
|
-
|
-
|
-
|
| First Active
|
Active
|
Recovery
|
Frame Adv
|
Circuit
|
Invuln
|
| -
|
-
|
42
|
-
|
-
|
-
|
| (Akiha)
|
Damage
|
Red Damage
|
Proration
|
Cancel
|
Guard
|
| 1500
|
1078
|
80% (M)
|
-
|
LH
|
| First Active
|
Active
|
Recovery
|
Frame Adv
|
Circuit
|
Invuln
|
| 105
|
2
|
-
|
-
|
10.0%
|
-
|
|
Akiha summon.
|
|
|
|
| EX
|
Damage
|
Red Damage
|
Proration
|
Cancel
|
Guard
|
| -
|
-
|
-
|
-
|
-
|
| First Active
|
Active
|
Recovery
|
Frame Adv
|
Circuit
|
Invuln
|
| -
|
-
|
3+30
|
-
|
-150.0%
|
-
|
| (Ciel)
|
Damage
|
Red Damage
|
Proration
|
Cancel
|
Guard
|
| 250*6 (1195)
|
(862)
|
80%*3 (O), 90%*3 (M)
|
-
|
LHA
|
| First Active
|
Active
|
Recovery
|
Frame Adv
|
Circuit
|
Invuln
|
| 3+28
|
X (22) X (21) X
|
-
|
-
|
0.0%
|
-
|
|
Ciel summon for 150% meter. She throws three sets of black keys, like her 214BBB series. It gets them off the ground or blocking, but it's not really worth the meter.
|
|
Arc Drive
|
|
| Damage
|
Red Damage
|
Proration
|
Cancel
|
Guard
|
| 3000
|
2181
|
100%
|
-
|
U
(Whiffs vs Air.)
|
| First Active
|
Active
|
Recovery
|
Frame Adv
|
Circuit
|
Invuln
|
| 13+0
|
2
|
39
|
-
|
removes all
|
Full 1-15
|
|
This is a command grab with not too much range that gives her a bit of life back. Kind of useful in setups, but not really a good choice.
|
|
Another Arc Drive
|
|
| Damage
|
Red Damage
|
Proration
|
Cancel
|
Guard
|
| 4200
|
3491
|
100%
|
-
|
U
(Whiffs vs Air.)
|
| First Active
|
Active
|
Recovery
|
Frame Adv
|
Circuit
|
Invuln
|
| 14+0
|
1
|
39
|
-
|
removes all
|
Full 1-15
|
|
The above with more range and damage. This used to be a very useful attack because it could hit airborne opponents, but it does not anymore, and is less useful for that. Don't use this often.
|
|
Last Arc
No ArkGrounded EX Shield during Blood Heat
|
| Damage
|
Red Damage
|
Proration
|
Cancel
|
Guard
|
| 3500 ~ 7000
|
2800 ~ 5100
|
50% + 50% * remaining BH time
|
-
|
U
|
| First Active
|
Active
|
Recovery
|
Frame Adv
|
Circuit
|
Invuln
|
| 4
|
1
|
22
|
-
|
removes all
|
Full
|
|
One of the Last Arcs with a fullscreen hitbox on activation. Summons a giant claw that crashes on the opponent if the LA connects.
|
|
MBAACC Navigation


