|
|
| Line 38: |
Line 38: |
| *Pretty strong left right mixup that is really hard to defend against. | | *Pretty strong left right mixup that is really hard to defend against. |
| *Really stable MU spread, has a decent time against every character of the game and in some cases she destroys them. | | *Really stable MU spread, has a decent time against every character of the game and in some cases she destroys them. |
| *has a really good use for Crescent Moon defensive mechanics: amazing EX Shield 5A and can Heat more than other characters because of her meter gain and lack of use in her combos. | | *Has a really good use for Crescent Moon defensive mechanics: amazing EX Shield 5A and can Heat more than other characters because of her meter gain and lack of use in her combos. |
| |- | | |- |
| |Weaknesses | | |Weaknesses |
Revision as of 13:11, 5 May 2022
Character Page Progress
Additional Resources
C-Kohaku Match Video Database
Players to watch/ask
JP:
NA:
SA:
Overview
Strengths / Weaknesses
| Strengths
|
- Extremely strong normals, has a normal for almost every situation (abare, anti-air, long range).
- Each hit leads into corner carry and oki.
- Combos are meter positive even after using metered knockdown ender.
- Some of the highest meterless damage in the game, can reliably 3 touch characters and in some cases 2 touch them.
- Some of the most flexible pressure in the game with amazing rebeat pressure, a command grab that gives her oki in the corner, gapless plus frames and a standing overhead that can be feint canceled for a low.
- Pretty strong left right mixup that is really hard to defend against.
- Really stable MU spread, has a decent time against every character of the game and in some cases she destroys them.
- Has a really good use for Crescent Moon defensive mechanics: amazing EX Shield 5A and can Heat more than other characters because of her meter gain and lack of use in her combos.
|
| Weaknesses
|
- She has notable startup in her universal movement options (airdash, dash).
- Doesn't have a meterless reversal and the metered ones are very slow to have a practical use.
- Exclusively depends of the Crescent Moon mechanics for defense.
|
General Gameplan
Place text here*
Neutral
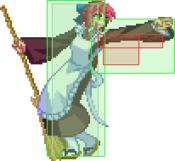
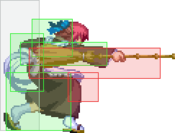
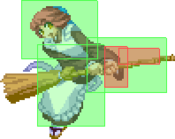
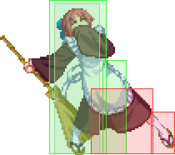
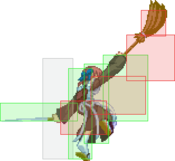
5C is active frame 8, faster than many at the same range and the broom handle has no green on it to hamper the red. Can be low profiled however.
2C is a "sweep" taken to the logical extreme. Very long range, but very slow. Useful against zoners, and in neutral exchanges when the opponent is getting used to walking in front of you.
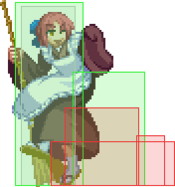
5B is deceptively small, but still excellent for anti-airs compared to other moves in this game. Don't expect the entire swinging animation to defend you, but on frame 9 a big chunk of red will be just above Kohaku's head. Long recovery, so don't miss.
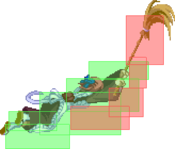
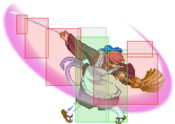
5[B] is the "stay the hell away from me" button. At the ranges you'll use it at, the opponent will likely be too far to whiff punish you. Obscenely long and disjointed AF. It will thwart all grounded & low-to-the-ground approaches. The trick is to know when to abort a charge attempt and go for 5B instead of allowing yourself to get CH by a preemptive approach. 5[B] has no air hitbox, again contradicting the swing-down animation.
4B is a great middle-ground between 5C and 5A/2A in neutral. Fast and disjointed. Be sure to release the button without delay to have the hitbox come out when you need it.
J.B is a strong move; infamous in fact. Utilize it to the fullest with IAD backwards & forwards. J.B is disjointed at the tip of the broom so for A2A exchanges aim to hit the opponent at that range. Kohaku is entirely green and stretched out during the 2 frames preceding its active frames, so be wary of opponents using J.A's to interrupt.
J.C is very strong itself. J.B is angled upwards, so you'll find opponents maneuvering themselves in ways that avoid that angle but make them susceptible to this downward angle. Use during air-to-ground and air-to-air exchanges where you need something to hit them from above. Disjointed at the broom bristles. In neutral, consider doing A2G J.C and airdash cancelling; if the J.C CH's you can do another J.C to confirm, and if not you're still relatively safe.
Pressure
Place text here
Okizeme
- Basic plant okizeme. Plants will not hit meaty and will not catch jumpouts (9 direction), but you can dash in and throw a poke. Even if you get countered, the plant persists and they will get hit, allowiwng you to combo again. Because of this most of the time people will respect plants and block, allowing you to go for mixups. You can also go for dash in throw before the plant hits. Using 22A opens up fuzzy opportunities. (Video example)
- This plant setup makes the plant hit jumpouts, but can't be used with long combos (e.g. double feint/battou loops) because the opponent will be able to tech the 6C.
- - 22A / 22B
- - 6C > 236A > 236C
- A great okizeme option, as it opens up a lot of possibilities. You can go for plants, crossup mixups (with dodge, or jump into 3-way), and even OTG into 236C knockdown.
- Cancelling the 2C into feint brings back all the normals, allowing greater freedom in enders.
- - 2{C} > 236B~C > IAD j.A(w)
- Partially charging the 2C opens an invisible gap between the opponent and the corner, allowing you to IAD and ambiguously crossup.
- - 2C~5C > 6C > 236A > 236C
- OTG string into hard knockdown.
- - 2C > 5C~C(4) > 236[B] > 2222C
- The Johnny setup. After the opponent hits the ground they can tech in any direction, but this is easily punished by 5C on reaction. If they do not tech, they are forced to block the fireballs coming from offscreen, and you can use their pushback (pushing the opponent out of the corner) for ambiguous crossup mixups. If you punish with 5C you can go for 236C - while they're in the hit animation the fireballs will still hit for some nice damage.
- - (delay) 22C (meaty)
- - 22B
- - 22222C
- After 236C you can go for the cactus, punching plant or poison plant. Note that the cactus needs to be delayed to hit meaty. When they start blocking the cactus, you have plenty of time to go for high-low mixups. (236[A] / 236{A} 4B, last moment airbackdash j.B, j.[C] fakeouts, etc.) Double IAD j.[C] (whiff) 236[A] hits them in such a way that you will be able to continue with a combo after the cactus wallslams them. Setting up the poison plant opens up fuzzy opportunities. (IAD j.C -> 2A / j.[C])
Defense
place text here*
Combos
| Combo Notation Help
|
Disclaimer: Combos are written by various writers, so the actual notation used in pages can differ from the standard one.
For more information, see Glossary and Controls.
|
| X > Y
|
X input is cancelled into Y.
|
| X > delay Y
|
Must wait for a short period before cancelling X input into Y.
|
| X, Y
|
X input is linked into Y, meaning Y is done after X's recovery period.
|
| X+Y
|
Buttons X and Y must be input simultaneously.
|
| X/Y
|
Either the X or Y input can be used.
|
| X~Y
|
This notation has two meanings.
- Use attack X with Y follow-up input.
- Input X then within a few frames, input Y. Usually used for option selects.
|
| X(w)
|
X input must not hit the opponent (Whiff).
|
| j.X
|
X input is done in the air, implies a jump/jump cancel if the previous move was done from the ground.
Applies to all air chain sections:
- Assume a forward jump cancel if no direction is given.
- Air chains such as j.A > j.B > j.C can be shortened to j.ABC.
|
| sj.X
|
X input is done after a super jump. Notated as sj8.X and sj9.X for neutral and forward super jumps respectively.
|
| dj.X
|
X input is done after a double jump.
|
| sdj.X
|
X input is done after a double super jump.
|
| tk.X
|
Stands for Tiger Knee. X motion must be buffered before jumping, inputting the move as close to the ground as possible. (ex. tk.236A)
|
| (X)
|
X is optional. Typically the combo will be easier if omitted.
|
| [X]
|
Input X is held down. Also referred to as Blowback Edge (BE). Depending on the character, this can indicate that this button is held down and not released until indicated by the release notation.
|
| ]X[
|
Input X is released. Will only appear if a button is previously held down. This type of input is referred to as Negative Edge.
|
| {X}
|
Button X should only be held down briefly to get a partially charged version instead of the fully charged one.
|
| X(N)
|
Attack "X" should only hit N times.
|
| (XYZ)xN
|
XYZ string must be performed N times. Combos using this notation are usually referred to as loops.
|
| (XYZ^)
|
A pre-existing combo labelled XYZ is inserted here for shortening purposes.
|
| CH
|
The first attack must be a Counter Hit.
|
| Air CH
|
The first attack must be a Counter Hit on an airborne opponent.
|
| 66
|
Performs a ground forward dash.
|
| j.66
|
Performs an aerial forward dash, used as a cancel for certain characters' air strings.
|
| IAD/IABD
|
Performs an Instant AirDash.
|
| AT
|
Performs an Air Throw. (j.6/4A+D)
|
| IH
|
Performs an Initiative Heat.
|
| AD
|
Performs an Arc Drive.
|
| AAD
|
Performs an Another Arc Drive.
|
- Note: ~ is used in this section to indicate a slight delay.
C-Kohaku's combos have changed dramatically since her PS2 incarnation. 6C > battou feint no longer links to 4B, so she is forced to use 236A 236B~C combos as a replacement. Luckily, the versatility of her new 236B > j.[C] combo gives her easy hitconfirms that carry to the corner where she can do massive damage into easy setups. Note that due to the way gravity works, a corner juggle that starts with a full ground string may not work off of an airthrow or a j.B counterhit without minor adjustment in timing or normals.
C-Kohaku is very flexible combo-wise. Combos vary from fairly basic variants to long-winded loops with severe execution requirements. Generally her combos consist of a launcher into j.[C] and then a ground string, but she can opt to use j.[C] as a knockdown tool in the corner. There are three main ways to add damage to her combos: corner battou loops (236B~A), feint loops (236A 236B~C), and 5[B] segments.
See here (Youtube) for combo video examples.
Starters
| Condition
|
Notation
|
Damage
vs V.Sion
|
Notes
|
|
| Normal starter, grounded opponent
|
- 2A > 2B > 4B > (2C~) 5CC(1-3) > 236B > j.[C]...
|
???
|
| |
| Meter Gained: ??? |
Meter Given (vs C-Moon): ??? |
| The standard launcher. Adding 2C reduces damage but makes them bounce higher, giving you more time to dash in and continue. |
|
|
| Normal starter, grounded opponent
|
- 2A > 2B > 4B > 5CC(1-3) > 236B > j.[C] > j.66 j.C~B
|
???
|
| |
| Meter Gained: ??? |
Meter Given (vs C-Moon): ??? |
| Alternative launcher. Gives good carry, but also increases gravity scaling, so some of the longer combos cam fizzle. Continue directly with 2C. |
|
|
| Normal starter, grounded opponent
|
- 2A > 2B > 4B > 5CC(1-3) > 236A > 236B > j.[C] (> j.66 j.C~B)...
|
???
|
| |
| Meter Gained: ??? |
Meter Given (vs C-Moon): ??? |
| Adding 236A to the launcher increases gravity scaling a lot, severely limiting the followup options. However, if used with a short followup (fullscreen 236[B]B 2C, single battou loop), this launcher adds 400-500 damage. Adjust followup timings accordingly. |
|
|
| Normal starter, grounded opponent
|
- 2A > 2B > 4B > 2C~5C~C(1-3) > 236A > 236B~C, 2A > 2C > 5C~C(1-3) > 236B > j.[C]...
|
???
|
| |
| Meter Gained: ??? |
Meter Given (vs C-Moon): ??? |
| Feint loop starter. Results in high gravity scaling so combo options afterwards are limited. |
|
|
Normal starter, grounded opponent
Corner
|
- 2A > 2B(B) > 2C > 5C > 5[B] > 4B > 236B > j.[C]...
|
???
|
| |
| Meter Gained: ??? |
Meter Given (vs C-Moon): ??? |
| Maximum damage starter for corner combos that include a launcher at the start. Omitting the 2B followup might be necessary depending on spacing. |
|
|
Enders
Basic Enders
| Condition
|
Notation
|
Damage
vs V.Sion
|
Notes
|
|
| Fullscreen
|
- ...66 2C > 5C~C(4) > 236[B]B, 2C
|
???
|
| |
| Meter Gained: ??? |
Meter Given (vs C-Moon): ??? |
| Easy fullscreen combo, works from about 90% of the screen. |
|
|
| Close to corner
|
- ...66 2C > 5C~C(4) > 236[B]B, 5A > 5C > 5[B] > 2A > 2C (> 4{B} > 6C > 236A > 236C)
|
???
|
| |
| Meter Gained: ??? |
Meter Given (vs C-Moon): ??? |
| Basic way to extend damage with a 5[B] segment. Must get close to corner for the combo to work. Optional 236C ender. |
|
|
| Corner
|
- ...2C > 5C~C(4) > 236[B], (2A >) 2C (> 4{B} > 6C > 236A > 236C)
|
???
|
| |
| Meter Gained: ??? |
Meter Given (vs C-Moon): ??? |
| Easy corner combo. Delaying the 5C followup allows them to get higher so you have time to catch them while they're falling. |
|
|
| Corner
|
- ...2C > 5C~C(4) > 236[B], 2A > 5C > 5[B] > 2B > 2C (> 4{B} > 6C > 236A > 236C)
|
???
|
| |
| Meter Gained: ??? |
Meter Given (vs C-Moon): ??? |
| Basic way to extend damage in the corner with a 5[B] segment. |
|
|
| Corner?
|
- ...2C > 5C~C(4) > 236[B]B, (4B >) 2C
|
???
|
| |
| Meter Gained: ??? |
Meter Given (vs C-Moon): ??? |
| This combo gets them out of the corner. Can follow up with 22B and use its pushback for mixups. |
|
|
| Anywhere
|
- ...5C > 5[B] > 2B > 2C > 4[B]
|
???
|
| |
| Meter Gained: ??? |
Meter Given (vs C-Moon): ??? |
| Easy combo into 4[B] knockdown. |
|
|
Anywhere
100% meter
|
- ...2C > 5C > 5[B] > 4B > 236A > 236C
|
???
|
| |
| Meter Gained: ??? |
Meter Given (vs C-Moon): ??? |
| Easy combo into 236C knockdown. |
|
|
Feint Loops
| Condition
|
Notation
|
Damage
vs V.Sion
|
Notes
|
|
| Midscreen
|
- ...2C~5C~C(1-3) > 236A > 236B~C, 2A > 2C (> OTG / 4{B} > 6C > 236A > 236C)
|
???
|
| |
| Meter Gained: ??? |
Meter Given (vs C-Moon): ??? |
| Basic variation of the feint loop. Use appropriate delays and number of 5CC hits to get the 236A to connect, while leaving them high enough so you can catch them with 2A after the feint. Works from about midscreen. |
|
|
| Fullscreen
|
- ...2C~5C~C(1-3) > 236A > 236B~C, 2A > 2C > 5C~C > 236[B]B, (4B >) 2C
|
???
|
| |
| Meter Gained: ??? |
Meter Given (vs C-Moon): ??? |
| Fullscreen feint loop combo. |
|
|
| Corner
|
- ...2C~5C~C(1-3) > 236A > 236B~C, 2A > 5C > 5[B] > 2B > 2C (> OTG / 4{B} > 6C > 236A > 236C)
|
???
|
| |
| Meter Gained: ??? |
Meter Given (vs C-Moon): ??? |
| Corner version of the feint loop. Extends ender with a 5[B] segment. |
|
|
Corner Battou Loops
| Condition
|
Notation
|
Damage
vs V.Sion
|
Notes
|
|
| Corner
|
- ...2C > 5C > 236B~A, (5A > 5C > 236B~A) 5A > 5C~C(4) > 236[B], 2A > 2C
|
???
|
| |
| Meter Gained: ??? |
Meter Given (vs C-Moon): ??? |
| Basic variant of the battou loop. This combo is very sensitive to height, so use appropriate delays to get them to the right spot (which is character specific). Second loop requires a bit faster timing. Ender sacrifices okizeme options. |
|
|
| Corner
|
- ...2C > 5C > 236B~A, (5A > 5C > 236B~A) 5A > 5C~C(4) > 236[B]B, (4B >) 2C
|
???
|
| |
| Meter Gained: ??? |
Meter Given (vs C-Moon): ??? |
| This ender gets them out of the corner. Can follow up with 22B and use its pushback for mixups. |
|
|
| Corner
|
- ...2C > 5C > 236B~A, (5A > 5C > 236B~A) 5A > 5C > 5[B] > 2B > 2C (> OTG / 4{B} > 6C > 236A > 236C)
|
???
|
| |
| Meter Gained: ??? |
Meter Given (vs C-Moon): ??? |
| Battou loop with 5[B] ender. (Ender gives a lot of options for okizeme, as seen in the Okizeme section.) |
|
|
| Corner
|
- ...2C > 5C > 5[B] > 2B > 4B > 236B~A, 5A > 5C > 5[B] > 2B > 2C (> OTG / 4{B} > 6C > 236A > 236C)
|
???
|
| |
| Meter Gained: ??? |
Meter Given (vs C-Moon): ??? |
| Extending the battou loop damage by inserting another 5[B] segment. More hits increase the gravity scaling so stick with one loop. |
|
|
Advanced Enders
| Condition
|
Notation
|
Damage
vs V.Sion
|
Notes
|
|
| Ends in the corner
|
- ...2C > 5C > 5[B] > (2B >) 4B > 236A > 236B~C, 2A > 5C > 5[B] > 2B > 2C (> OTG / 4{B} > 6C > 236A > 236C)
|
???
|
| |
| Meter Gained: ??? |
Meter Given (vs C-Moon): ??? |
| Extending the feint loop damage by inserting two 5[B] segments. The 2B in the combo should be omitted against Warachia, Seifuku, Ries and Len. The combo does not work on the Necos. Must end up in the corner for 5[B] stuff to work. |
|
|
| Ends in the corner
|
- ...2C > 5C > 236B~A, 5A > 5C > 5[B] > (2B >) 4B > 236A > 236B~C, 2A > 2C (> OTG / 4{B} > 6C > 236A > 236C)
|
???
|
| |
| Meter Gained: ??? |
Meter Given (vs C-Moon): ??? |
| Combo including battou, feint and 5[B] segments. Must get to the corner for the ender to work. |
|
|
| ?
|
- ...2C > 5C > 5[B] > (2B >) 4B > 236A > 236B~C, 2A > 5C > 5[B] > (4B >) 2B > 236A > 236B~C, 2A > 2C (> 5C~C(4) > 236[B], (2A >) 2C)
|
???
|
| |
| Meter Gained: ??? |
Meter Given (vs C-Moon): ??? |
| Double 5[B] into feint combo, doing the extended ender removes the OTG okizeme options. |
|
|
Misc. Corner Combos
| Condition
|
Notation
|
Damage
vs V.Sion
|
Notes
|
|
| Normal starter, grounded opponent
|
- 2A > 2B > 4B > 2C > 5CC(1-3) > 236B~A...
|
???
|
| |
| Meter Gained: ??? |
Meter Given (vs C-Moon): ??? |
| An alternative way to start the battou loop. Yields suboptimal damage. Can continue the combo in any of the ways listed above. |
|
|
| Normal starter, grounded opponent
|
- 2A > 2B > 2C > 5C > 5[B] > 4B > 236B~A, 5A > 5C > 5[B] > 2B > 4B > 236B~A, 5A > 5C > 5[B] > 2B > 4B > 236B > j.[C] (> OTG / dj.[C] (4{B} > 6C > 236A > 236C))
|
???
|
| |
| Meter Gained: ??? |
Meter Given (vs C-Moon): ??? |
| Because this corner combo omits the relaunch part, the gravity is not as scaled and you can go for multiple battou loops and 5[B] segments. For ender you can either opt for a single j.[C] into the usual options, or go for dj.[C] into plant or 236C knockdown. |
|
|
| Normal starter, grounded opponent
|
- 2A > 2B > 2C > 5C > 5[B] > 4B > 236B~A, 5A > 5C > 5[B] > 2B > 4B > 236B~A, 5A > 5C > 5[B] > 2B > 4B > 236A > 236B~C, 2A > 2C (OTG / 4{B} > 6C > 236A > 236C)
|
???
|
| |
| Meter Gained: ??? |
Meter Given (vs C-Moon): ??? |
| Corner specific battou loop. Similar to the above combo, but includes a feint ender. |
|
|
Misc. Hitconfirms
| Condition
|
Notation
|
Damage
vs V.Sion
|
Notes
|
|
| Long-range 2C starter
|
- 2C > (6C >) (236A >) 236B > j.[C]...
|
???
|
| |
| Meter Gained: ??? |
Meter Given (vs C-Moon): ??? |
| Long-range hitconfirm for when j.[C] can connect. Most of Kohaku's pokes can easily confirm into very damaging combos, making the opponents fear her pressure. |
|
|
| Long-range 2C starter
|
- 2C > 236A > 236B > IAD j.B > dj.BC
|
???
|
| |
| Meter Gained: ??? |
Meter Given (vs C-Moon): ??? |
| Long-range hitconfirm for when j.[C] can't connect. The knockdown is techable, so be prepared to punish any techs as appropriate. |
|
|
| Aerial normal starter
|
- ... j.AAAB > dj.AAACB > AT
|
???
|
| |
| Meter Gained: ??? |
Meter Given (vs C-Moon): ??? |
| Random aerial hitconfirm when you don't want to risk techable knockdown. Number of j.A can be adjusted. |
|
|
| 22C starter
|
(Cactus Hits)...
- 5C (x2-3) > j.[C] > dj.[C]
- 5C (x2-3), 5C > 5[B] > 2B > 2C > 4[B] OTG
- 5C (x2-3), 5C > 5[B] > 4B > 236B > j.[C], land 2C
- 5C (x2-3), 2[C] > 4[B]
|
???
|
| |
| Meter Gained: ??? |
Meter Given (vs C-Moon): ??? |
| Use any of these if the opponent is stupid enough not to block the cactus. |
|
|
| Raw Airthrow starter
|
- Raw AT, land 66 2C > 5CC(1-3) > 236B > j.[C]...
|
???
|
| |
| Meter Gained: ??? |
Meter Given (vs C-Moon): ??? |
| Note that airthrow gives slightly different gravity scaling and combos will need to be adjusted. |
|
|
| 236[A] starter, metered
|
236[A]...
- AD
- 236C
- 22C, 5[B] > 4B > 236B~A... (Corner)
|
???
|
| |
| Meter Gained: ??? |
Meter Given (vs C-Moon): ??? |
| Use any of these if the opponent gets hit by the overhead. Note that while Arc Drive hits OTG, Another Arc Drive does not. |
|
|
Move Descriptions
| Frame Data Help
|
| Header
|
Tooltip
|
| Move Box Colors
|
Light gray = Collision Box (A move lacking one means it can go through the opponent's own collision box).
Green: Hurt Boxes.
Red: Hit(/Grab) Boxes.
Yellow: Clash Boxes (When an active hitbox strikes a clash box, the active hitbox stops being active. Multi-hit attacks can beat clash since they will still progress to the next hitbox.)
Magenta: Projectile-reflecting boxes OR Non-hit attack trigger boxes (usually).
Blue: Reflectable Projectile Boxes.
|
| Damage
|
Base damage done by this attack.
(X) denotes combined and scaled damage tested against standing V. Sion.
|
| Red Damage
|
Damage done to the recoverable red health bar by this attack. The values are inherently scaled and tested against standing V. Sion.
(X) denotes combined damage.
|
| Proration
|
The correction value set by this attack and the way it modifies the scaling during a string. See this page for more details.
X% (O) means X% Overrides the previous correction value in a combo if X is of a lower percentage.
X% (M) means the current correction value in a combo will be Multiplied by X%. This can also be referred to as relative proration.
|
| Circuit
|
Meter gained by this attack on hit.
(X%) denotes combined meter gain.
-X% denotes a meter cost.
|
| Cancel
|
Actions this move can be cancelled into.
SE = Self cancelable.
N = Normal cancelable.
SP = Special cancelable.
CH = Cancelable into the next part of the same attack (Chain in case of specials).
EX = EX cancelable.
J = Jump cancelable.
(X) = Cancelable only on hit.
-X- = Cancelable on whiff.
|
| Guard
|
The way this move must be blocked.
L = Can block crouching
H = Can block standing.
A = Can block in the air.
U = Unblockable.
|
| Startup
|
Amount of frames that must pass prior to reaching the active frames. Also referred to as "True Startup".
|
| Active
|
The amount of frames that this move will have a hitbox.
(x) denotes frame gaps where there are no hitboxes is present. Due to varied blockstuns, (x) frames are difficult to use to determine punish windows. Generally the larger the numbers, the more time you have to punish.
X denotes active frames with a duration separate from its origin move's frame data, such as projectile attacks. In this case, the total length of the move is startup+recovery only.
|
| Recovery
|
Frames that this move has after the active frames if not canceled. The character goes into one frame where they can block but not act afterwards, which is not counted here.
|
| Advantage
|
The difference in frames where you can act before your opponent when this move is blocked (assuming the move isn't canceled and the first active frame is blocked).
If the opponent uses a move with startup that is at least 2 frames less than this move's negative advantage, it will result in the opponent hitting that move.
±x~±y denotes a range of possible advantages.
|
| Invul
|
Lists any defensive properties this move has.
X y~z denotes X property happening between the y to z frames of the animations. If no frames are noted, it means the invincibility lasts through the entire move.
Invicibility:
- Strike = Strike invincible.
- Throw = Throw invincible.
Hurtbox-Based Properties:
- Full = No hurtboxes are present.
- High = Upper body lacks a hurtbox.
- Low = Lower body lacks a hurtbox.
Miscellaneous Properties
- Clash = Frames in which clash boxes are active.
- Reflect = Frames in which projectile-reflecting boxes are active.
- Super Armor = Frames in which the character can take hits without going into hit stun.
|
Normal Moves
Standing Normals
|
|
| Damage
|
Red Damage
|
Proration
|
Cancel
|
Guard
|
| 350
|
166
|
78% (O)
|
-SE-, -N-, -SP-, -EX-, (J)
|
LH
|
| First Active
|
Active
|
Recovery
|
Frame Adv
|
Circuit
|
Invuln
|
| 3
|
4
|
8
|
0
|
3.5%
|
-
|
|
Standard 5A for whiff canceling and antiair. The vertical hitbox has been nerfed a bit from PSA, but because of the removal of anti-air armor in CC 1.07, it's far more viable to use to trade with air attacks.
This attack will hit Wara, Nanaya, Tohno, Archetype, Wlen, and Nero while they are crouching, but it barely whiffs on everybody else. This means if they use any move that extends their hitbox during the startup, the 5A will most likely counterhit them.
|
|
|
|
| 5B
|
Damage
|
Red Damage
|
Proration
|
Cancel
|
Guard
|
| 600
|
392
|
70% (O)
|
N, SP, EX, (J)
|
H (Whiffs vs Crouch.),
LH
|
| First Active
|
Active
|
Recovery
|
Frame Adv
|
Circuit
|
Invuln
|
| 8
|
5
|
14
|
-4 (vs Stand.)
-2 (vs Crouch.)
|
6.0%
|
-
|
|
Kohaku swipes with the broom over her head. This antiair attack will trade or beat most jump in attacks provided you space it correctly, but the broom extends Kohaku's hitbox making her particularly vulnerable to disjointed air to air attacks. It can also be used to halt jump out attempts when your opponent is in the corner.
|
| 5[B]
|
Damage
|
Red Damage
|
Proration
|
Cancel
|
Guard
|
| 1000
|
686
|
70% (O)
|
N, SP, EX, (J)
|
LH
|
| First Active
|
Active
|
Recovery
|
Frame Adv
|
Circuit
|
Invuln
|
| 17
|
8
|
12
|
-5
|
10.0%
|
-
|
|
This looks the same as 5B but has a very different purpose. This is a very fast charge move that has a disjointed horizontal hitbox that's perfect for stuffing pokeout attempts in your blockstrings. It used to be untechable knockdown in PS2, but now if you hit your opponent in the air with it they can tech as soon as they reach the ground. Even with this change, it's very good at swatting your opponent trying to jump out of the corner as even if they tech it Kohaku can punish very easily on reaction. This normal is also a mainstay for her very damaging corner loops, although obviously you can't use it as a hard knockdown ender anymore.
|
|
|
|
| 5C
|
Damage
|
Red Damage
|
Proration
|
Cancel
|
Guard
|
| 900
|
686
|
90% (O)
|
N, SP, -CH-, EX, (J)
|
LH
|
| First Active
|
Active
|
Recovery
|
Frame Adv
|
Circuit
|
Invuln
|
| 7
|
6
|
18
|
-9
|
6.0%
|
-
|
|
Kohaku stabs you with the broom handle. Like most of her other normals, this is a very strong poke that can be used in a variety of situations such as meaty, combo filler, and antijumpout. Almost the entire broom handle is unhittable, so at the right ranges this can beat much quicker attacks and it is almost always confirmable into its command followup, 5CC. Abuse the hell out of this move.
|
| 5C~C
|
Damage
|
Red Damage
|
Proration
|
Cancel
|
Guard
|
| 150*3, 800 (1160)
|
(451)
|
100%*3, 60% (M)
|
N, SP, EX, (J)
|
LHA
|
| First Active
|
Active
|
Recovery
|
Frame Adv
|
Circuit
|
Invuln
|
| 2
|
10
|
29
|
-15
|
1.0%*4 (4.0%)
|
-
|
|
After 5C, Kohaku does a twirl with her broom handle for 4 hits, with the last hit launching them. In PS2, the first part of this followup had a significant amount of forward movement that made it amazing in blockstrings. This forward movement has been removed, but the move still cancels your pushback from 5C which makes it an invaluable asset in her strings and combos. If they block it, cancel the first hits into 2A or 4B to keep pressuring or into 5A whiff and command throw them, if it hits you can just go into a normal combo. Avoid the last hit though, its use is limited to specific blockstrings and her 5CC > 236[B] loop.
|
|
Crouching Normals
|
|
| Damage
|
Red Damage
|
Proration
|
Cancel
|
Guard
|
| 300
|
98
|
75% (O)
|
-SE-, -N-, -SP-, -EX-, (J)
|
L
|
| First Active
|
Active
|
Recovery
|
Frame Adv
|
Circuit
|
Invuln
|
| 3
|
4
|
8
|
0
|
3.0%
|
-
|
|
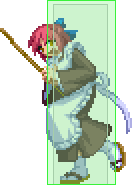
C-Kohaku has a very strong 2A. It has 3 frames of startup, hits low, and has decent range. Mash away, but make sure you are in range for the rest of your combo.
|
|
|
|
| 2B
|
Damage
|
Red Damage
|
Proration
|
Cancel
|
Guard
|
| 500
|
294
|
85% (O)
|
N, SP, -CH-, EX, (J)
|
LH
|
| First Active
|
Active
|
Recovery
|
Frame Adv
|
Circuit
|
Invuln
|
| 7
|
4
|
22
|
-11
|
5.0%
|
Clash 8-11
|
|
Mostly used for blockstring and combo filler, this move also doubles as a decent antiair from certain angles and it hits high enough to tag players who are jumping out of the corner. The horizontal range isn't as good as it looks, so be careful when you are adding it to combos and use 4b if you are too far away. This is a mid attack.
|
| 2B~2B
|
Damage
|
Red Damage
|
Proration
|
Cancel
|
Guard
|
| 500
|
313
|
85% (O)
|
N, SP, EX, (J)
|
L
|
| First Active
|
Active
|
Recovery
|
Frame Adv
|
Circuit
|
Invuln
|
| 6
|
4
|
17
|
-6
|
5.0%
|
-
|
|
Low hit command followup to 2B, you can delay the hit to make it useful in blockstrings but in combos it's usually better to do 2B > 4B if you have that option available.
|
|
|
|
| 2C
|
Damage
|
Red Damage
|
Proration
|
Cancel
|
Guard
|
| 1100
|
686
|
60% (O)
|
N, SP, EX, (J)
|
L
|
| First Active
|
Active
|
Recovery
|
Frame Adv
|
Circuit
|
Invuln
|
| 9
|
4
|
24
|
-10
|
7.0%
|
-
|
|
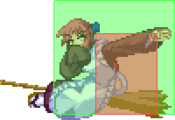
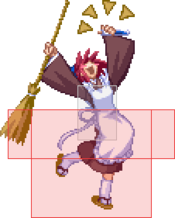
A long range literal sweep attack that hits low. This move has changed quite a bit since PS2, it now features a invisible vertical hitbox in the center of Kohaku's character model which makes it a piece of cake to use in her point blank corner juggle combos. As a tradeoff, the move no longer has as low a profile as it used to, so she can't use it to avoid as many attacks. Still, if you're sure it will land this is a very good long range poke that's fairly fast for how far it hits, just don't get caught whiffing it ever.
|
| 2[C]
|
Damage
|
Red Damage
|
Proration
|
Cancel
|
Guard
|
| 1400
|
980
|
90% (M)
|
N, SP, EX, (J)
|
L
|
| First Active
|
Active
|
Recovery
|
Frame Adv
|
Circuit
|
Invuln
|
| 21
|
5
|
24
|
-11
|
12.0%
|
-
|
|
Charged version has a smaller hurtbox.
|
|
Aerial Normals
|
|
| Damage
|
Red Damage
|
Proration
|
Cancel
|
Guard
|
| 300
|
98
|
73% (O)
|
SE, N, SP, EX, J
|
LHA
|
| First Active
|
Active
|
Recovery
|
Frame Adv
|
Circuit
|
Invuln
|
| 4
|
4
|
10
|
-
|
3.0%
|
-
|
|
A broom handle poke in the air. This j.A is angled in such a way it's good for jumping in as well as air to air, although the crossup potential has been nerfed since PS2.
|
|
|
|
| Damage
|
Red Damage
|
Proration
|
Cancel
|
Guard
|
| 680
|
392
|
90% (O)
|
N, SP, EX, J
|
HA
|
| First Active
|
Active
|
Recovery
|
Frame Adv
|
Circuit
|
Invuln
|
| 7
|
4
|
-
|
-
|
5.0%
|
-
|
|
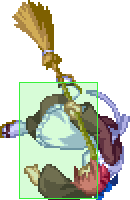
A blazingly fast upward broom swipe that has a truly staggering range. This is your mainstay air to air attack and one of the best at what it does. The broom tip does not have a hittable box, so use this move to swat your opponent out of the sky when they are at that upward angle, but it's speed also allows it to be used as a instant air backdash overhead or just a move you can throw out on the way down when you don't have time to use j.C. Most of Kohaku's neutral game comes from calculated abuse of this move.
|
|
|
|
| j.C
|
Damage
|
Red Damage
|
Proration
|
Cancel
|
Guard
|
| 1000
|
637
|
70% (O)
|
N, SP, EX, J
|
HA
|
| First Active
|
Active
|
Recovery
|
Frame Adv
|
Circuit
|
Invuln
|
| 9
|
3
|
-
|
-
|
10.0%
|
-
|
|
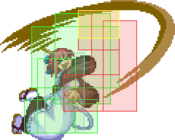
A downward broom swipe. Kohaku's jumpin attack has been slightly buffed since PS2 and now has more potential to stuff antiairs. On air hit, it slams them to the ground for a techable knockdown which Kohaku can punish at most ranges in the corner. Random air hits should be avoided and the main useage of this move should be to attack someone who is on the ground.
|
| j.[C]
|
Damage
|
Red Damage
|
Proration
|
Cancel
|
Guard
|
| 1050
|
686
|
80% (M)
|
N, SP, EX, J
|
HA
|
| First Active
|
Active
|
Recovery
|
Frame Adv
|
Circuit
|
Invuln
|
| 27
|
3
|
-
|
-
|
5.0%
|
-
|
|
Charged version ground bounces on air hit.
|
|
Command Normals
|
|
| 4B
|
Damage
|
Red Damage
|
Proration
|
Cancel
|
Guard
|
| 800
|
490
|
80% (O)
|
N, SP, EX, (J)
|
L
|
| First Active
|
Active
|
Recovery
|
Frame Adv
|
Circuit
|
Invuln
|
| 6
|
5
|
10
|
0
|
8.0%
|
-
|
|
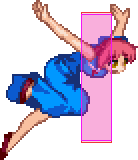
A super moe side kick. This modest looking normal is one of the best in the game for a crescent moon character, it's like they accidentally gave her a full moon normal. It's a standing low that has blazing fast startup, an almost unbeatable hitbox, almost no recovery, and it moves Kohaku forward during the startup. It's neutral on block, and if you counterhit them with it the new 1.07 counterhitstun allows you to link another 4B into a full combo. Abuse this move whenever you are in range, and even when you aren't you can throw it out there to stuff a normal that extends your opponents hitbox.
|
| 4[B]
|
Damage
|
Red Damage
|
Proration
|
Cancel
|
Guard
|
| 1000
|
784
|
55% (O)
|
N, SP, EX, (J)
|
LH
|
| First Active
|
Active
|
Recovery
|
Frame Adv
|
Circuit
|
Invuln
|
| 26
|
5
|
10
|
1
|
10.0%
|
-
|
|
A charged kick that hits mid and vacuums the opponent in on block or trips on hit. This is a very slow charge move that has more range than her normal 4B and a vertical hitbox that was buffed in 1.07, but extends her hittable box far more. It's +1 on block, but due to it's slow speed it is very hard to successfully get the move out against a mashy opponent so you have to mix in half charge 4B's into your strings to make them scared. New to 1.07, this move now OTG relaunches which makes it an ideal ender to her combos and allows her to setup whatever plant mixup she wants.
|
|
|
|
| Damage
|
Red Damage
|
Proration
|
Cancel
|
Guard
|
| 1000
|
490
|
45% (O)
|
SP, EX, (J)
|
L
|
| First Active
|
Active
|
Recovery
|
Frame Adv
|
Circuit
|
Invuln
|
| 10
|
3
|
31
|
-6
|
4.0%
|
-
|
|
Downward sword slash that hits low and is special cancelable only. The main purpose of this move is for blockstrings and should always be canceled on hit or block into fake battou or 236[A] overhead. On block, if you cancel it into 236BC Kohaku gets plenty of + frames to work with, although the amount has been nerfed since PS2 you can still stuff whatever nonreversal they want to do by throwing out a 4B after it. On hit, Kohaku gets a hard knockdown that she can followup with an OTG string, or 4[B] relaunch if you are fast enough at confirming. On counterhit she can followup with a full juggle without the need for otg relaunch.
|
|
Universal Mechanics
|
|
| Damage
|
Red Damage
|
Proration
|
Cancel
|
Guard
|
| 1000
|
490
|
100%
|
-
|
U
|
| First Active
|
Active
|
Recovery
|
Frame Adv
|
Circuit
|
Invuln
|
| 2
|
1
|
20
|
-
|
0.0%
|
-
|
|
Syringe hit. Untechable knockdown.
|
|
|
|
| Damage
|
Red Damage
|
Proration
|
Cancel
|
Guard
|
| 1600 (Raw)/1300
|
588
|
30%
|
-
|
U
|
| First Active
|
Active
|
Recovery
|
Frame Adv
|
Circuit
|
Invuln
|
| 1
|
1
|
12
|
-
|
0.0%
|
-
|
|
Ground bounces the opponnent using a 16-ton weight.
|
|
|
|
| Bunker
|
Damage
|
Red Damage
|
Proration
|
Cancel
|
Guard
|
| 500
|
196
|
50%
|
-
|
LHA
|
| First Active
|
Active
|
Recovery
|
Frame Adv
|
Circuit
|
Invuln
|
| 25
|
4
|
19
|
-5
|
0.0%
(-50.0% in blockstun)
|
Clash 1-10
|
| (Clash)
|
Damage
|
Red Damage
|
Proration
|
Cancel
|
Guard
|
| 500
|
196
|
50%
|
-
|
LHA
|
| First Active
|
Active
|
Recovery
|
Frame Adv
|
Circuit
|
Invuln
|
| 7
|
4
|
19
|
-5
|
0.0%/-50.0%
|
Strike 1-7
|
|
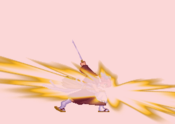
Flaming battou swipe.
|
|
|
|
| Damage
|
Red Damage
|
Proration
|
Cancel
|
Guard
|
| 100
|
0
|
100%
|
-
|
U
|
| First Active
|
Active
|
Recovery
|
Frame Adv
|
Circuit
|
Invuln
|
| 15
|
7
|
25
|
-
|
-100.0% (min)
|
Full 1-22
|
|
Decently quick and large hitbox.
|
|
|
|
| Ground
|
Damage
|
Red Damage
|
Proration
|
Cancel
|
Guard
|
| 100
|
0
|
100%
|
-
|
U
|
| First Active
|
Active
|
Recovery
|
Frame Adv
|
Circuit
|
Invuln
|
| 10
|
10
|
20
|
-
|
removes all
|
Full 1-39
|
| Air
|
Damage
|
Red Damage
|
Proration
|
Cancel
|
Guard
|
| 100
|
0
|
100%
|
-
|
U
|
| First Active
|
Active
|
Recovery
|
Frame Adv
|
Circuit
|
Invuln
|
| 11
|
10
|
15
|
-
|
removes all
|
Strike 1-30
|
|
Universal burst mechanic. Unlike Crescent/Full Heat activation, the hitbox and frame data doesn't vary between characters. However, you can be thrown out of this move if you input it in the air.
|
|
Special Moves
Special Movement
|
|
| Damage
|
Red Damage
|
Proration
|
Cancel
|
Guard
|
| -
|
-
|
-
|
-
|
-
|
| First Active
|
Active
|
Recovery
|
Frame Adv
|
Circuit
|
Invuln
|
| -
|
-
|
-
|
-
|
-
|
-
|
|
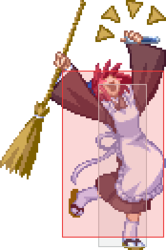
Slow approach that shrinks Kohaku's hurtbox.
|
|
Grounded Specials
A A [A] [A] B B [B] [B] A/[A]~A A/[A]~A B/[B]~A B/[B]~A ~B ~B ~C ~C EX EX
|
| A
|
Damage
|
Red Damage
|
Proration
|
Cancel
|
Guard
|
| 1000
|
656
|
96% (M)
|
(SP)*, -CH-, -EX-
|
LHA
|
| First Active
|
Active
|
Recovery
|
Frame Adv
|
Circuit
|
Invuln
|
| 7
|
2
|
29
|
-13
|
10.0%
|
Clash 4-5
|
| [A]
|
Damage
|
Red Damage
|
Proration
|
Cancel
|
Guard
|
| 1500
|
950
|
60% (O)
|
-CH-, -EX-
|
HA
|
| First Active
|
Active
|
Recovery
|
Frame Adv
|
Circuit
|
Invuln
|
| 28
|
2
|
44
|
-28
|
10.0%
|
-
|
|
Low slash. Charged version knocks down and is an overhead. Uncharged version can cancel into 236B on hit.
|
| B
|
Damage
|
Red Damage
|
Proration
|
Cancel
|
Guard
|
| 1000
|
656
|
70% (O)
|
-CH-, -EX-, (J)
|
LHA*
|
| First Active
|
Active
|
Recovery
|
Frame Adv
|
Circuit
|
Invuln
|
| 8
|
4
|
44
|
-24
|
3.0%
|
Clash 4-5
|
| [B]
|
Damage
|
Red Damage
|
Proration
|
Cancel
|
Guard
|
| 1200
|
980
|
70% (O)
|
-CH-, -EX-
|
LH
|
| First Active
|
Active
|
Recovery
|
Frame Adv
|
Circuit
|
Invuln
|
| 25
|
4
|
44
|
-24
|
10.0%
|
-
|
|
High slash. Charged version wallslams and is air-unblockable. Unique to Crescent, uncharged version can jump-cancel the recovery on hit.
|
| A/[A]~A
|
Damage
|
Red Damage
|
Proration
|
Cancel
|
Guard
|
| 800
|
294
|
70% (O)
|
-
|
LH*
|
| First Active
|
Active
|
Recovery
|
Frame Adv
|
Circuit
|
Invuln
|
| 12
|
4
|
28
|
-18 ~ -17
|
8.0%
|
-
|
| B/[B]~A
|
Damage
|
Red Damage
|
Proration
|
Cancel
|
Guard
|
| 800
|
294
|
85% (M)
|
-
|
LH
|
| First Active
|
Active
|
Recovery
|
Frame Adv
|
Circuit
|
Invuln
|
| 12
|
10
|
40
|
-38
|
3.0%
|
-
|
| ~B
|
Damage
|
Red Damage
|
Proration
|
Cancel
|
Guard
|
| -
|
-
|
-
|
-
|
-
|
| First Active
|
Active
|
Recovery
|
Frame Adv
|
Circuit
|
Invuln
|
| -
|
-
|
35
|
-
|
-
|
-
|
| ~C
|
Damage
|
Red Damage
|
Proration
|
Cancel
|
Guard
|
| -
|
-
|
-
|
-
|
-
|
| First Active
|
Active
|
Recovery
|
Frame Adv
|
Circuit
|
Invuln
|
| -
|
-
|
18
|
-
|
-
|
-
|
|
For non-EX versions, any of these can be used on hit, whiff, or block:
- Pressing A will do a follow-up attack, launching the opponent. Will launch behind Kohaku if done from A slash, and upwards if done from B slash.
- Pressing B will do a follow-up roll.
- Pressing C during startup will cancel the attack.
|
| EX
|
Damage
|
Red Damage
|
Proration
|
Cancel
|
Guard
|
| 2000
|
1568
|
100%
|
-
|
LH
|
| First Active
|
Active
|
Recovery
|
Frame Adv
|
Circuit
|
Invuln
|
| 4+5
|
1
|
55
|
-38
|
-100.0%
|
Full 1-7
|
|
Low slash. Untechable launch.
|
|
A/B A/B ~X ~X EX EX
|
| A
|
Damage
|
Red Damage
|
Proration
|
Cancel
|
Guard
|
| -
|
-
|
-
|
-CH-
|
-
|
| First Active
|
Active
|
Recovery
|
Frame Adv
|
Circuit
|
Invuln
|
| 21
|
18
|
18
|
-
|
-
|
Strike 18-46
|
| B
|
Damage
|
Red Damage
|
Proration
|
Cancel
|
Guard
|
| -
|
-
|
-
|
-CH-
|
-
|
| First Active
|
Active
|
Recovery
|
Frame Adv
|
Circuit
|
Invuln
|
| 20
|
18
|
36
|
-
|
-
|
Strike 17-45
|
| ~X
|
Damage
|
Red Damage
|
Proration
|
Cancel
|
Guard
|
| 600*3 (1743)
|
(853)
|
100%*2, 80% (O)
|
-
|
LHA
|
| First Active
|
Active
|
Recovery
|
Frame Adv
|
Circuit
|
Invuln
|
| 32 ~ 37
|
2 (2) 2 (2) 8
|
-
|
-
|
6.0%*3 (18.0%)
|
-
|
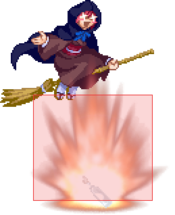
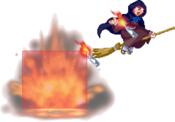
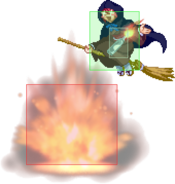
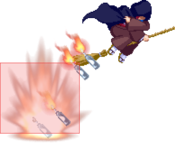
- Kohaku jumps off the ground and flies on her broom. While airborne, she can drop one explosive projectile on the ground by inputting any button. She lacks hurtboxes and a collision box while flying, but can still be air thrown.
A version fully recovers in the air, so it can be followed by a jump/airdash or a j.A.
B version goes farther but has to go through landing recovery.
|
| EX
|
Damage
|
Red Damage
|
Proration
|
Cancel
|
Guard
|
| (500*3) x4
|
(313*3) x4
|
(100%*2, 75% (M)) x4
|
-
|
LHA
|
| First Active
|
Active
|
Recovery
|
Frame Adv
|
Circuit
|
Invuln
|
| 17+(37 ~ 45)
|
X
|
71
|
-
|
-100.0%
|
Strike 1-115
|
|
Same as above, but kohaku will automatically drop 4 projectiles in succession.
|
|
|
|
A
(~[X])
|
Damage
|
Red Damage
|
Proration
|
Cancel
|
Guard
|
| 333*N
|
98*N
|
100%
|
-
|
LHA
|
| First Active
|
Active
|
Recovery
|
Frame Adv
|
Circuit
|
Invuln
|
57
(~171)
|
X
|
49
|
-
|
3.0%*N
|
-
|
|
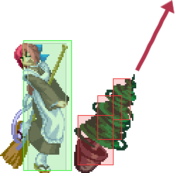
Kohaku puts out a spinning pine tree that goes diagonally upwards. The take-off can be delayed by holding any button beforehand, giving you a negative-edge type attack.
|
| B
|
Damage
|
Red Damage
|
Proration
|
Cancel
|
Guard
|
| 280*8 (1724)
|
(782)
|
-4%*8
|
-
|
LHA
|
| First Active
|
Active
|
Recovery
|
Frame Adv
|
Circuit
|
Invuln
|
| 80
|
32
|
53
|
-
|
3.0%*8 (24.0%)
|
-
|
|
This version puts out a grounded multihit spinning tree.
|
| EX
|
Damage
|
Red Damage
|
Proration
|
Cancel
|
Guard
|
| 500, 250*12 (1986)
|
(1521)
|
-4%*8
|
-
|
LH (1), LHA
|
| First Active
|
Active
|
Recovery
|
Frame Adv
|
Circuit
|
Invuln
|
| 4+23
|
15 (12), 1 (7) 1 (9) x5,
1 (5) 2
|
4+34
|
-
|
-100.0%
|
Full 1-5
|
|
Pulls out a cactus that performs a series of punches. On hit, this will finish with a superflash into a wallslam hit.
|
|
|
|
| Damage
|
Red Damage
|
Proration
|
Cancel
|
Guard
|
| 800*4
|
588*4
|
80% (O)
|
-
|
LHA
|
| First Active
|
Active
|
Recovery
|
Frame Adv
|
Circuit
|
Invuln
|
| 3+113
|
X
|
3+46
|
-
|
-150.0%
|
-
|
|
Special plant that spits 4 fireballs. Will correct which way it faces if it appears behind the opponent. Costs 150% meter.
|
|
|
|
| Damage
|
Red Damage
|
Proration
|
Cancel
|
Guard
|
| 100
|
49
|
50%
|
-
|
LH
|
| First Active
|
Active
|
Recovery
|
Frame Adv
|
Circuit
|
Invuln
|
| 3+108
|
72
|
3+36
|
-
|
-150.0%
|
-
|
|
Special plant that spits a slow poison projectile. On hit, it will inflict a damage over time effect on the opponent for approx. 15 seconds, though that effect only deals recoverable damage. The DoT effect automatically ends if Kohaku is hit. Will correct which way it faces if it appears behind the opponent. Costs 150% meter.
|
|
|
|
| Grab
|
Damage
|
Red Damage
|
Proration
|
Cancel
|
Guard
|
| 500 (440)
|
(431)
|
80% (O)
|
(CH)
|
U
(Whiffs vs Air.)
|
| First Active
|
Active
|
Recovery
|
Frame Adv
|
Circuit
|
Invuln
|
| 3
|
1
|
22
|
-
|
8.0%
|
-
|
| ~X (Lv 3)
|
Damage
|
Red Damage
|
Proration
|
Cancel
|
Guard
|
| 3500 (2826)
|
(2435)
|
80% (O)
|
-
|
-
|
| First Active
|
Active
|
Recovery
|
Frame Adv
|
Circuit
|
Invuln
|
| 0
|
1
|
30
|
-
|
20.0%
|
-
|
| ~X (Lv 2)
|
Damage
|
Red Damage
|
Proration
|
Cancel
|
Guard
|
| 1500 (1462)
|
(1232)
|
80% (O)
|
-
|
-
|
| First Active
|
Active
|
Recovery
|
Frame Adv
|
Circuit
|
Invuln
|
| 1
|
2
|
28
|
-
|
10.0%
|
-
|
| ~X (Lv 1)
|
Damage
|
Red Damage
|
Proration
|
Cancel
|
Guard
|
| 1000 (1121)
|
(898)
|
70% (O)
|
-
|
-
|
| First Active
|
Active
|
Recovery
|
Frame Adv
|
Circuit
|
Invuln
|
| 3
|
3
|
23
|
-
|
10.0%
|
-
|
|
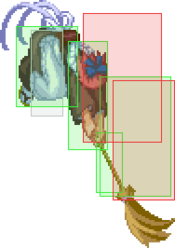
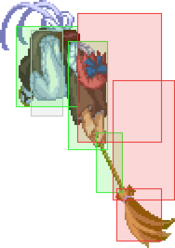
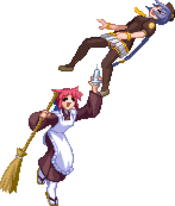
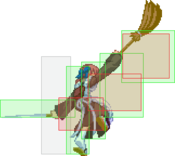
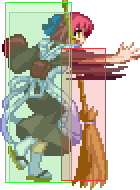
A command grab. If it lands, Kohaku will try to bat the opponent using her broom. The followup is done using any button, and Kohaku will still perform and whiff it if nothing is pressed.
The followup has 3 levels of strength depending on how low to the ground you hit the opponent (see second image). Level 3 will send the opponent flying as far as possible and result in an untechable knockdown.
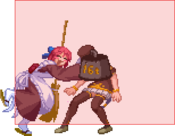
|
|
Don't do drugs, kids, as they are a waste of meter. Don't do drugs, kids, as they are a waste of meter.
|
| Damage
|
Red Damage
|
Proration
|
Cancel
|
Guard
|
| -
|
-
|
-
|
-
|
-
|
| First Active
|
Active
|
Recovery
|
Frame Adv
|
Circuit
|
Invuln
|
| -
|
-
|
24+100
|
-
|
-100.0%
|
-
|
|
Kohaku injects herself with drugs, granting her Blood Heat and super armor during its duration. After the long super flash, there is a long startup (100f), and it can only be safely used if the opponent is under cactus lockdown. The Blood Heat lasts 300f (5 seconds), shorter than Full Moon's maximum Blood Heat duration (750f, or 12.5 seconds). The super armor completely ignores normal throws, even if you tech throw it she's still invulnerable to that, however command throws can beat it. The only way to cancel it with a throw is by attacking Kohaku during the animation before the super armor comes, with that it becomes a total waste of meter.
24f of startup, then long super flash, then 100f before it becomes active.
While cool-looking, this move has no real practical uses, unless you want to use it for memes.
|
|
Aerial Specials
|
|
| A
|
Damage
|
Red Damage
|
Proration
|
Cancel
|
Guard
|
| 600*3 (1743)
|
(853)
|
100%*2, 80% (O)
|
-
|
LHA
|
| First Active
|
Active
|
Recovery
|
Frame Adv
|
Circuit
|
Invuln
|
| 19*
|
X
|
-
|
-
|
6.0%*3 (18.0%)
|
Strike 8-40
|
|
Aerial version of 214X that automatically drops an explosive.
|
| B
|
Damage
|
Red Damage
|
Proration
|
Cancel
|
Guard
|
| 300*3, 200*3 (1170)
|
(680)
|
-5%*3
|
-
|
LHA
|
| First Active
|
Active
|
Recovery
|
Frame Adv
|
Circuit
|
Invuln
|
| 20*
|
X
|
-
|
-
|
1.0%*3, 0.5%*3 (4.5%)
|
-
|
|
Kohaku hovers around and drops up to 3 explosives depending on how long this move is held. No strike invincibility.
|
| EX
|
Damage
|
Red Damage
|
Proration
|
Cancel
|
Guard
|
| (500*3) x4
|
(313*3) x4
|
(100%*2, 75% (M)) x4
|
-
|
LHA
|
| First Active
|
Active
|
Recovery
|
Frame Adv
|
Circuit
|
Invuln
|
| 17+(35 ~ 41)
|
X
|
-
|
-
|
-100.0%
|
Strike 1-59
|
|
Aerial EX version drops 4 explosives in a much faster succession than its grounded counterpart.
|
|
Arc Drive
|
|
| Damage
|
Red Damage
|
Proration
|
Cancel
|
Guard
|
| 4700 (2176)
|
(859)
|
50% (O)
|
-
|
U
(Whiffs vs Air.)
|
| First Active
|
Active
|
Recovery
|
Frame Adv
|
Circuit
|
Invuln
|
| 2+14
|
X
|
Knockdown*
|
-
|
removes all
|
Full
|
|
Kohaku dashes forward at high speed and goes into a 3-hit sequence that circuit breaks and knocks the opponent down. This is an unblockable that can only be evaded jumping. If this misses, Kohaku will hit the wall and be in an untechable knockdown state that allows for the opponent to OTG you.
|
|
Another Arc Drive
|
|
| Damage
|
Red Damage
|
Proration
|
Cancel
|
Guard
|
| 13800 (5238)
|
(3826)
|
50%
|
-
|
U
(Whiffs vs Air.)
|
| First Active
|
Active
|
Recovery
|
Frame Adv
|
Circuit
|
Invuln
|
| 2+17
|
X
|
Knockdown*
|
-
|
removes all
|
Full
|
|
Essentially the same as Arc Drive version in the beginning, but it has much more hits and wallslams the opponent into a ground tech situation. More damage, but does not circuit break.
|
|
Last Arc
|
|
| Damage
|
Red Damage
|
Proration
|
Cancel
|
Guard
|
| 7000 (3500 ~ 7000)
|
2930 ~ 5374
|
50% + 50% * remaining BH time
|
-
|
U
|
| First Active
|
Active
|
Recovery
|
Frame Adv
|
Circuit
|
Invuln
|
| 4+0
|
1+1
|
16+56
|
-
|
removes all
|
Full
|
|
The final battou. Goes into a cutscene on hit. Untechable knockdown.
|
|
MBAACC Navigation
