Character Page Progress
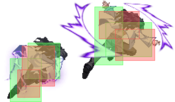
This page is still a work in progress, consider joining as an editor to help expand it. Please update this character's roadmap page when one of the editing goals have been reached.
| In Progress |
To-do
|
- Combos:
- Add damage and meter gain/given numbers to the pre-existing combos.
|
- Players to watch/ask
- If you know any players in particular that can be helpful for learning this character, please add them with, if possible a way to contact them (such as a Discord handle) and a name that can be searched in the match video database.
|
Additional Resources
F-Roa Match Video Database
Melty Bits: F-Roa
F-Roa Basics by TexasTim
Players to watch/ask
JP:
- Text goes here after asterisk
- Text goes here after asterisk
NA:
- Text goes here after asterisk
- Text goes here after asterisk
Overview
Strengths / Weaknesses
| Strengths
|
- Text goes here after asterisk
- Text goes here after asterisk
|
| Weaknesses
|
- Place text here be sure to use "*" for each point*
|
General Gameplan
F-Roa is a basic character with basic tools. Its a good thing and a bad IMO, and by good I mean he's easy for a decent player to perform well with. It's bad because he only has so many tools to work with and maybe easy to read if you aren't creative enough. He's a very fast and linear character both on the ground and in the air. Use his mobility to overwhelm your opponent.
Neutral
Place text here*
Pressure/Okizeme
Maintain pressure with 214A (lighting), 236A/B/C(slide slash) 236[B](sway/Smooth criminal). Use these tools in blockstrings and mix it up. Once you get the opponent to respect your 236 pressure, then the fun can start :).
You can start to use the 236[B] for better mix ups, do at your own risk (not masher friendly). His j.[C] also has good priority. You can also use the fact that his j.C is chargeable. You can mix them up with jump ins on oki or OTG setups.
OTG Combo:
Corner EX: after 214 knock down
- 2A*5 > 5B > 2B > 2C > jc IAD...
- At this point you can either:
- - j.C To go for an overhead if you think they will duck, or if you want to keep applying pressure.
- - j.[C] when you IAD you will be too low to the ground to complete the move so you will land right in front of them you can choose to grab or go low etc(basic high low mix ups).
Keep in mind if they tech forward then you will be the one in the corner and you wont be able to punish them. So yeah look for the tech...
214 Enders/oki Setup
For those unfamiliar with safe jump setups, it basically is used as a means to force an opponent to block and if they try to get away through reversals they can be punished. F-Roa has a setup that achieves this by timing a j.[C] just as the opponent is getting up. If the move hits go into a combo, if they try to reverse out with something like a DP you can block before the move can hit you, if they block they are now in j.[C] block stun and you are at massive advantage. You can even punish back dashes if you are quick enough with 2C into full combo (or maybe something better?). The one way for characters to beat this is to reversal parry your j.C. Given this is very hard timing and you can alter your setup in many ways to adjust for wake up parries. If your opponent has resorted to that then the setup had done its job and you should start mixing in j.[C] whiffs into lows and throws or run different setups for a while.
This is an interesting setup that plays off the properties of j.236A. Basically you get a knockdown and immediately air dash over the opponent and activate j.236A just as your about to reach the ground (but don't cancel the move). This setup does a couple of pretty cool things: 1) It reverses your opponent's inputs, meaning they have to dp the other direction to get the move out. 2) The back of j.236X sucks the opponent towards you pulling them right next to you as you land. 3) Done correctly this setup is meaty and leaves you at frame advantage on block (only A and C versions) 4) if you hit you get to follow up with an air combo for 2.5-3.5k) sometimes if the opponent crouch blocks they actually cross back in front of you before you land.
B version may have some utility as a ghetto shield setup as you are at disadvantage but not punishable.
All in all I'm really liking this setup right now. Its main weakness is that a well timed back dash will avoid this setup completely and of course a wake up shield will beat it as well. The trick is to vary the timing and use this one sparingly mixed with other IAD setups.
- IAD j.B (whiff), land 2A/2B
This one is just a basic IAD setup. If you play around with the timing on the j.B you can make the landing low cross-up or not and it can be very ambiguous. Obviously, this one can play off the IAD j.236A trap as well.
If you hold down the B button after F-Roa's 236B on the ground you get a command dash that can pass through opponents. Using this property we can setup another very ambiguous cross-up after 214A/B and adjust the range to make the dash cross-up or not. This one is all about how tight you are with the spacing as it can be very hard to see or very easy depending on how lazy you get with it. Also, you can do a similar cross-up by canceling a mid-screen OTG string into the 236B. Cool stuff.
This is about as simple as it gets. However, given the properties of F-Roa's grounded B normals, he is quite good at this one. Both standing and crouching B normals have good active frames, are decently fast, and most importantly leave you at advantage on block. This can lead to some pretty good pressure where it is really dangerous for the opponent to press any buttons at all. Mix in these great normals with his advantage specials (214A and 236B) and now you have some potent pressure with frame traps galore!
Defense
place text here*
Combos
| Combo Notation Help
|
Disclaimer: Combos are written by various writers, so the actual notation used in pages can differ from the standard one.
For more information, see Glossary and Controls.
|
| X > Y
|
X input is cancelled into Y.
|
| X > delay Y
|
Must wait for a short period before cancelling X input into Y.
|
| X, Y
|
X input is linked into Y, meaning Y is done after X's recovery period.
|
| X+Y
|
Buttons X and Y must be input simultaneously.
|
| X/Y
|
Either the X or Y input can be used.
|
| X~Y
|
This notation has two meanings.
- Use attack X with Y follow-up input.
- Input X then within a few frames, input Y. Usually used for option selects.
|
| X(w)
|
X input must not hit the opponent (Whiff).
|
| j.X
|
X input is done in the air, implies a jump/jump cancel if the previous move was done from the ground.
Applies to all air chain sections:
- Assume a forward jump cancel if no direction is given.
- Air chains such as j.A > j.B > j.C can be shortened to j.ABC.
|
| sj.X
|
X input is done after a super jump. Notated as sj8.X and sj9.X for neutral and forward super jumps respectively.
|
| dj.X
|
X input is done after a double jump.
|
| sdj.X
|
X input is done after a double super jump.
|
| tk.X
|
Stands for Tiger Knee. X motion must be buffered before jumping, inputting the move as close to the ground as possible. (ex. tk.236A)
|
| (X)
|
X is optional. Typically the combo will be easier if omitted.
|
| [X]
|
Input X is held down. Also referred to as Blowback Edge (BE). Depending on the character, this can indicate that this button is held down and not released until indicated by the release notation.
|
| ]X[
|
Input X is released. Will only appear if a button is previously held down. This type of input is referred to as Negative Edge.
|
| {X}
|
Button X should only be held down briefly to get a partially charged version instead of the fully charged one.
|
| X(N)
|
Attack "X" should only hit N times.
|
| (XYZ)xN
|
XYZ string must be performed N times. Combos using this notation are usually referred to as loops.
|
| (XYZ^)
|
A pre-existing combo labelled XYZ is inserted here for shortening purposes.
|
| CH
|
The first attack must be a Counter Hit.
|
| Air CH
|
The first attack must be a Counter Hit on an airborne opponent.
|
| 66
|
Performs a ground forward dash.
|
| j.66
|
Performs an aerial forward dash, used as a cancel for certain characters' air strings.
|
| IAD/IABD
|
Performs an Instant AirDash.
|
| AT
|
Performs an Air Throw. (j.6/4A+D)
|
| IH
|
Performs an Initiative Heat.
|
| AD
|
Performs an Arc Drive.
|
| AAD
|
Performs an Another Arc Drive.
|
Normal Combos
| Condition
|
Notation
|
Damage
vs V.Sion
|
Notes
|
|
| Normal starter, grounded opponent
|
- 2A > 5B > 2B > 5C(2) > 6C > 214A, 6C > 214A
|
???
|
| |
| Meter Gained: ??? |
Meter Given (vs C-Moon): ??? |
| Basic BnB oki combo. |
|
|
| Normal starter, grounded opponent
|
- 2A > 5B > 2B > 5C(2) > 6C > 214A, 6C > 623A/B/C
|
???
|
???
|
|
| Normal starter, grounded opponent
|
- 2A > 5B > 2B > 5C(2) > 6C > 214A, 236A > j.B[C] > dj.BC > AT/j.236C
|
???
|
| |
| Meter Gained: ??? |
Meter Given (vs C-Moon): ??? |
Easy combo that does a lot of damage, 236A can be substituted with 6C.
Can do one hit on 5C if your spacing is too far. |
|
|
| Raw Airthrow starter
|
- AT > j.C, land j.BC > dj.BC AT
|
???
|
???
|
|
| Raw Airthrow starter, Corner
|
|
???
|
???
|
|
Metered Combos
| Condition
|
Notation
|
Damage
vs V.Sion
|
Notes
|
|
| Normal starter, grounded opponent, 100% meter
|
- 2A > 5B > 2B > 5C(2) > 6C > 214A, 6C > 214A, 236C, 66 > 2C > 6C > 214A (> Corner Oki)
|
???
|
| |
| Meter Gained: ??? |
Meter Given (vs C-Moon): ??? |
| After the 236C dash up so you can catch them on the wall slam(your follow up depends on the spacing) and if your coming from the other side of the stage you can use substitute 2C for 5C whiff the first hit of 5C and catch them with the second... or you can simply 214A/B depending on the range. |
|
|
Move Descriptions
| Frame Data Help
|
| Header
|
Tooltip
|
| Move Box Colors
|
Light gray = Collision Box (A move lacking one means it can go through the opponent's own collision box).
Green: Hurt Boxes.
Red: Hit(/Grab) Boxes.
Yellow: Clash Boxes (When an active hitbox strikes a clash box, the active hitbox stops being active. Multi-hit attacks can beat clash since they will still progress to the next hitbox.)
Magenta: Projectile-reflecting boxes OR Non-hit attack trigger boxes (usually).
Blue: Reflectable Projectile Boxes.
|
| Damage
|
Base damage done by this attack.
(X) denotes combined and scaled damage tested against standing V. Sion.
|
| Red Damage
|
Damage done to the recoverable red health bar by this attack. The values are inherently scaled and tested against standing V. Sion.
(X) denotes combined damage.
|
| Proration
|
The correction value set by this attack and the way it modifies the scaling during a string. See this page for more details.
X% (O) means X% Overrides the previous correction value in a combo if X is of a lower percentage.
X% (M) means the current correction value in a combo will be Multiplied by X%. This can also be referred to as relative proration.
|
| Circuit
|
Meter gained by this attack on hit.
(X%) denotes combined meter gain.
-X% denotes a meter cost.
|
| Cancel
|
Actions this move can be cancelled into.
SE = Self cancelable.
N = Normal cancelable.
SP = Special cancelable.
CH = Cancelable into the next part of the same attack (Chain in case of specials).
EX = EX cancelable.
J = Jump cancelable.
(X) = Cancelable only on hit.
-X- = Cancelable on whiff.
|
| Guard
|
The way this move must be blocked.
L = Can block crouching
H = Can block standing.
A = Can block in the air.
U = Unblockable.
|
| Startup
|
Amount of frames that must pass prior to reaching the active frames. Also referred to as "True Startup".
|
| Active
|
The amount of frames that this move will have a hitbox.
(x) denotes frame gaps where there are no hitboxes is present. Due to varied blockstuns, (x) frames are difficult to use to determine punish windows. Generally the larger the numbers, the more time you have to punish.
X denotes active frames with a duration separate from its origin move's frame data, such as projectile attacks. In this case, the total length of the move is startup+recovery only.
|
| Recovery
|
Frames that this move has after the active frames if not canceled. The character goes into one frame where they can block but not act afterwards, which is not counted here.
|
| Advantage
|
The difference in frames where you can act before your opponent when this move is blocked (assuming the move isn't canceled and the first active frame is blocked).
If the opponent uses a move with startup that is at least 2 frames less than this move's negative advantage, it will result in the opponent hitting that move.
±x~±y denotes a range of possible advantages.
|
| Invul
|
Lists any defensive properties this move has.
X y~z denotes X property happening between the y to z frames of the animations. If no frames are noted, it means the invincibility lasts through the entire move.
Invicibility:
- Strike = Strike invincible.
- Throw = Throw invincible.
Hurtbox-Based Properties:
- Full = No hurtboxes are present.
- High = Upper body lacks a hurtbox.
- Low = Lower body lacks a hurtbox.
Miscellaneous Properties
- Clash = Frames in which clash boxes are active.
- Reflect = Frames in which projectile-reflecting boxes are active.
- Super Armor = Frames in which the character can take hits without going into hit stun.
|
Normal Moves
Standing Normals
|
|
| Damage
|
Red Damage
|
Proration
|
Cancel
|
Guard
|
| 300
|
202
|
75% (O)
|
-SE-, -N-, -SP-, -EX-, (J)
|
LH
|
| First Active
|
Active
|
Recovery
|
Frame Adv
|
Circuit
|
Invuln
|
| 4
|
4
|
5
|
3
|
2.7%
|
-
|
|
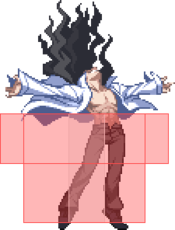
Standard standing jab. Does hit crouching opponents.
|
|
|
|
| Damage
|
Red Damage
|
Proration
|
Cancel
|
Guard
|
| 670
|
545
|
90%
|
N, SP, EX, (J)
|
L
|
| First Active
|
Active
|
Recovery
|
Frame Adv
|
Circuit
|
Invuln
|
| 8
|
4
|
10
|
1
|
6.03%
|
-
|
|
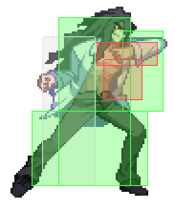
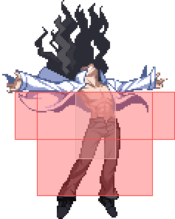
Hits mid and moves Roa forward a bit. Mostly used in combos or frame traps off of 2A.
|
|
|
|
| Damage
|
Red Damage
|
Proration
|
Cancel
|
Guard
|
| 400, 550 (825)
|
575
|
80% (O), 90% (M)
|
N, SP, EX, (J)
|
LH
|
| First Active
|
Active
|
Recovery
|
Frame Adv
|
Circuit
|
Invuln
|
| 8
|
3 (10) 7
|
14
|
-16, -3 ~ 0
|
3.6%, 4.95% (8.55%)
|
-
|
|
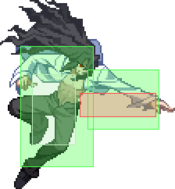
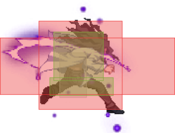
2 hits, great range, moves Roa forward, some application as anti-air as well as tech punishing. If you space incorrectly, the 2nd hit of 5C will whiff, and you will question your life choices.
|
|
Crouching Normals
|
|
| Damage
|
Red Damage
|
Proration
|
Cancel
|
Guard
|
| 300
|
202
|
75% (O)
|
-SE-, -N-, -SP-, -EX-, (J)
|
L
|
| First Active
|
Active
|
Recovery
|
Frame Adv
|
Circuit
|
Invuln
|
| 3
|
4
|
5
|
3
|
2.7%
|
-
|
|
Hits low. fast, but short ranged.
|
|
|
|
| Damage
|
Red Damage
|
Proration
|
Cancel
|
Guard
|
| 600
|
505
|
80% (O)
|
N, SP, EX, (J)
|
L
|
| First Active
|
Active
|
Recovery
|
Frame Adv
|
Circuit
|
Invuln
|
| 5
|
4
|
10
|
1
|
6.3%
|
-
|
|
A F-Roa exclusive, good ranged low poke with pretty solid active frames for tech punishing.
|
|
|
|
| Damage
|
Red Damage
|
Proration
|
Cancel
|
Guard
|
| 900
|
707
|
55% (O)
|
N, SP, EX, (J)
|
L
|
| First Active
|
Active
|
Recovery
|
Frame Adv
|
Circuit
|
Invuln
|
| 8
|
11
|
13
|
-6
|
8.1%
|
-
|
|
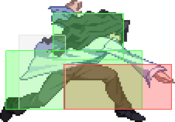
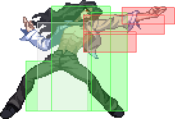
A short slide. Hits low. Can combo a 6C after for an air combo. Catches after air counter hits pretty well.
|
|
Aerial Normals
|
|
| Damage
|
Red Damage
|
Proration
|
Cancel
|
Guard
|
| 250
|
151
|
75% (O)
|
SE, N, SP, EX, J
|
HA
|
| First Active
|
Active
|
Recovery
|
Frame Adv
|
Circuit
|
Invuln
|
| 5
|
4
|
10
|
-
|
2.25%
|
-
|
|
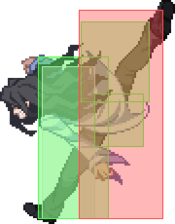
Quick hand jab, fast with poor range, decent for a quick air-to-air.
|
|
|
|
| Damage
|
Red Damage
|
Proration
|
Cancel
|
Guard
|
| 700
|
505
|
90%
|
N, SP, EX, J
|
HA
|
| First Active
|
Active
|
Recovery
|
Frame Adv
|
Circuit
|
Invuln
|
| 7
|
4
|
-
|
-
|
6.3%
|
-
|
|
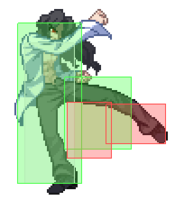
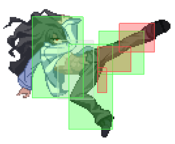
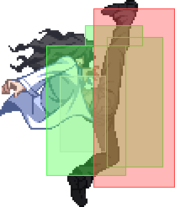
Good range kick that hits slightly above Roa.
|
|
|
|
| j.C
|
Damage
|
Red Damage
|
Proration
|
Cancel
|
Guard
|
| 1000
|
808
|
90% (O)
|
SP, EX, J
|
HA
|
| First Active
|
Active
|
Recovery
|
Frame Adv
|
Circuit
|
Invuln
|
| 7
|
6
|
-
|
-
|
7.2%
|
-
|
|
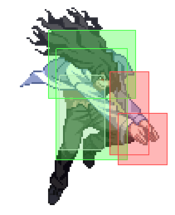
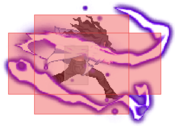
Roa attempts storm’s jump fierce. This is a great air normal, if a bit slow. Can be charged for more range/stun/damage. Can hit as a cross up if charged. Beats a lot of things once fully charged.
|
| j.[C]
|
Damage
|
Red Damage
|
Proration
|
Cancel
|
Guard
|
| 1300
|
1111
|
90% (O)
|
SP, EX, J
|
HA
|
| First Active
|
Active
|
Recovery
|
Frame Adv
|
Circuit
|
Invuln
|
| 18
|
8
|
-
|
-
|
9.0%
|
-
|
|
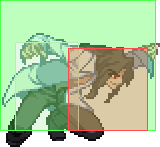
Look at that hitbox.
|
|
Command Normals
|
|
| Damage
|
Red Damage
|
Proration
|
Cancel
|
Guard
|
| 1000
|
808
|
65% (O)
|
SP, EX, (J)
|
LH
|
| First Active
|
Active
|
Recovery
|
Frame Adv
|
Circuit
|
Invuln
|
| 11
|
5
|
16
|
-3
|
9.0%
|
-
|
|
Long arm strike, great range and moves forward.
|
|
Universal Mechanics
|
|
| Neutral
|
Damage
|
Red Damage
|
Proration
|
Cancel
|
Guard
|
| 1000
|
404
|
50%
|
-
|
U
|
| First Active
|
Active
|
Recovery
|
Frame Adv
|
Circuit
|
Invuln
|
| 2
|
1
|
20
|
-
|
0.0%
|
-
|
|
Roa has a very solid ground throw.
- If they don't tech then you can otg into relaunch with 236C.
- Teachable throw, but all techs are punishable from mid-screen.
- Arc drive and dash 214B lightning punish back techs.
- Closer techs punished by dashing 2B or 214A or B lightning.
|
| ~2
|
Damage
|
Red Damage
|
Proration
|
Cancel
|
Guard
|
| 800
|
404
|
50%
|
-
|
U
|
| First Active
|
Active
|
Recovery
|
Frame Adv
|
Circuit
|
Invuln
|
| 2
|
1
|
20
|
-
|
0.0%
|
-
|
|
You can also press 2 during his throw to ground them right next to you for untechable knockdown.
|
|
|
|
| Damage
|
Red Damage
|
Proration
|
Cancel
|
Guard
|
1600 (Raw)
1200 (Ender)
|
606
|
100%
|
-
|
U
|
| First Active
|
Active
|
Recovery
|
Frame Adv
|
Circuit
|
Invuln
|
| 1
|
1
|
12
|
-
|
0.0%
|
-
|
|
OTG-able ground bounce when done raw, untechable knockdown as a combo ender.
|
|
|
|
| Standing
|
Damage
|
Red Damage
|
Proration
|
Cancel
|
Guard
|
| 500 (345)
|
202
|
45%
|
(SP), (EX), (J)
|
LHA
|
| First Active
|
Active
|
Recovery
|
Frame Adv
|
Circuit
|
Invuln
|
| 8
|
4
|
18
|
-4
|
4.5%
|
-
|
|
Same animation as 5C(1).
|
| Aerial
|
Damage
|
Red Damage
|
Proration
|
Cancel
|
Guard
|
| 500 (345)
|
202
|
45%
|
-
|
HA
|
| First Active
|
Active
|
Recovery
|
Frame Adv
|
Circuit
|
Invuln
|
| 8
|
4
|
-
|
16 (Max)
|
4.5%
|
-
|
|
Same animation as C/H-Moon j.B.
|
|
|
|
| Bunker
|
Damage
|
Red Damage
|
Proration
|
Cancel
|
Guard
|
| 500
|
202
|
100%
|
-
|
LHA
|
| First Active
|
Active
|
Recovery
|
Frame Adv
|
Circuit
|
Invuln
|
| 25
|
4
|
19
|
-5
|
0.0%
(-50.0% in blockstun)
|
Clash 1-10
|
| (Clash)
|
Damage
|
Red Damage
|
Proration
|
Cancel
|
Guard
|
| 500
|
202
|
100%
|
-
|
LHA
|
| First Active
|
Active
|
Recovery
|
Frame Adv
|
Circuit
|
Invuln
|
| 7
|
4
|
19
|
-5
|
0.0%/-50.0%
|
Strike 1-7
|
|
Similar to 6C.
|
|
|
|
| Damage
|
Red Damage
|
Proration
|
Cancel
|
Guard
|
| 100
|
0
|
100%
|
-
|
U
|
| First Active
|
Active
|
Recovery
|
Frame Adv
|
Circuit
|
Invuln
|
| 18
|
3
|
18
|
-
|
uses all
|
Full 1-18
|
|
One of the larger heat activations out there.
|
|
|
|
| Ground
|
Damage
|
Red Damage
|
Proration
|
Cancel
|
Guard
|
| 100
|
0
|
100%
|
-
|
U
|
| First Active
|
Active
|
Recovery
|
Frame Adv
|
Circuit
|
Invuln
|
| 10
|
10
|
20
|
-
|
removes all
|
Full 1-39
|
| Air
|
Damage
|
Red Damage
|
Proration
|
Cancel
|
Guard
|
| 100
|
0
|
100%
|
-
|
U
|
| First Active
|
Active
|
Recovery
|
Frame Adv
|
Circuit
|
Invuln
|
| 11
|
10
|
15
|
-
|
removes all
|
Strike 1-30
|
|
Universal burst mechanic. Unlike Crescent/Full Heat activation, the hitbox and frame data doesn't vary between characters. However, you can be thrown out of this move if you input it in the air.
|
|
Special Moves
Grounded Specials
A A B B [B] [B] EX EX
|
| A
|
Damage
|
Red Damage
|
Proration
|
Cancel
|
Guard
|
| 1000
|
808
|
70% (O)
|
-EX-, (J)
|
LH
|
| First Active
|
Active
|
Recovery
|
Frame Adv
|
Circuit
|
Invuln
|
| 14
|
3
|
20
|
-5
|
9.0%
|
-
|
| B
|
Damage
|
Red Damage
|
Proration
|
Cancel
|
Guard
|
| 1000
|
808
|
70% (O)
|
-EX-, (J)
|
LH
|
| First Active
|
Active
|
Recovery
|
Frame Adv
|
Circuit
|
Invuln
|
| 20
|
3
|
15
|
0
|
9.0%
|
-
|
| [B]
|
Damage
|
Red Damage
|
Proration
|
Cancel
|
Guard
|
| -
|
-
|
-
|
-
|
-
|
| First Active
|
Active
|
Recovery
|
Frame Adv
|
Circuit
|
Invuln
|
| -
|
-
|
28
|
-
|
-
|
-
|
- An upward ground slash. All versions are air-unblockable.
A and B versions can be canceled by any EX move or Arc Drive, and jump on hit.
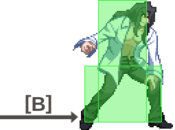
B version can be held for a command dash that can cross up through a grounded opponent. Also, somewhat useful for continuing pressure.
|
| EX
|
Damage
|
Red Damage
|
Proration
|
Cancel
|
Guard
|
| 1000*2 (1677)
|
(1355)
|
70% (O), 80% (M)
|
-
|
LH
|
| First Active
|
Active
|
Recovery
|
Frame Adv
|
Circuit
|
Invuln
|
| 4+5
|
2 (10) 3
|
23
|
-20, -8
|
-100.0%
|
-
|
|
EX version hits twice, wall bounces, and can be combo’d after in the corner.
|
|
Followup on hit Followup on hit
|
| A
|
Damage
|
Red Damage
|
Proration
|
Cancel
|
Guard
|
| 400*2, 700 (1317)
|
(1059)
|
100%, 90% (O)
|
-
|
LH
|
| First Active
|
Active
|
Recovery
|
Frame Adv
|
Circuit
|
Invuln
|
| 4
|
7
|
42
|
-31, -27
|
2.7%, 9.0%, 6.3% (18.0%)
|
-
|
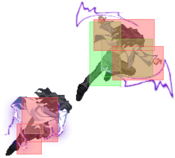
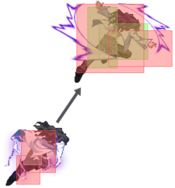
- Dragon punch. Goes off the ground at a 45 degree angle. All versions have an automatic followup on hit which causes untechable knockdown.
A version is air-unblockable with no invincibility.
|
| B
|
Damage
|
Red Damage
|
Proration
|
Cancel
|
Guard
|
| 400*4, 700 (1926)
|
(1516)
|
100%, 90% (O)
|
-
|
LH (1), LHA (2-4)
|
| First Active
|
Active
|
Recovery
|
Frame Adv
|
Circuit
|
Invuln
|
| 3
|
12
|
46
|
-40, -36,
-32, -30
|
2.7%*4, 6.3% (17.1%)
|
Full 1-5
|
|
B version is air-blockable after the first hit and has invincibility until after the first 2 active frames.
|
| EX
|
Damage
|
Red Damage
|
Proration
|
Cancel
|
Guard
|
| 350*7, 700 (2471)
|
(2139)
|
100%, 90% (O)
|
-
|
LH
|
| First Active
|
Active
|
Recovery
|
Frame Adv
|
Circuit
|
Invuln
|
| 2+0
|
25
|
44
|
-58 (min)
|
-100.0%
|
Full 1-4
|
|
EX version is fully air unblockable, with some invicibility during active frames like B version.
|
|
|
|
| A / B
|
Damage
|
Red Damage
|
Proration
|
Cancel
|
Guard
|
| 1000
|
808
|
70% (O)
|
-
|
LHA
|
| First Active
|
Active
|
Recovery
|
Frame Adv
|
Circuit
|
Invuln
|
| 15
|
8
|
14 / 16
|
0 / -2
|
9.0%
|
-
|
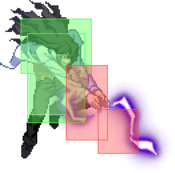
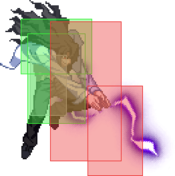
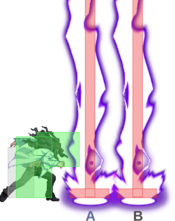
- Lightning bolt strikes in a vertical column in front of Roa. Lightning floats on grounded hit and is an untechable knockdown on air hit.
A version hits close, but not directly in front of Roa, B hits a little further out. Air blockable, and same damage between the two.
|
| EX
|
Damage
|
Red Damage
|
Proration
|
Cancel
|
Guard
|
| 300*N
|
202*N
|
95% (M)*N
|
-
|
LH
|
| First Active
|
Active
|
Recovery
|
Frame Adv
|
Circuit
|
Invuln
|
| 3+6
|
54
|
40
|
-29 ~ -22
|
-100.0%
|
Full 1-81
|
|
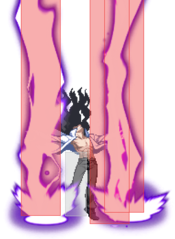
EX version is air-unblockable, invincible, and punishable on block. It can set up for air tech traps, as the lightning hits in a larger vertical column over Roa’s head for a little less then 2k damage.
|
|
Aerial Specials
|
|
| A
|
Damage
|
Red Damage
|
Proration
|
Cancel
|
Guard
|
| 800
|
505
|
75% (O)
|
(EX), (J)
|
LHA
|
| First Active
|
Active
|
Recovery
|
Frame Adv
|
Circuit
|
Invuln
|
| 11
|
3
|
3
|
3 (TK)
|
7.2%
|
-
|
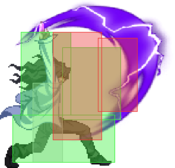
- Electricity surrounds Roa in the air. All versions air-blockable with some utility as anti air. Safe on block and can be canceled before the hit by landing on the ground. Can hit on both sides allowing for cross ups. Has some sort of vacuum on block
A version gives advantage if TK’ed close to the ground. Allows for a follow up combo with float on counter hit.
|
| B
|
Damage
|
Red Damage
|
Proration
|
Cancel
|
Guard
|
| 700*3 (1579)
|
(910)
|
75% (O)
|
EX, J
|
LHA
|
| First Active
|
Active
|
Recovery
|
Frame Adv
|
Circuit
|
Invuln
|
| 14
|
3 (3) 3 (3) 3
|
9
|
-1 (TK)
|
6.3%*3 (18.9%)
|
-
|
|
B versions hits three times.
|
| EX
|
Damage
|
Red Damage
|
Proration
|
Cancel
|
Guard
|
| 400*6 (1591)
|
(1204)
|
75% (O)
|
-
|
LHA
|
| First Active
|
Active
|
Recovery
|
Frame Adv
|
Circuit
|
Invuln
|
| 3+10
|
12
|
6
|
5 (TK)
|
-100.0%
|
Full 1-25
|
|
EX version has greater range than A/B and has invicibility. Can add some damage to air combos if used instead of air throw finisher (about 200 dmg). Allows for a follow up combo with float on counter hit.
|
|
Arc Drive
|
|
| Damage
|
Red Damage
|
Proration
|
Cancel
|
Guard
|
| 7000 (3080)
|
(2248)
|
50% (O)
|
-
|
LH
|
| First Active
|
Active
|
Recovery
|
Frame Adv
|
Circuit
|
Invuln
|
| 7+5
|
2
|
38
|
-15
|
removes all
|
Full 7-8, 13-14
|
|
Quick horizontal lightning bolt crosses the screen.
- This move is Very fast and has VERY long range.
- Can be used to punish any tech from a ground throw.
- Easily combo-able from basic strings.
- Air-unblockable
- Deceptively large vertical hitbox.
|
|
Another Arc Drive
|
|
| Damage
|
Red Damage
|
Proration
|
Cancel
|
Guard
|
| 8000 (3520)
|
(2453)
|
50% (O)
|
-
|
LH
|
| First Active
|
Active
|
Recovery
|
Frame Adv
|
Circuit
|
Invuln
|
| 6+5
|
2
|
38
|
-15
|
removes all
|
Full 6-7, 12-13
|
|
Quick horizontal lightning bolt crosses the screen. Does more a bit damage and has a fancier cutscene on hit. OTG-able hard knockdown.
|
|
Last Arc
|
|
| Damage
|
Red Damage
|
Proration
|
Cancel
|
Guard
|
| 5000
|
4040
|
N/A
|
-
|
U
|
| First Active
|
Active
|
Recovery
|
Frame Adv
|
Circuit
|
Invuln
|
| 3
|
1+1
|
40
|
-
|
removes all
|
Full
|
|
Fullscreen command grab Last Arc. Long boring animation that has nothing to do with lighting. Notable for doing fixed damage no matter how much Blood Heat gauge Roa has left.
|
|
MBAACC Navigation
