Character Page Progress
This page is still a work in progress, consider joining as an editor to help expand it. Please update this character's roadmap page when one of the editing goals have been reached.
| In Progress |
To-do
|
- Move Descriptions:
- Expand upon the move descriptions, cite their uses, add captions where helpful, etc.
|
- Additional Ressources/Players to watch/ask
- Add any external links to ressources such as video guides or articles.
- If you know any players in particular that can be helpful for learning this character, please add them with, if possible a way to contact them (such as a Discord handle) and a name that can be searched in the match video database.
- Overview/General Gameplan:
- Add a short summary of this character with a list of strengths and weaknesses
- Do your best to describe how to play this character, change or add subsections based on what you would write as a guide.
- Combos:
- Add tech in the starters, enders, OTG pickup and normal/corner combo sections.
- Add damage, meter gain/given numbers and video links to combos as you add them.
|
Additional Resources
F-NecoMech Match Video Database
Players to watch/ask
JP:
NA:
- Darko
- Text goes here after asterisk
Overview
Strengths / Weaknesses
| Strengths
|
- Text goes here after asterisk
- Text goes here after asterisk
|
| Weaknesses
|
- Place text here be sure to use "*" for each point*
|
General Gameplan
Place text here*
Neutral
Place text here*
Pressure
Place text here
Okizeme
Place text here
Defense
place text here*
Combos
| Combo Notation Help
|
Disclaimer: Combos are written by various writers, so the actual notation used in pages can differ from the standard one.
For more information, see Glossary and Controls.
|
| X > Y
|
X input is cancelled into Y.
|
| X > delay Y
|
Must wait for a short period before cancelling X input into Y.
|
| X, Y
|
X input is linked into Y, meaning Y is done after X's recovery period.
|
| X+Y
|
Buttons X and Y must be input simultaneously.
|
| X/Y
|
Either the X or Y input can be used.
|
| X~Y
|
This notation has two meanings.
- Use attack X with Y follow-up input.
- Input X then within a few frames, input Y. Usually used for option selects.
|
| X(w)
|
X input must not hit the opponent (Whiff).
|
| j.X
|
X input is done in the air, implies a jump/jump cancel if the previous move was done from the ground.
Applies to all air chain sections:
- Assume a forward jump cancel if no direction is given.
- Air chains such as j.A > j.B > j.C can be shortened to j.ABC.
|
| sj.X
|
X input is done after a super jump. Notated as sj8.X and sj9.X for neutral and forward super jumps respectively.
|
| dj.X
|
X input is done after a double jump.
|
| sdj.X
|
X input is done after a double super jump.
|
| tk.X
|
Stands for Tiger Knee. X motion must be buffered before jumping, inputting the move as close to the ground as possible. (ex. tk.236A)
|
| (X)
|
X is optional. Typically the combo will be easier if omitted.
|
| [X]
|
Input X is held down. Also referred to as Blowback Edge (BE). Depending on the character, this can indicate that this button is held down and not released until indicated by the release notation.
|
| ]X[
|
Input X is released. Will only appear if a button is previously held down. This type of input is referred to as Negative Edge.
|
| {X}
|
Button X should only be held down briefly to get a partially charged version instead of the fully charged one.
|
| X(N)
|
Attack "X" should only hit N times.
|
| (XYZ)xN
|
XYZ string must be performed N times. Combos using this notation are usually referred to as loops.
|
| (XYZ^)
|
A pre-existing combo labelled XYZ is inserted here for shortening purposes.
|
| CH
|
The first attack must be a Counter Hit.
|
| Air CH
|
The first attack must be a Counter Hit on an airborne opponent.
|
| 66
|
Performs a ground forward dash.
|
| j.66
|
Performs an aerial forward dash, used as a cancel for certain characters' air strings.
|
| IAD/IABD
|
Performs an Instant AirDash.
|
| AT
|
Performs an Air Throw. (j.6/4A+D)
|
| IH
|
Performs an Initiative Heat.
|
| AD
|
Performs an Arc Drive.
|
| AAD
|
Performs an Another Arc Drive.
|
Starter
| Condition
|
Notation
|
Damage
vs V.Sion
|
Notes
|
|
| Normal starter, grounded opponent
|
- (2A >) 5B > 2B > 6C > Ender #1/2
|
2604
|
| |
| Meter Gained: 32.2% |
Meter Given (vs C-Moon): 10.7% |
| Basic starter. |
|
|
| Normal starter, grounded opponent
|
- (2A >) 5B > 2B > (5C >) Ender #3
|
2550
|
| |
| Meter Gained: 28.6% |
Meter Given (vs C-Moon): 9.5%% |
| This is for when 2B pushes you too far away for the above combo to hit or you just want . 5C will whiff from 2B if you are far enough away so if you aren't sure if it will connect just go into 623C. |
|
|
Enders
| Condition
|
Notation
|
Damage
vs V.Sion
|
Notes
|
|
| Ender #1
|
|
3417
|
| |
| Meter Gained: 29.7% |
Meter Given (vs C-Moon): 9.9% |
| The easier aerial ender that you have. Less corner carry, less damage, less meter gain but it will do the job. |
|
|
| Ender #2
|
- j.[C] > dj.[C] > land 66 > 5C, j.ABC > dj.ABC > AT
|
4625
|
| |
| Meter Gained: 57.6% |
Meter Given (vs C-Moon): 19.2% |
| The harder ender you have but it is definitely worth it to learn. |
|
|
| Ender #3 100 Meter
|
|
3409
|
| |
| Meter Gained: -100% |
Meter Given (vs C-Moon): 11.1% |
| This ender gives hard knockdown or an otg combo as well as a lot of damage for minimal effort. |
|
|
OTG Pick ups
| Condition
|
Notation
|
Damage
vs V.Sion
|
Notes
|
|
| After Ender #3
|
|
3851
|
| |
| Meter Gained: 8.7% |
Meter Given (vs C-Moon): 6.7% |
| The damage here includes the 623C. The second hit of 2B will whiff midscreen. |
|
|
Normal Combos
| Condition
|
Notation
|
Damage
vs V.Sion
|
Notes
|
|
| Normal starter, grounded opponent
|
- (2A >) 5B > 2B > 2C > 6C > j.BC > dj.AAAAC > AT
|
4232
|
| |
| Meter Gained: 61.9% |
Meter Given (vs C-Moon): 20.6% |
| Basic bnb. If the 2B will push you too far out (which it often will) only hit with the 1st hit of 2B. You could replace the dj.AAAAC with dj.ABC or dj.AAAC if you want but it will lead to less damage. |
|
|
| Normal starter, grounded opponent
|
- (2A >) 5B > 2B > 2C > 6C > j.[C] > dj.[C] > land 66 > 5C, j.ABC > dj.ABC > AT
|
4664
|
| |
| Meter Gained: 89.8% |
Meter Given (vs C-Moon): 29.9% |
| This is the harder combo but it is better in almost every way to the above one. The hardest part about it is the 5C, j.A link but after some practice you will be able to get it down consistently. This combo gives full corner carry. |
|
|
| Normal starter, grounded opponent, 100 Meter
|
- (2A >) 5B > 2B > (5C >) 623C
|
4390
|
| |
| Meter Gained: -100% +28.6% |
Meter Given (vs C-Moon): 20.6% |
| This ender gives hard knockdown or an otg combo as well as a lot of damage for minimal effort. |
|
|
| 214B starter, grounded opponent
|
|
4358
|
| |
| Meter Gained: 32.4% |
Meter Given (vs C-Moon): 10.8% |
| You most likely will be getting a combo like this if neco hits. |
|
|
| 214B starter, grounded opponent
|
- 214B > j.[C] > j.[C] > land 66 > 5C, j.ABC > dj.ABC > AT
|
5379
|
| |
| Meter Gained: 66.6% |
Meter Given (vs C-Moon): 22.2% |
| Very unlikely to hit a j.[C] off of neco hitting but if you do this is the combo to go for. |
|
|
Corner Combos
| Condition
|
Notation
|
Damage
vs V.Sion
|
Notes
|
|
| Normal starter, grounded opponent
|
|
text
|
| |
| Meter Gained: text |
Meter Given (vs C-Moon): text |
| text |
|
|
Move Descriptions
| Frame Data Help
|
| Header
|
Tooltip
|
| Move Box Colors
|
Light gray = Collision Box (A move lacking one means it can go through the opponent's own collision box).
Green: Hurt Boxes.
Red: Hit(/Grab) Boxes.
Yellow: Clash Boxes (When an active hitbox strikes a clash box, the active hitbox stops being active. Multi-hit attacks can beat clash since they will still progress to the next hitbox.)
Magenta: Projectile-reflecting boxes OR Non-hit attack trigger boxes (usually).
Blue: Reflectable Projectile Boxes.
|
| Damage
|
Base damage done by this attack.
(X) denotes combined and scaled damage tested against standing V. Sion.
|
| Red Damage
|
Damage done to the recoverable red health bar by this attack. The values are inherently scaled and tested against standing V. Sion.
(X) denotes combined damage.
|
| Proration
|
The correction value set by this attack and the way it modifies the scaling during a string. See this page for more details.
X% (O) means X% Overrides the previous correction value in a combo if X is of a lower percentage.
X% (M) means the current correction value in a combo will be Multiplied by X%. This can also be referred to as relative proration.
|
| Circuit
|
Meter gained by this attack on hit.
(X%) denotes combined meter gain.
-X% denotes a meter cost.
|
| Cancel
|
Actions this move can be cancelled into.
SE = Self cancelable.
N = Normal cancelable.
SP = Special cancelable.
CH = Cancelable into the next part of the same attack (Chain in case of specials).
EX = EX cancelable.
J = Jump cancelable.
(X) = Cancelable only on hit.
-X- = Cancelable on whiff.
|
| Guard
|
The way this move must be blocked.
L = Can block crouching
H = Can block standing.
A = Can block in the air.
U = Unblockable.
|
| Startup
|
Amount of frames that must pass prior to reaching the active frames. Also referred to as "True Startup".
|
| Active
|
The amount of frames that this move will have a hitbox.
(x) denotes frame gaps where there are no hitboxes is present. Due to varied blockstuns, (x) frames are difficult to use to determine punish windows. Generally the larger the numbers, the more time you have to punish.
X denotes active frames with a duration separate from its origin move's frame data, such as projectile attacks. In this case, the total length of the move is startup+recovery only.
|
| Recovery
|
Frames that this move has after the active frames if not canceled. The character goes into one frame where they can block but not act afterwards, which is not counted here.
|
| Advantage
|
The difference in frames where you can act before your opponent when this move is blocked (assuming the move isn't canceled and the first active frame is blocked).
If the opponent uses a move with startup that is at least 2 frames less than this move's negative advantage, it will result in the opponent hitting that move.
±x~±y denotes a range of possible advantages.
|
| Invul
|
Lists any defensive properties this move has.
X y~z denotes X property happening between the y to z frames of the animations. If no frames are noted, it means the invincibility lasts through the entire move.
Invicibility:
- Strike = Strike invincible.
- Throw = Throw invincible.
Hurtbox-Based Properties:
- Full = No hurtboxes are present.
- High = Upper body lacks a hurtbox.
- Low = Lower body lacks a hurtbox.
Miscellaneous Properties
- Clash = Frames in which clash boxes are active.
- Reflect = Frames in which projectile-reflecting boxes are active.
- Super Armor = Frames in which the character can take hits without going into hit stun.
|
Normal Moves
Standing Normals
|
|
| Damage
|
Red Damage
|
Proration
|
Cancel
|
Guard
|
| 300
|
202
|
78% (O)
|
-SE-, -N-, -SP-, -EX-, (J)
|
LH
|
| First Active
|
Active
|
Recovery
|
Frame Adv
|
Circuit
|
Invuln
|
| 5
|
4
|
7
|
2
|
2.7%
|
-
|
|
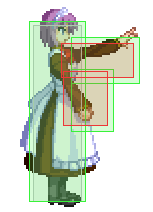
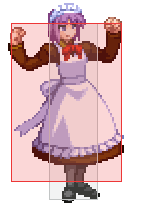
Short poke.
|
|
|
|
| Damage
|
Red Damage
|
Proration
|
Cancel
|
Guard
|
| 700
|
505
|
100%
|
N, SP, EX, (J)
|
LH
|
| First Active
|
Active
|
Recovery
|
Frame Adv
|
Circuit
|
Invuln
|
| 8
|
4
|
10
|
1
|
6.3%
|
-
|
|
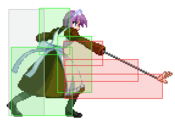
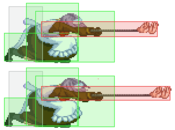
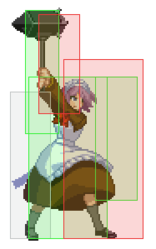
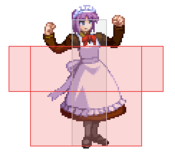
Downward arm-extending attack.
|
|
|
|
| Damage
|
Red Damage
|
Proration
|
Cancel
|
Guard
|
| 500*3 (1452)
|
(880)
|
100%
|
N, SP, EX, (J)
|
L
|
| First Active
|
Active
|
Recovery
|
Frame Adv
|
Circuit
|
Invuln
|
| 10
|
2 (2) 2 (2) 2
|
10
|
6
|
3.6%*3 (10.8%)
|
-
|
|
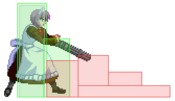
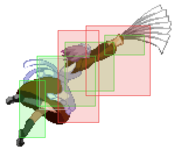
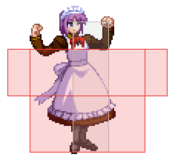
A downward machine gun attack that hits low and is +6 on block.
|
|
Crouching Normals
|
|
| Damage
|
Red Damage
|
Proration
|
Cancel
|
Guard
|
| 320
|
161
|
78% (O)
|
-SE-, -N-, -SP-, -EX-, (J)
|
L
|
| First Active
|
Active
|
Recovery
|
Frame Adv
|
Circuit
|
Invuln
|
| 4
|
4
|
5
|
3
|
2.52%
|
-
|
|
Low poke.
|
|
|
|
| Damage
|
Red Damage
|
Proration
|
Cancel
|
Guard
|
| 500*2 (887)
|
(537)
|
80% (O)
|
N, SP, EX, (J)
|
L
|
| First Active
|
Active
|
Recovery
|
Frame Adv
|
Circuit
|
Invuln
|
| 6
|
6
|
18
|
-5
|
4.5%*2 (9.0%)
|
-
|
|
Low arm-extending attack. 2 hits.
|
|
|
|
| Damage
|
Red Damage
|
Proration
|
Cancel
|
Guard
|
| 1000
|
707
|
60% (O)
|
N, SP, EX, (J)
|
L
|
| First Active
|
Active
|
Recovery
|
Frame Adv
|
Circuit
|
Invuln
|
| 12
|
3
|
16
|
-1
|
9.0%
|
-
|
|
Laser sword sweep.
|
|
Jumping Normals
|
|
| Damage
|
Red Damage
|
Proration
|
Cancel
|
Guard
|
| 300
|
202
|
75% (O)
|
SE, N, J
|
HA
|
| First Active
|
Active
|
Recovery
|
Frame Adv
|
Circuit
|
Invuln
|
| 3
|
4
|
11
|
-
|
2.7%
|
-
|
|
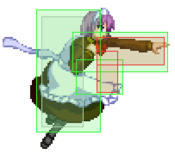
Fast air jab.
|
|
|
|
| Damage
|
Red Damage
|
Proration
|
Cancel
|
Guard
|
| 600
|
363
|
100%
|
N, J
|
HA
|
| First Active
|
Active
|
Recovery
|
Frame Adv
|
Circuit
|
Invuln
|
| 7
|
4
|
-
|
-
|
4.5%
|
-
|
|
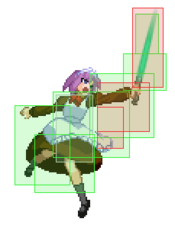
Air-to-air laser swipe.
|
|
j.Cj.[C]
([C] Launches Neco)
|
| j.C
|
Damage
|
Red Damage
|
Proration
|
Cancel
|
Guard
|
| 1100
|
707
|
90% (M)
|
J
|
HA
|
| First Active
|
Active
|
Recovery
|
Frame Adv
|
Circuit
|
Invuln
|
| 8
|
7
|
-
|
-
|
7.2%
|
-
|
|
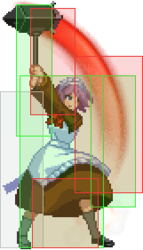
Jump-in hammer swing type attack.
|
| j.[C]
|
Damage
|
Red Damage
|
Proration
|
Cancel
|
Guard
|
| 1300
|
1010
|
80% (M)
|
J
|
HA
|
| First Active
|
Active
|
Recovery
|
Frame Adv
|
Circuit
|
Invuln
|
| 24
|
8
|
-
|
-
|
9.0%
|
-
|
|
Charged version ground bounces on aerial hit. Launches Neco in an upward arc, in which she is air unblockable.
|
|
Command Normals
|
|
| 6C
|
Damage
|
Red Damage
|
Proration
|
Cancel
|
Guard
|
| 800
|
505
|
70% (O)
|
SP, EX, (J)
|
LHA
|
| First Active
|
Active
|
Recovery
|
Frame Adv
|
Circuit
|
Invuln
|
| 9
|
4
|
22
|
-8
|
5.4%
|
-
|
|
Hammer swing. Acts as a launcher for both the opponent and Neco. The neco hit is air unblockable.
|
| 6[C]
|
Damage
|
Red Damage
|
Proration
|
Cancel
|
Guard
|
| 1000
|
505
|
70% (O)
|
SP, EX, (J)
|
LH
|
| First Active
|
Active
|
Recovery
|
Frame Adv
|
Circuit
|
Invuln
|
| 20
|
4
|
22
|
-8
|
5.4%
|
-
|
|
Charged version becomes air unblockable. Launches Neco much farther, which will wallslam the opponent on hit.
|
|
Universal Mechanics
|
|
| Damage
|
Red Damage
|
Proration
|
Cancel
|
Guard
|
| 500*6, 300 (1680)
|
(805)
|
50%
|
-
|
U
|
| First Active
|
Active
|
Recovery
|
Frame Adv
|
Circuit
|
Invuln
|
| 2
|
1
|
20
|
-
|
0.0%
|
-
|
|
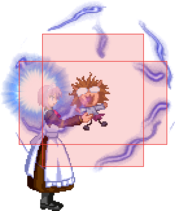
Mech-Hisui electrocutes the opponent. Untechable knockdown.
|
|
|
|
| Damage
|
Red Damage
|
Proration
|
Cancel
|
Guard
|
| 1600 (Raw)/1200
|
505
|
30%
|
(Any if Raw)
|
U
|
| First Active
|
Active
|
Recovery
|
Frame Adv
|
Circuit
|
Invuln
|
| 1
|
1
|
12
|
-
|
0.0%
|
-
|
|
Standard air throw. Ground bounces if done raw, causes an untechable knockdown otherwise.
|
|
|
|
| Ground
|
Damage
|
Red Damage
|
Proration
|
Cancel
|
Guard
|
| 500 (345)
|
202
|
50%
|
(SP), (EX), (J)
|
LHA
|
| First Active
|
Active
|
Recovery
|
Frame Adv
|
Circuit
|
Invuln
|
| 8
|
4
|
18
|
-4
|
4.5%
|
-
|
|
Same animation as 6C.
|
| Air
|
Damage
|
Red Damage
|
Proration
|
Cancel
|
Guard
|
| 500 (345)
|
202
|
50%
|
-
|
HA
|
| First Active
|
Active
|
Recovery
|
Frame Adv
|
Circuit
|
Invuln
|
| 8
|
4
|
-
|
-
|
4.5%
|
-
|
|
Same animation as C-Moon j.B.
|
|
|
|
| Bunker
|
Damage
|
Red Damage
|
Proration
|
Cancel
|
Guard
|
| 500
|
202
|
50%
|
-
|
LHA
|
| First Active
|
Active
|
Recovery
|
Frame Adv
|
Circuit
|
Invuln
|
| 25
|
4
|
19
|
-5
|
0.0%
(-50.0% in blockstun)
|
Clash 1-10
|
| (Clash)
|
Damage
|
Red Damage
|
Proration
|
Cancel
|
Guard
|
| 500
|
202
|
50%
|
-
|
LHA
|
| First Active
|
Active
|
Recovery
|
Frame Adv
|
Circuit
|
Invuln
|
| 7
|
4
|
19
|
-5
|
0.0%/-50.0%
|
Strike 1-7
|
|
Performs an attack similar to H Moon's 623A/B. Moves Mech-Hisui forward.
|
|
|
|
| Damage
|
Red Damage
|
Proration
|
Cancel
|
Guard
|
| 100
|
0
|
100%
|
-
|
U
|
| First Active
|
Active
|
Recovery
|
Frame Adv
|
Circuit
|
Invuln
|
| 17
|
4
|
24
|
-
|
uses all
|
Full 1-21
|
|
Same as solo Mech Heat.
|
|
|
|
| Ground
|
Damage
|
Red Damage
|
Proration
|
Cancel
|
Guard
|
| 100
|
0
|
100%
|
-
|
U
|
| First Active
|
Active
|
Recovery
|
Frame Adv
|
Circuit
|
Invuln
|
| 10
|
10
|
20
|
-
|
removes all
|
Full 1-39
|
| Air
|
Damage
|
Red Damage
|
Proration
|
Cancel
|
Guard
|
| 100
|
0
|
100%
|
-
|
U
|
| First Active
|
Active
|
Recovery
|
Frame Adv
|
Circuit
|
Invuln
|
| 11
|
10
|
15
|
-
|
removes all
|
Strike 1-30
|
|
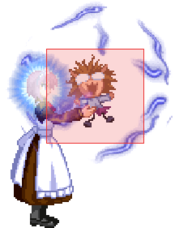
Universal burst mechanic. Unlike Crescent/Full Heat activation, the hitbox and frame data doesn't vary between characters. However, you can be thrown out of this move if you input it in the air.
|
|
Special Moves
No laser sprites, framedisplay is bugged. No laser sprites, framedisplay is bugged. EX EX
|
| A/B
|
Damage
|
Red Damage
|
Proration
|
Cancel
|
Guard
|
| 250*7 (1418)
|
(684)
|
100%
|
-
|
LHA
|
| First Active
|
Active
|
Recovery
|
Frame Adv
|
Circuit
|
Invuln
|
| 54
|
14
|
48
|
36
|
1.8%*7 (12.6%)
|
-
|
|
Neco-Arc jumps forward and fires a downard eye beam. B version makes Neco-Arc jump higher.
|
| EX
|
Damage
|
Red Damage
|
Proration
|
Cancel
|
Guard
|
| 300*8
|
252*8
|
90% (O)
|
-
|
HA
(Whiffs vs. Crouch)
|
| First Active
|
Active
|
Recovery
|
Frame Adv
|
Circuit
|
Invuln
|
| 1+24
|
16
|
29
|
-17
|
-100.0%
|
Full 1-19
|
| (Neco-Arc)
|
Damage
|
Red Damage
|
Proration
|
Cancel
|
Guard
|
| 250*10 (1705)
|
151*10
|
100%
|
-
|
LHA
|
| First Active
|
Active
|
Recovery
|
Frame Adv
|
Circuit
|
Invuln
|
| 1+23
|
20
|
29
|
-13
|
0.0%
|
-
|
|
Both Neco and Mech shoots beams from their eyes. Invulnerable during most of its startup.
|
|
|
|
| A
|
Damage
|
Red Damage
|
Proration
|
Cancel
|
Guard
|
| 400*4 (1524)
|
(769)
|
100%
|
-EX-
|
LH
(Whiffs vs Air.)
|
| First Active
|
Active
|
Recovery
|
Frame Adv
|
Circuit
|
Invuln
|
| 6
|
10
|
19
|
-6
|
4.5%*4 (18.0%)
|
-
|
|
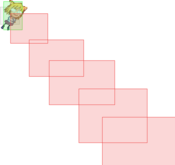
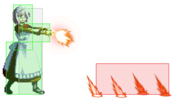
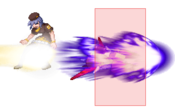
Mech-Hisui shoots the ground at mid-range. All versions cannot hit airborne opponents.
|
| B
|
Damage
|
Red Damage
|
Proration
|
Cancel
|
Guard
|
| 400*6 (2211)
|
(1115)
|
100%
|
-EX-
|
LH
(Whiffs vs Air.)
|
| First Active
|
Active
|
Recovery
|
Frame Adv
|
Circuit
|
Invuln
|
| 24
|
21
|
14
|
-6
|
3.6%*6 (21.6%)
|
-
|
|
A longer version.
|
| EX
|
Damage
|
Red Damage
|
Proration
|
Cancel
|
Guard
|
| 400*10 (3409)
|
(2559)
|
100%
|
-
|
LH
(Whiffs vs Air.)
|
| First Active
|
Active
|
Recovery
|
Frame Adv
|
Circuit
|
Invuln
|
| 1+6
|
37
|
14
|
-12
|
-100.0%
|
Full 1-2
|
|
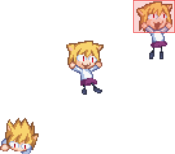
The EX version covers more space and causes an untechable knockdown on hit. If Neco-Arc is caught in the hitbox of this EX, she enters a dancing animation instead of being hit.
|
|
|
|
| A
|
Damage
|
Red Damage
|
Proration
|
Cancel
|
Guard
|
| 1000
|
808
|
100%
|
-
|
LHA
|
| First Active
|
Active
|
Recovery
|
Frame Adv
|
Circuit
|
Invuln
|
| 44
|
22
|
48
|
24
|
9.0%
|
-
|
|
Neco-Arc burrows into the ground and jumps out. Launches the opponent on hit.
|
| B
|
Damage
|
Red Damage
|
Proration
|
Cancel
|
Guard
|
| 1000
|
808
|
100%
|
-
|
LHA
|
| First Active
|
Active
|
Recovery
|
Frame Adv
|
Circuit
|
Invuln
|
| 45*
|
22
|
48
|
25*
|
9.0%
|
-
|
|
This version makes Neco-Arc advance underground until she reaches the opponent's position and attacks.
|
| EX
|
Damage
|
Red Damage
|
Proration
|
Cancel
|
Guard
|
| 1000
|
808
|
100%
|
-
|
LHA
|
| First Active
|
Active
|
Recovery
|
Frame Adv
|
Circuit
|
Invuln
|
| 15+10
|
83
|
48
|
5 ~ 66
|
-100.0%
|
-
|
|
A wave of Necos come out of the ground starting from Neco-Arc's position. A total of 5 Necos come out.
|
|
A/B A/B (Clash) (Clash) EX EX
|
| A
|
Damage
|
Red Damage
|
Proration
|
Cancel
|
Guard
|
| 700
|
404
|
75% (O)
|
-
|
LHA
|
| First Active
|
Active
|
Recovery
|
Frame Adv
|
Circuit
|
Invuln
|
| 37
|
7
|
10
|
11
|
4.5%
|
Clash 17-36
|
| B
|
Damage
|
Red Damage
|
Proration
|
Cancel
|
Guard
|
| 700
|
404
|
75% (O)
|
-
|
LHA
|
| First Active
|
Active
|
Recovery
|
Frame Adv
|
Circuit
|
Invuln
|
| 32
|
7
|
28
|
-7
|
4.5%
|
Clash 12-31
|
| (Clash)
|
Damage
|
Red Damage
|
Proration
|
Cancel
|
Guard
|
| 350*6 (1742)
|
(1003)
|
100%
|
-
|
U
|
| First Active
|
Active
|
Recovery
|
Frame Adv
|
Circuit
|
Invuln
|
| 2
|
1 (5) 1 (5) 1 (7)
1 (5) 1 (5) 1
|
28
|
-
|
1.8%*6 (10.8%)
|
Full 1-42
|
|
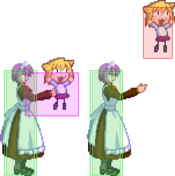
Mech-Hisui holds out a Neco in front of her. If the opponent hits this Neco while it's being held, a Clash effect will occur and Mech-Hisui will counter with an invincible, unblockable Neco electrocution. If the Neco isn't hit by the opponent, it will just jump out and become a hitbox.
The B version is a bit faster but has much longer recovery.
|
| EX
|
Damage
|
Red Damage
|
Proration
|
Cancel
|
Guard
|
| 450*6 (2238)
|
(1452)
|
100%
|
-
|
LHA
|
| First Active
|
Active
|
Recovery
|
Frame Adv
|
Circuit
|
Invuln
|
| 22+2
|
1 (5) 1 (5) 1 (7)
1 (5) 1 (5) 1
|
20
|
-5
|
-100.0%
|
Full 1-64
|
|
EX version is a stronger but blockable variant of the 22A/B followup on clash. Invulnerable though lenghty startup.
|
|
Arc Drive
|
|
| Damage
|
Red Damage
|
Proration
|
Cancel
|
Guard
|
| 500*13 (4143)
|
(2487)
|
90% (O)
|
-
|
LHA
|
| First Active
|
Active
|
Recovery
|
Frame Adv
|
Circuit
|
Invuln
|
| 17+7
|
X
|
21
|
45 ~ 72
|
removes all
|
Full 1-29
|
|
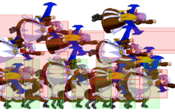
Summons a train of Mech-Hisuis. Has startup invulnerability and very advantageous on block.
|
|
Another Arc Drive
|
|
| Damage
|
Red Damage
|
Proration
|
Cancel
|
Guard
|
| 500*29 (5969)
|
(3570)
|
90% (O)
|
-
|
LHA
|
| First Active
|
Active
|
Recovery
|
Frame Adv
|
Circuit
|
Invuln
|
| 1+22
|
X
|
22
|
42 ~ 68
|
removes all
|
Full 1
|
|
A bunch of flying Mech-Hisuis are added up, covering the majority of the screen. Does not have Arc Drive's startup invuln.
|
|
Last Arc
|
|
| Damage
|
Red Damage
|
Proration
|
Cancel
|
Guard
|
| 2100*4 (3250~6500)
|
(2600~5100)
|
50% + 50% * remaining BH time
|
-
|
U
|
| First Active
|
Active
|
Recovery
|
Frame Adv
|
Circuit
|
Invuln
|
| 1+2
|
13 (23) 13 (21) 13 (23) 13
|
111
|
-
|
removes all
|
Full
|
|
Mech-Hisui transforms into a plane and impacts the opponent 4 times.
|
|
MBAACC Navigation
