Character Page Progress
This page is still a work in progress, consider joining as an editor to help expand it. Please update this character's roadmap page when one of the editing goals have been reached.
| In Progress |
To-do
|
- Combos:
- Add damage, meter gain/given numbers and video links to pre-existing combos.
|
- Additional Ressources/Players to watch/ask
- Add any external links to ressources such as video guides or articles.
- If you know any players in particular that can be helpful for learning this character, please add them with, if possible a way to contact them (such as a Discord handle) and a name that can be searched in the match video database.
- Overview/General Gameplan:
- Add a short summary of this character with a list of strengths and weaknesses
- Do your best to describe how to play this character, change or add subsections based on what you would write as a guide.
- Move Descriptions:
- Expand upon the pre-existing move descriptions, cite their uses, add captions where helpful, etc.
|
This page was edited by Whisk#4197 on discord. Please message me there if you have any questions or concerns.
Additional Resources
H-Seifuku Match Video Database
H-Sei Guide by Dumb Seagull (WIP)
"H Seifuku Combo Doc/Notes" by Cheezy
Players to watch/ask
JP:
- Text goes here after asterisk
- Text goes here after asterisk
NA:
- Text goes here after asterisk
- Text goes here after asterisk
Overview
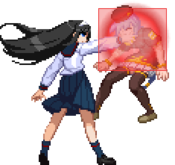
HSei is the more rushdown focused of the Seifukus, with a strong emphasis on pressure and combos. She loses most of the zoning utility that CSei’s kit has, opting to focus more on her strong normals and good movement to score a hit and carry the opponent into the corner, where she can work her pressure. Notably, she has one of the most plus on block raw normals in the game, with her 5a being +6, a frame advantage even most F-Moons would be envious of. Combine this with her strong command grab, and you get some of the most brutal corner pressure melty has to offer.
Strengths / Weaknesses
| Strengths
|
- Amazing pressure with a ton of plus frames in tandem with command grab
- Strong normals such as 2b which is a very fast and disjointed low poke, and j.b which has a strong disjoint directly below her
- Good movement with the fastest airdash of the Seifukus and a dash that can cover fullscreen distances very quickly
- Has quite a few lows, including a few standing ones
- Can consistently get full corner carry and okizeme from every combo
- High optimization potential on combos for more damage
|
| Weaknesses
|
- H-Moon
- While strong, pressure can be very linear and weak to Ex-Shield and reversals
- Most specials are either situational or just plain bad
- She has quite a few lows, but her 2a isn't one of them and it has an abnormally large hurtbox
- Very tight execution requirements for damaging combos, with lots of character specifics
- Damage can be very low when you take into account rebeat penalty, especially without more advanced routes
- Very poor defensive options without meter for bunker
|
General Gameplan
HSei is typically aiming to score one hit in neutral, which she can use to carry the opponent into the corner and start her pressure. She mainly plays a very standard melty neutral game, opting to scout out hits and use her good movement to capitalize on the opponents mistakes. Her pressure is where she really shines, where she can play a scary strike throw game with her command grab and plus frames, which can loop back into itself.
Neutral
Pressure
HSei possesses a very strong but linear pressure game. She mainly wants to use the frame advantage on two things, 22b and 5a, both of which are +6, to keep her turn and keep looping her offense. After she conditions them not to mash, she can use her strong command throw to punish them for blocking and keep them guessing.
Some examples of pressure sequences:
2a 5b 2b 5c 22b 5b 2b 5c 22b…
This sets up her basic pressure loop pretty nicely, and keeps her in a position where she can threaten command throw after 22b.
String if you need to regain more ground:
2b 5c(1) 22b 2b 5c(1) 22b…
The 5c(1) 22b is able to be mashed or jumped, but it will move her forward a considerable distance, useful if they are focusing on Ex-Guard.
When you're looping +f, you'll want to mix in command throw whenever you are plus and could press a button to keep them from just blocking all day. The best spot is after 22b, which does not push you back at all. After 5a, you may have to walk a bit to get into position to command throw. Dashing works as well, but keep in mind it's a rather slow startup so it can be riskier.
Midscreen pressure:
2a 2b 5c(1) 5a 2b 5c(1) 5a…
Her midscreen pressure isn’t great as it relies a lot on 5a which stacks rebeat penalty, and it is fairly trivial to backdash. Best used if you are able to put them in the corner within 2-3 loops.
Safe Reset to Neutral:
5b 2b 5c 5a 6a delay 6a
Finally, if you just want a safe way to end pressure, 5a6aa works pretty well. You can throw in one last stagger before the last 6a which nets you a combo if they mash, but otherwise this will push you out a ton on block while also leaving you +3. Sometimes it’s good to know when to quit and reset to neutral.
Okizeme
...j.[c] j.a(w) fall j.214a
...j.[c] falling j.b 2c 22a 214a
These are her two most common enders. Her oki is pretty simple, just aim to hit them meaty with the pillar. On some characters, you may have to land completely after j.[c] in order to get a meaty pillar, but in general you want to place it while you are falling down (whiffing a j.a lets you recover in mid-air and place it while falling).
This is just a single hit meaty so it's not fantastic okizeme (Ex-Shield is pretty effective at denying it) but it is at least DP safe. The most common option after this oki is to just block and see what they do. If they just block it, you can start your pressure from there. As long as you block, it will beat most reversals as well (and if the reversal only has a limited amount of invul, the pillar is active enough to counterhit it anyway, which scores you a good combo). If they get hit by it but not counterhit, it can be a bit tricky to convert. The best option is to react with a rising j.a and convert from there, which leads to a very good combo since it saves a jump cancel. It is a bit hard to react to however, so practice is reccomended.
Defense
Being a H-Moon character, your defensive options are naturally quite limited, and her toolkit doesn't offer many other options. The one saving grace is that her abare options are quite good.
623c-
Not a very good reversal. Metered, horribly punishable on block, and it doesn't even have throw invul so it'll lose to those. It's quite active at the very least, and your only true reversal, but the meter would better be spent on bunker.
214d-
H-Moon trademark defensive option, and the main way you'll be getting out of pressure. Scores a hard knockdown when done out of blockstun, but costs 100 meter. This is what you'll mostly be saving your meter for, if not heat. Best used if you are in the corner, since you'll be able to steal it back from the opponent, and leave them in a poor situation.
Abare-
Her main options for this include 2a, an average 4f 2a that can cancel into itself for mashing. Not amazing but it's decent for calling out smaller gaps in offense. She also has 2b, which is a very fast (6f) and disjointed low poke with large recovery. Great for mashing out of pressure, but use with caution. Finally she has 5c, which is infamously good on Akiha/V.Aki as amazing abare. It beats out most other normals at it's range in terms of speed (8f) and can easily confirm into any combo with it's two hits. Not quite as good as the other versions however, since it's been demoted from a command normal to a regular button, which removes the buffer window that made it quite scary. Still, a good option.
Combos
| Combo Notation Help
|
Disclaimer: Combos are written by various writers, so the actual notation used in pages can differ from the standard one.
For more information, see Glossary and Controls.
|
| X > Y
|
X input is cancelled into Y.
|
| X > delay Y
|
Must wait for a short period before cancelling X input into Y.
|
| X, Y
|
X input is linked into Y, meaning Y is done after X's recovery period.
|
| X+Y
|
Buttons X and Y must be input simultaneously.
|
| X/Y
|
Either the X or Y input can be used.
|
| X~Y
|
This notation has two meanings.
- Use attack X with Y follow-up input.
- Input X then within a few frames, input Y. Usually used for option selects.
|
| X(w)
|
X input must not hit the opponent (Whiff).
|
| j.X
|
X input is done in the air, implies a jump/jump cancel if the previous move was done from the ground.
Applies to all air chain sections:
- Assume a forward jump cancel if no direction is given.
- Air chains such as j.A > j.B > j.C can be shortened to j.ABC.
|
| sj.X
|
X input is done after a super jump. Notated as sj8.X and sj9.X for neutral and forward super jumps respectively.
|
| dj.X
|
X input is done after a double jump.
|
| sdj.X
|
X input is done after a double super jump.
|
| tk.X
|
Stands for Tiger Knee. X motion must be buffered before jumping, inputting the move as close to the ground as possible. (ex. tk.236A)
|
| (X)
|
X is optional. Typically the combo will be easier if omitted.
|
| [X]
|
Input X is held down. Also referred to as Blowback Edge (BE). Depending on the character, this can indicate that this button is held down and not released until indicated by the release notation.
|
| ]X[
|
Input X is released. Will only appear if a button is previously held down. This type of input is referred to as Negative Edge.
|
| {X}
|
Button X should only be held down briefly to get a partially charged version instead of the fully charged one.
|
| X(N)
|
Attack "X" should only hit N times.
|
| (XYZ)xN
|
XYZ string must be performed N times. Combos using this notation are usually referred to as loops.
|
| (XYZ^)
|
A pre-existing combo labelled XYZ is inserted here for shortening purposes.
|
| CH
|
The first attack must be a Counter Hit.
|
| Air CH
|
The first attack must be a Counter Hit on an airborne opponent.
|
| 66
|
Performs a ground forward dash.
|
| j.66
|
Performs an aerial forward dash, used as a cancel for certain characters' air strings.
|
| IAD/IABD
|
Performs an Instant AirDash.
|
| AT
|
Performs an Air Throw. (j.6/4A+D)
|
| IH
|
Performs an Initiative Heat.
|
| AD
|
Performs an Arc Drive.
|
| AAD
|
Performs an Another Arc Drive.
|
Note: These are just the very basics to know with HSei, more advanced combos coming soon. For now refer to the Combo Doc linked at the start of this page for more advanced routes. Some of these routes can be optimized slightly by adding 6b after 2b instead of after 6c, or by adding more j.as. These are just the confirms that I personally use the most, feel free to adjust them to suit your needs.
Normal Combos
| Condition
|
Notation
|
Damage
vs V.Sion
|
Notes
|
|
| Normal starter, grounded opponent
|
- 2A > 5B > 2B > 5C > 2C > 6C > 6B > j.BC > dj.[C] > dl j.214B/A > Land > j.BC > dj.[C]A(w)
|
???
|
| |
| Meter Gained: ??? |
Meter Given (vs C-Moon): ??? |
| Most basic BnB, gives full corner to corner carry and okizeme. The j.A(w) at the end is to allow you to set a pit while falling (see Okizeme section). When closer to the corner, use j.214A instead of B so the pit does not go offscreen. The delay is important so you have enough time to rejump, you can optionally choose to whiff airthrow after the j.214 to make you land faster, which will make the link easier. |
|
|
| Normal starter, grounded opponent
|
- 2A > 5B > 2B > 6B > 5C > 2C > 6C > j.A > j.B > j.C > sdj.[C] > dl Falling j.B > Land > 2C > 214A > j.B > j.C > dj.[C]A(w)
|
???
|
| |
| Meter Gained: ??? |
Meter Given (vs C-Moon): ??? |
| Basic combo using a bounce pickup after j.[C]. Character specifics pending (W.I.P). |
|
|
Corner Combos
| Condition
|
Notation
|
Damage
vs V.Sion
|
Notes
|
|
| Normal starter, grounded opponent, 100% meter
|
- 2A > 5B > 2B > 5C > 2C > 6C > 6B > j.B > dl j.C > dj.[C] > dl Falling j.B > Land > 5B > 236C > j.B > j.C > dj.[C] > dl Falling j.B > Land > 2C > 22A
|
???
|
| |
| Meter Gained: ??? |
Meter Given (vs C-Moon): ??? |
| Standard metered route in the corner. Character specifics pending (W.I.P). |
|
|
Move Descriptions
| Frame Data Help
|
| Header
|
Tooltip
|
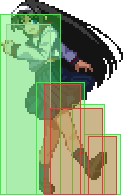
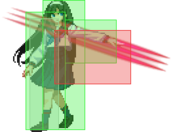
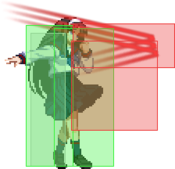
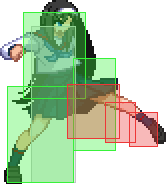
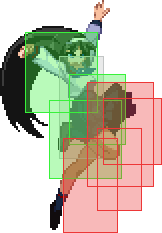
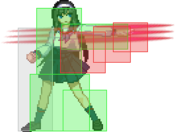
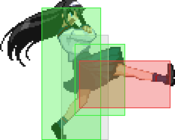
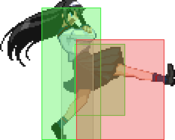
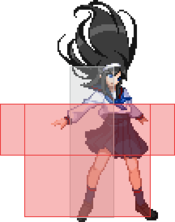
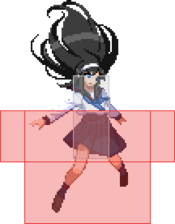
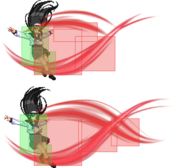
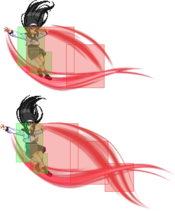
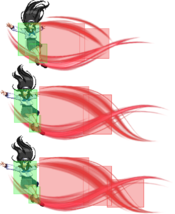
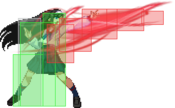
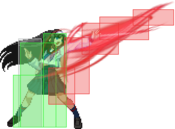
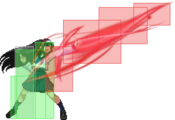
| Move Box Colors
|
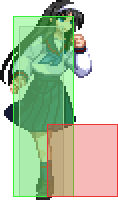
Light gray = Collision Box (A move lacking one means it can go through the opponent's own collision box).
Green: Hurt Boxes.
Red: Hit(/Grab) Boxes.
Yellow: Clash Boxes (When an active hitbox strikes a clash box, the active hitbox stops being active. Multi-hit attacks can beat clash since they will still progress to the next hitbox.)
Magenta: Projectile-reflecting boxes OR Non-hit attack trigger boxes (usually).
Blue: Reflectable Projectile Boxes.
|
| Damage
|
Base damage done by this attack.
(X) denotes combined and scaled damage tested against standing V. Sion.
|
| Red Damage
|
Damage done to the recoverable red health bar by this attack. The values are inherently scaled and tested against standing V. Sion.
(X) denotes combined damage.
|
| Proration
|
The correction value set by this attack and the way it modifies the scaling during a string. See this page for more details.
X% (O) means X% Overrides the previous correction value in a combo if X is of a lower percentage.
X% (M) means the current correction value in a combo will be Multiplied by X%. This can also be referred to as relative proration.
|
| Circuit
|
Meter gained by this attack on hit.
(X%) denotes combined meter gain.
-X% denotes a meter cost.
|
| Cancel
|
Actions this move can be cancelled into.
SE = Self cancelable.
N = Normal cancelable.
SP = Special cancelable.
CH = Cancelable into the next part of the same attack (Chain in case of specials).
EX = EX cancelable.
J = Jump cancelable.
(X) = Cancelable only on hit.
-X- = Cancelable on whiff.
|
| Guard
|
The way this move must be blocked.
L = Can block crouching
H = Can block standing.
A = Can block in the air.
U = Unblockable.
|
| Startup
|
Amount of frames that must pass prior to reaching the active frames. Also referred to as "True Startup".
|
| Active
|
The amount of frames that this move will have a hitbox.
(x) denotes frame gaps where there are no hitboxes is present. Due to varied blockstuns, (x) frames are difficult to use to determine punish windows. Generally the larger the numbers, the more time you have to punish.
X denotes active frames with a duration separate from its origin move's frame data, such as projectile attacks. In this case, the total length of the move is startup+recovery only.
|
| Recovery
|
Frames that this move has after the active frames if not canceled. The character goes into one frame where they can block but not act afterwards, which is not counted here.
|
| Advantage
|
The difference in frames where you can act before your opponent when this move is blocked (assuming the move isn't canceled and the first active frame is blocked).
If the opponent uses a move with startup that is at least 2 frames less than this move's negative advantage, it will result in the opponent hitting that move.
±x~±y denotes a range of possible advantages.
|
| Invul
|
Lists any defensive properties this move has.
X y~z denotes X property happening between the y to z frames of the animations. If no frames are noted, it means the invincibility lasts through the entire move.
Invicibility:
- Strike = Strike invincible.
- Throw = Throw invincible.
Hurtbox-Based Properties:
- Full = No hurtboxes are present.
- High = Upper body lacks a hurtbox.
- Low = Lower body lacks a hurtbox.
Miscellaneous Properties
- Clash = Frames in which clash boxes are active.
- Reflect = Frames in which projectile-reflecting boxes are active.
- Super Armor = Frames in which the character can take hits without going into hit stun.
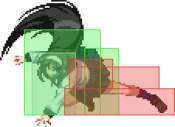
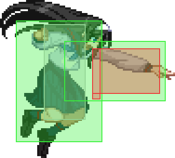
|
Normal Moves
Standing Normals
|
|
| 5A
|
Damage
|
Red Damage
|
Proration
|
Cancel
|
Guard
|
| 350
|
192
|
75% (O)
|
N, SP, -CH-, EX, (J)
|
L
|
| First Active
|
Active
|
Recovery
|
Frame Adv
|
Circuit
|
Invuln
|
| 6
|
2
|
11
|
6
|
2.45%
|
-
|
|
A small standing low kick. +6 on block.
|
| 5A~6A
|
Damage
|
Red Damage
|
Proration
|
Cancel
|
Guard
|
| 600
|
384
|
80% (M)
|
N, SP, -CH-, EX, (J)
|
LH
|
| First Active
|
Active
|
Recovery
|
Frame Adv
|
Circuit
|
Invuln
|
| 9
|
6
|
10
|
-1
|
4.2%
|
-
|
|
Swipe followup.
|
| 5A~6A~6A
|
Damage
|
Red Damage
|
Proration
|
Cancel
|
Guard
|
| 1000
|
768
|
60% (O)
|
(N), SP, EX, (J)
|
LH
|
| First Active
|
Active
|
Recovery
|
Frame Adv
|
Circuit
|
Invuln
|
| 12
|
3
|
12
|
3
|
7.0%
|
-
|
|
Final followup, launches and +3 on block.
|
|
|
|
| Damage
|
Red Damage
|
Proration
|
Cancel
|
Guard
|
| 600
|
288
|
80% (O)
|
N, SP, EX, (J)
|
L
|
| First Active
|
Active
|
Recovery
|
Frame Adv
|
Circuit
|
Invuln
|
| 7
|
4
|
12
|
-1
|
4.2%
|
-
|
|
A second, longer ranged standing low kick.
|
|
|
|
| Damage
|
Red Damage
|
Proration
|
Cancel
|
Guard
|
| 500*2 (954)
|
(550)
|
94% (M), 90% (O)
|
N, SP, EX, (J)
|
LH
|
| First Active
|
Active
|
Recovery
|
Frame Adv
|
Circuit
|
Invuln
|
| 9
|
4
|
19
|
-11, -4
|
3.5%*2 (7.0%)
|
-
|
|
A forward-extending mid-hitting swipe.
|
|
Crouching Normals
|
|
| Damage
|
Red Damage
|
Proration
|
Cancel
|
Guard
|
| 300
|
144
|
70% (O)
|
-SE-, -N-, -SP-, -EX-, (J)
|
LH
|
| First Active
|
Active
|
Recovery
|
Frame Adv
|
Circuit
|
Invuln
|
| 4
|
4
|
10
|
-2
|
2.1%
|
-
|
|
Fast mid-hitting crouching swipe.
|
|
|
|
| Damage
|
Red Damage
|
Proration
|
Cancel
|
Guard
|
| 550
|
336
|
80% (O)
|
N, SP, EX, (J)
|
L
|
| First Active
|
Active
|
Recovery
|
Frame Adv
|
Circuit
|
Invuln
|
| 6
|
4
|
19
|
-8
|
3.85%
|
-
|
|
Low swipe.
|
|
|
|
| Damage
|
Red Damage
|
Proration
|
Cancel
|
Guard
|
| 850
|
384
|
55% (O)
|
N, SP, EX, (J)
|
L
|
| First Active
|
Active
|
Recovery
|
Frame Adv
|
Circuit
|
Invuln
|
| 8
|
4
|
20
|
-6
|
5.95%
|
-
|
|
A sweep that moves Seifuku forward.
|
|
Aerial Normals
|
|
| Damage
|
Red Damage
|
Proration
|
Cancel
|
Guard
|
| 300
|
192
|
75% (O)
|
SE, N, SP, EX, J
|
LHA
|
| First Active
|
Active
|
Recovery
|
Frame Adv
|
Circuit
|
Invuln
|
| 5
|
4
|
9
|
-
|
2.1%
|
-
|
|
Standard air jab.
|
|
|
|
| Damage
|
Red Damage
|
Proration
|
Cancel
|
Guard
|
| 600
|
307
|
90% (O)
|
N, SP, EX, J
|
HA
|
| First Active
|
Active
|
Recovery
|
Frame Adv
|
Circuit
|
Invuln
|
| 8
|
4
|
-
|
-
|
4.2%
|
-
|
|
Hits directly below Seifuku.
|
|
|
|
| j.C
|
Damage
|
Red Damage
|
Proration
|
Cancel
|
Guard
|
| 800
|
480
|
85% (O)
|
N, SP, EX, J
|
HA
|
| First Active
|
Active
|
Recovery
|
Frame Adv
|
Circuit
|
Invuln
|
| 9
|
4
|
-
|
-
|
5.6%
|
-
|
|
Air flipkick.
|
| j.[C]
|
Damage
|
Red Damage
|
Proration
|
Cancel
|
Guard
|
| 1200
|
960
|
85% (O)
|
N, SP, EX, J
|
HA
|
| First Active
|
Active
|
Recovery
|
Frame Adv
|
Circuit
|
Invuln
|
| 17
|
7
|
-
|
-
|
8.4%
|
-
|
|
Charged version alters your momentum and give an hard knockdown on air hit.
|
|
Command Normals
|
|
| Damage
|
Red Damage
|
Proration
|
Cancel
|
Guard
|
| 600
|
384
|
80% (O)
|
N, SP, EX, (J)
|
LH
|
| First Active
|
Active
|
Recovery
|
Frame Adv
|
Circuit
|
Invuln
|
| 8
|
4
|
18
|
-7
|
4.2%
|
-
|
|
Forward-reaching swipe.
|
|
|
|
| Damage
|
Red Damage
|
Proration
|
Cancel
|
Guard
|
| 500
|
288
|
80% (O)
|
N, SP, EX, (Jd)
|
LH
|
| First Active
|
Active
|
Recovery
|
Frame Adv
|
Circuit
|
Invuln
|
| 9
|
4
|
23
|
-10
|
3.5%
|
-
|
|
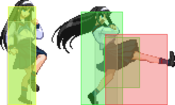
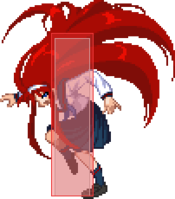
The Akiha Kick™.
|
|
Universal Mechanics
|
|
| Damage
|
Red Damage
|
Proration
|
Cancel
|
Guard
|
| 1300
|
480
|
100%
|
-
|
U
|
| First Active
|
Active
|
Recovery
|
Frame Adv
|
Circuit
|
Invuln
|
| 2
|
1
|
20
|
-
|
0.0%
|
-
|
|
Akiha grabs the opponent by the neck and explodes them. Untechable knockdown.
|
|
|
|
| Damage
|
Red Damage
|
Proration
|
Cancel
|
Guard
|
1600 (Raw)
1300
|
1152
|
100%
|
-
|
U
|
| First Active
|
Active
|
Recovery
|
Frame Adv
|
Circuit
|
Invuln
|
| 1
|
1
|
12
|
-
|
7.0%
|
-
|
|
Aerial version of Seifuku's throw. Untechable knockdown as a combo ender. One of the few air throws that build meter.
|
|
|
|
| Standing
|
Damage
|
Red Damage
|
Proration
|
Cancel
|
Guard
|
| 500 (345)
|
198
|
50%
|
(SP), (EX), (J)
|
LHA
|
| First Active
|
Active
|
Recovery
|
Frame Adv
|
Circuit
|
Invuln
|
| 8
|
4
|
18
|
-4
|
3.5%
|
-
|
|
Same animation as F-Moon 3C.
|
| Crouching
|
Damage
|
Red Damage
|
Proration
|
Cancel
|
Guard
|
| 1500 (1117)
|
714
|
50%
|
(SP), (EX)
|
LA
|
| First Active
|
Active
|
Recovery
|
Frame Adv
|
Circuit
|
Invuln
|
| 8
|
4
|
18
|
-4
|
10.5%
|
-
|
|
Same animation as 2B.
|
| Aerial
|
Damage
|
Red Damage
|
Proration
|
Cancel
|
Guard
|
| 500 (345)
|
198
|
50%
|
-
|
HA
|
| First Active
|
Active
|
Recovery
|
Frame Adv
|
Circuit
|
Invuln
|
| 8
|
4
|
-
|
-
|
3.5%
|
Full 1-3
|
|
Same animation as F-Moon j.C.
|
|
|
|
| Neutral
|
Damage
|
Red Damage
|
Proration
|
Cancel
|
Guard
|
| 500
|
192
|
50%
|
-
|
LHA
|
| First Active
|
Active
|
Recovery
|
Frame Adv
|
Circuit
|
Invuln
|
| 25
|
4
|
19
|
-5
|
0.0%
|
Clash 1-10
|
| (Clash)
|
Damage
|
Red Damage
|
Proration
|
Cancel
|
Guard
|
| 500
|
192
|
50%
|
-
|
LHA
|
| First Active
|
Active
|
Recovery
|
Frame Adv
|
Circuit
|
Invuln
|
| 7
|
4
|
19
|
-5
|
0.0%
|
Strike 1-7
|
|
A version of 6C with a bigger hitbox.
|
| Blockstun
|
Damage
|
Red Damage
|
Proration
|
Cancel
|
Guard
|
| 0
|
0
|
100%
|
-
|
LHA
|
| First Active
|
Active
|
Recovery
|
Frame Adv
|
Circuit
|
Invuln
|
| 18
|
3
|
22
|
-7
|
-100.0%
|
-
|
|
H-Moon specific reversal bunker.
|
|
|
|
| Ground
|
Damage
|
Red Damage
|
Proration
|
Cancel
|
Guard
|
| 100
|
0
|
100%
|
-
|
U
|
| First Active
|
Active
|
Recovery
|
Frame Adv
|
Circuit
|
Invuln
|
| 10
|
10
|
20
|
-
|
removes all
|
Full 1-39
|
| Air
|
Damage
|
Red Damage
|
Proration
|
Cancel
|
Guard
|
| 100
|
0
|
100%
|
-
|
U
|
| First Active
|
Active
|
Recovery
|
Frame Adv
|
Circuit
|
Invuln
|
| 11
|
10
|
15
|
-
|
removes all
|
Strike 1-30
|
|
Universal burst mechanic. Unlike Crescent/Full Heat activation, the hitbox and frame data doesn't vary between characters. However, you can be thrown out of this move if you input it in the air.
|
|
Special Moves
Grounded Specials
|
|
| A
|
Damage
|
Red Damage
|
Proration
|
Cancel
|
Guard
|
| 800*2 (1381)
|
(828)
|
75% (O)
|
-
|
LHA
|
| First Active
|
Active
|
Recovery
|
Frame Adv
|
Circuit
|
Invuln
|
| 19
|
10
|
28
|
-7
|
5.6%*2 (11.2%)
|
-
|
|
Seifuku jumps back in the air and performs a slightly upward-angled flametongue attack.
|
| B
|
Damage
|
Red Damage
|
Proration
|
Cancel
|
Guard
|
| 800*2 (1381)
|
(828)
|
75% (O)
|
-
|
LHA
|
| First Active
|
Active
|
Recovery
|
Frame Adv
|
Circuit
|
Invuln
|
| 20
|
10
|
27
|
-4
|
5.6%*2 (11.2%)
|
-
|
|
B version jumps back further and is downward-angled.
|
| EX
|
Damage
|
Red Damage
|
Proration
|
Cancel
|
Guard
|
| 450*6 (2279)
|
(1215)
|
90% (O)
|
-
|
LHA
|
| First Active
|
Active
|
Recovery
|
Frame Adv
|
Circuit
|
Invuln
|
| 13+5
|
12
|
16
|
17 (max)
|
-100.0%
|
-
|
|
Jumps back and summons a 6-hit ribbon. Gives good frame advantage depending on how many hits are blocked.
|
|
|
|
| A
|
Damage
|
Red Damage
|
Proration
|
Cancel
|
Guard
|
| 700
|
480
|
45% (O)
|
-EX-
|
LH
|
| First Active
|
Active
|
Recovery
|
Frame Adv
|
Circuit
|
Invuln
|
| 13
|
5
|
28
|
-9
|
4.9%
|
-
|
|
Seifuku casts a spike of fire into the air at a forward angle. Air unblockable. Fast startup, long recovery. Somewhat useful as anti air, but has a weird hitbox and long recovery. Useful after a dash to catch jumpers and large characters (such as Nero summoning stuff). It does only 1 hit, so can be combo'd after on Counter Hit.
|
| B
|
Damage
|
Red Damage
|
Proration
|
Cancel
|
Guard
|
| 750*2 (1260)
|
(645)
|
80% (O)
|
-EX-
|
LH
|
| First Active
|
Active
|
Recovery
|
Frame Adv
|
Circuit
|
Invuln
|
| 27
|
6
|
19
|
2
|
5.25%*2 (10.5%)
|
-
|
|
Slower version. Can be used in combos, not much reason to otherwise.
|
| EX
|
Damage
|
Red Damage
|
Proration
|
Cancel
|
Guard
|
| 400*6 (1802)
|
(864)
|
96% (M)*6
|
-
|
LH
|
| First Active
|
Active
|
Recovery
|
Frame Adv
|
Circuit
|
Invuln
|
| 5+4
|
18
|
38
|
-20
|
-100.0%
|
Full 1-5
|
|
This version has strike invulnerability, and can be used as a reversal. However, grab beats it on wakeup, and it's very easily avoidable if read. Not as good as a real DP, but hits very far and high.
|
|
|
|
| Damage
|
Red Damage
|
Proration
|
Cancel
|
Guard
|
| 700
|
480
|
75% (O)
|
-
|
LHA
|
| First Active
|
Active
|
Recovery
|
Frame Adv
|
Circuit
|
Invuln
|
| 49
|
4
|
40
|
-
|
4.9%
|
-
|
|
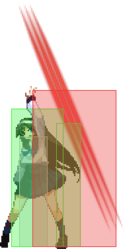
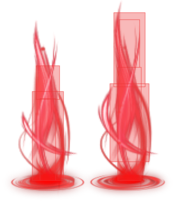
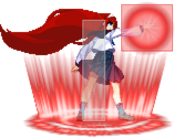
H-Sei's "Soko De". Summons a tall pillar in front of Seifuku that becomes active shortly after she recovers. Button choice only affects the pillar's distance from Seifuku.
|
|
A/B A/B EX EX
|
| A
|
Damage
|
Red Damage
|
Proration
|
Cancel
|
Guard
|
| 1300
|
960
|
75% (O)
|
-EX-
|
L
|
| First Active
|
Active
|
Recovery
|
Frame Adv
|
Circuit
|
Invuln
|
| 12
|
14
|
18
|
-4
|
9.1%
|
-
|
|
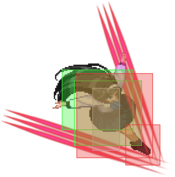
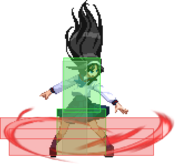
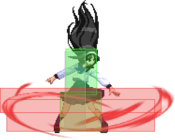
Seifuku surrounds herself with a low to the ground burst of energy. Hits low and causes untechable knockdown on hit. EX cancelable on whiff.
|
| B
|
Damage
|
Red Damage
|
Proration
|
Cancel
|
Guard
|
| 1100
|
768
|
80% (M)
|
-
|
L
|
| First Active
|
Active
|
Recovery
|
Frame Adv
|
Circuit
|
Invuln
|
| 18
|
14
|
8
|
6
|
7.7%
|
-
|
|
A "longer startup but short recovery"-type B version. +6 on block.
|
| EX
|
Damage
|
Red Damage
|
Proration
|
Cancel
|
Guard
|
| 1800
|
1152
|
75% (O)
|
-
|
L
|
| First Active
|
Active
|
Recovery
|
Frame Adv
|
Circuit
|
Invuln
|
| 4+9
|
14
|
19
|
-5
|
-100.0%
|
-
|
|
EX version is much bigger and launches the opponent upward into an air-tech state on hit.
|
|
|
|
| Damage
|
Red Damage
|
Proration
|
Cancel
|
Guard
|
| 700
|
480
|
35%
|
-
|
U
(Whiffs vs Air.)
|
| First Active
|
Active
|
Recovery
|
Frame Adv
|
Circuit
|
Invuln
|
| 5
|
1
|
29
|
-
|
0.0%
|
-
|
|
Seifuku's command grab. Sideswitches and lets you combo off of it.
|
|
Aerial Specials
|
|
| Damage
|
Red Damage
|
Proration
|
Cancel
|
Guard
|
| 700
|
480
|
75% (O)
|
-J-
|
LHA
|
| First Active
|
Active
|
Recovery
|
Frame Adv
|
Circuit
|
Invuln
|
| 48
|
4
|
25*
|
Plus
|
4.9%
|
-
|
|
Aerial "Soko de". Jump cancellable even on whiff.
|
|
Arc Drive
Throw Throw Strike Strike
|
Throw
Strike
|
Damage
|
Red Damage
|
Proration
|
Cancel
|
Guard
|
10800 (3568)
1500
|
(2275)
1152
|
50% (O)
100%
|
-
|
A
LHA
|
| First Active
|
Active
|
Recovery
|
Frame Adv
|
Circuit
|
Invuln
|
| 3+0
|
1 (26)
2
|
42
|
-
-16
|
removes all
|
Full 1-58
|
|
Seifuku grabs the opponent and assaults it with fiery might. Command grab that only grabs grounded targets when they're close, but aerial targets much easier, even when they're almost above her. If the grab part whiffs, the will only be a small explosion coming out of her hand.
|
|
MBAACC Navigation
