Combos
Normal Combos
- First normal midscreen combos, the corner combos, then character specific combos
- explanation
Metered Combos
- ...
Strategy
Do what you need to do to extrapolate on the character. Here are example categories below.
Crescent
Spacing
Pressure
Move Descriptions
Normal Moves
| 2A
Start-up: 6 | Active: 4 | Recovery: - | Advantage: -1
Low hitting 2A. Has decent range, but has 6F start-up, so be wary when trying to use this to mash out of pressure.
Also one of her better reverse beat options for pressure strings.
|
| 5A
Start-up: 6 | Active: 4 | Recovery: 9 | Advantage: 0
Neutral on block can be used to tick throw and pressure, has decent range for a 5A.
|
| 2B
Start-up: 9 | Active: 4 | Recovery: 16 | Advantage: -1
-1 on block, hits mid. Nothing especially noteworthy about her 2B, the range is nothing spectacular,
Combo/blockstring fodder,
|
| 5B
Start-up: 8 | Active: 6 | Recovery: 9 | Advantage: +1
+1 on block and hits multiple times, making it a good general purpose pressure/hitconfirm tool
Can be used as a ghetto anti-air sometimes, as the hitbox is slightly higher than it seems.
|
| 2C
Not quite as degenerate as F-Hime's 2C, but it's still pretty good, and unlike F-Hime's, it hits low!
Reaches quite far, can be hitconfirmed into 5C 214B/236A for a combo, is only -1 on block, overall a solid ground poke.
Should take care to avoid whiffing it, but with 15f recovery, it can be rather difficult for the opponent to punish it with an IAD/Jump in.
|
| 5C
The 5C Powerd Ciel wishes she had. Amazing poke, great whiff punisher, virtually incontestable from further ranges, can easily hitconfirm into 2C6C236A for a full combo, great pressure tool when used from a range alongside her specials. just be wary of opponents air dashing over it, as its hitbox doesn't reach especially high
just press it sometimes, it's a good button.
|
| 6C
Blockstring and combo filler. Launches and is jump cancelable on hit, can be used as a ghetto anti air but it's not recommended. BE6C also serves a similar function, but theres nothing especially noteworthy about it, besides having slightly better frame advantage.
|
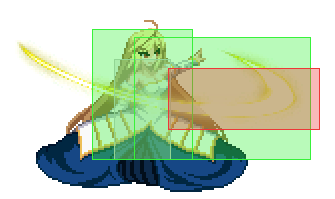
| JA
Regular girl JA. teeny hitbox, not great as a jump in but can be used to make IAD strings tighter.
Can whiff cancel the recovery into more air options (jump air dash, buttons, flight) but once she begins her descent animation she loses that opportunity.
|
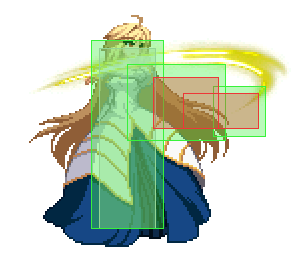
| JB
Huge (sorta). Great air to air, decent air to ground, hits twice and will beat out a good number of opposing air to airs. only downside is it's rather suspect hitboxes, as sometimes characters will appear to phase through its active frame, so get a good feel for how it hits.
|
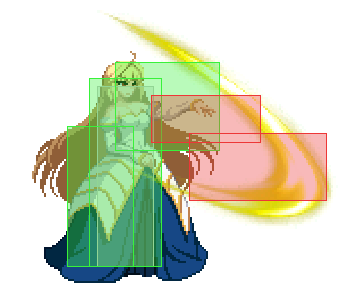
| JC
Savage. Hime claws your face off with an omnidirectional swipe. Really really big, but also quite slow, so don't be surprised if you get counter hit out of it. Good air to air, great air to ground, just be wary that it can be low profiled if coming down from too high.
Used during flight oki to get some fun mixups!
Probably one of your favourite buttons
|
Special Moves
Name 「JP name」 - 22ABC
- (Description) - Simply describe the move here and what it can be used for
- (A version) - This is where you put what the version of the move can be used for and how its different from the rest of the moves.
- (B version) - Ditto
- (EX version) - This is were you describe what happens when you feed it 100%
|
「」 - 236ABC
- (Description) - Geyser series. They hit low and are air unblockable, making them pretty good for harassing the opponent at a range.
- (A version) - Hime summons a Geyser in front of her that launches the opponent into the air. can be jump canceled on hit, and flight canceled on block and whiff. Mostly combo filler, but can make a nice relatively safe poke too.
- (B version) - Hime summons a Geyser even further away from her. generally used as a poke, can be confirmed into j.236c for quick damage and a knockdown/tech trap when flight canceled.
- (EX version) - Please refrain from using this.
|
「」 - 623ABC
- (Description) - DP series. It's a DP lol.
- (A version) - It's a functional anti air sometimes, pretty decent if you have a read on their air approach.
- (B version) - Invincible. Has regrettably small initial hitboxes, and the 2nd set only emerge when she loses her invincibility, use with caution, if they block this you will die.
- (EX version) - More Invincible and knocks down at the end.
|
「」 - 214ABC
- (Description) - Wind Mine series. Air unblockable initial hitbox, does ample chip damage and guard damage.
- (A version) - Hime spins gracefully, and places a projectile which turns into a lingering wind mine. The mine can be activated at any time with 214A or j214A/B, and can be BE'd to create a bigger explosion. Can flight cancel on hit, whiff or block, but cannot flight cancel the mine activation input. Both the initial projectile and the activation are air unblockable. Only -2 on block, so can be used rather liberally from a distance. Note that the mine activation itself is punishable if used too close, unless BE'd.
- (B version) - Hime spins even more elegantly, and creates a projectile which places explodes a wind mine instantly. The initial projectile is air unblockable, but the 'explosion' is air blockable. Is jump cancelable on hit, and flight cancelable on whiff and block. Only -3 on block, so can also be used to harass the opponent from just outside their effective range, catch jump outs, shark techs, the list goes on.
- (EX version) - Waste of meter. Hitbox disappears partway through the animation, so the opponent can just waltz in, and ponder how they're going to kill you while they wait for you to land. Please don't use this.
|
「」 - J22ABC
- (Description) - Hikari series.
|
「」 - 426ABC
- (Description) - ...
- (A version) -
- (B version) -
- (EX version) -
|
「」 - BC
- (Description) - ...
- (Standing) -
- (Crouching) -
- (Airborne) -
|
Arc Drive
「」
- (Description) - AD description
|
Another Arc Drive
「」
- (Description) - AAD description
|
Last Arc
「」
- (Description) - LA description. Mention where it is activated (air or ground shield) first.
|
MBAACC Navigation


