Combos
All damages are recorded from the combos being done on Sion.
Simple Combos
Midscreen BnB
- 2AB 5B 5A6AA 2C 5C 4C 421[A/B]
- 3149 damage, 49.0 meter gain. Orb okizeme BnB.
- 2AB 5B 5A6AA 2C 5C 3C j.BC dj.BC Airthrow
- 4328 damage, 69.3 meter gain. Airthrow damage bnb.
- 2AB 5B 5A6AA 4[C] 421[A/B]
- 2566 damage, 33.6 meter gain. 4[C] gives a longer knockdown for more options.
- 2B 5BC 2C 3C j.BC dj.ABC Airthrow
- 4553 damage, 55.3 meter gain. The H-Aoko special.
- 66 2AB 5BC 2C 3C j.BC dj.ABC Airthrow
- 4344 damage, 57.4 meter gain. Dash momentum is necessary for 2C to connect. Can't use 2AA either.
- 2AB 5B 5A6AA 4[C] 214A 66 j.ABC dj.ABC Airthrow
- 4137 damage, 65.8 meter gain. Basic corner carry combo.
- 2AB 5B 5A6AA 4[C] 66 2A 2C 5C 3C j.BC j.BC Airthrow
- 4377 damage, 78.4 meter gain. Slightly more damaging version. Delay 2C 5C 3C a lot or 3C will whiff.
- 2AB 5B 5A6AA 4[C] 66 2A 2C 5C 3C 63214A 421[A/B]
- 3635 damage, 64.4 meter gain. Oki orb variant of the above.
The suggested way to do the "4[C] 66 XX" link is 4[C] 66~[3]~A/B 2C. For example, dash then shift to hold 3 and do a late 3A 2C instead of 2AC.
For corner carry and meterless damage/okizeme, it's important to learn the "4[C] 66 (2A/2B/2C)" combos. They also leave you with a jump cancel for whatever shenanigans. This is stressed even more so against characters who can be hit by 4[C] 66 2B.
Corner:
All of the above still work. Also:
- 2AAB 5B 5A6AA 4[C] walk back 5A 2C 5C 3C 63214A 421[A/B]
- 3729 damage, 67.2 meter gain. Oki orb combo.
- 2AAB 5B 5A6AA 4[c] 2A 2C 5C 4C 623A
- 3952 damage, 71.4 metergain. Leads to H-Aoko's "Kicking Ass" tech punishes.
- 2A 5B 5C 2C (5A)6AA 4[C]...
- ...another way to setup BE4C stuff
Universal whiff cancel combos
These combos are examples of meterless, fullscreen carry with different knockdown options. Combining the dash link (4[C] 66 2A/2B/2C) with other BNBs gives aoko great opportunity to land high damage oki setups from any good starter.
There are many variations in whiffcancelling, the ones listed here (in my opintion) seem the most stable.
note the combos don't use 5[c] before 4[C] midscreen. (Usually there is not enough gravity, but it will work in some combos with added gravity or in the corner)
Midscreen / Fullscreen
- Midscreen string 1 - (6AAA 4[c] 66.. 2C / 2AC / 2BC)
- 2AB 5B 6AAA 4[C] 66 2A2C 6A(whiff) 6AA 4[C] 66 2C 5C 3C 63214a.
- 4134dmg 91 % mtr - use this from any where 'mid'screen to move all the way to the corner. 66 2C, 2A2C or 2B2C works in all these combos, see charspecifics.
- 2AB 5B 6AAA 4[C] 66 2A2C 6A(whiff) 6AA 4[C] 66 2C 5C 3C jBC jBC AT.
- ????dmg ?? % mtr - meterless damage version you probably won't use
- Midscreen string 2 - uses two instances of 6AAA before the first 4[c] 66.. 2C / 2AC / 2BC
- dash 2AB 5B 6AAA 2A2C 6A(whiff)6AA 4[C] 66 2A2c 6A(whiff)6AA 4[C]
- 3972dmg 84 % mtr - Keeps the opponent juggled (high) so the dash link is easier. Requires almost point blank opener.
- dash 2AB 5B 6AAA 2A2C 6A(whiff)6AA 4[C] 66 2A2c 6A(whiff)6AA 4[C] 2C 5C 3C 63214a 421a.
- 4392dmg 113 %mtr - shield knockdown is a little more damage, but less frame advantage.
- dash 2AB 5B 6AAA 2A2C 6A(whiff)6AA 4[C] 66 2A2c 6A(whiff)6AA 4[C] 2C 5C 3C jBC jABC AT.
- 4665dmg 113 %mtr - meterless damage version.
- Fullscreen string -
- 2AB 5B 6AAA 4[C] 66 2B2C 6A(whiff) 6AA 4[C] 66 2B2C 6A(whiff) 6AA (5[C]) 4[C].
- 4238dmg 98 % mtr - use this from one edge of the stage to the other. Only 5[C] if you reach the very corner)
- Anywhere -
- 66 2AA 2B5B (5A6AA iAD jB) or (5A6AA 4[C] 9JB) 2C 6A(whiff) 6AA...
- this works but is difficult to time jB and 2c against your iAD input.
Corner or near corner - In the corner, '4[C] empty 6A(whiff) 6AA' 5/4[C]' also works
- Corner Loop 1
- 2AB 5B 6AAA 4[C] 2A2C 6A(whiff)6AA 5[C] 4[C]...
- ...some possible followups, you've used two ground bounces already, 4[C] again will end the combo with untechable down.
- ..2A 2C 5C 3C jBC jABC AT.
- 4745dmg. 117 %mtr
- ..2A 2c 5c 3c 63214a 421a.
- 4358dmg. 101 %mtr.
- ..j8~4(driftback) late jB 2C 6A(whiff)6AA 4[C] 421a.
- 4343dmg. 101.5 %mtr.
- ..walkback 5A2C 2A(whiff) fullyrecover 2A2C 5C 3C jBC jBC AT.
- 4796dmg 129.9 %mtr
- ..walkback 5A2c 2A(whiff) fullyrecover 2A2C 6A(whiff)6AA 4[C].
- 4423dmg 110.6 %mtr - must walk backwards or ensure spacing so that '2A' after '5A2C' whiffs.
- Corner Loop 2
- 2AB 5B 6AAA 2A2C 6A(whiff)6AA 5[C] 4[C]...
...similar followups although only one ground bounce is used by this point
- ..2A2C 6A(whiff)6AA 4[C] 2A2C 5C 3C jBC jABC AT.
- ????dmg. ??? mtr.
- ..2A2C 6A(whiff)6AA 4[C] 2A2C 5C 3C 63214a 421a.
- ????dmg. ??? mtr.
- ..j8~4(driftback) late jB 2C 6A(whiff)6AA 4[C] 421a.
- 4275dmg. 101 %mtr.
- ..j8~4(driftback) late jB 2C 6A(whiff)6AA 4[C] 2A2C 5C 3C 63214a.
- 4668dmg. 104 %mtr.
- Max Meter building loop
- 2AA 2B5B 6AAA 4[C] walkback 5A2C 2A(whiff+fullyrecover) 2A2C 6A(whiff)6AA 5[C] 4[C] walkback 5A2C 2A(whiff+fullyrecover) 2A2C 5C3C jABC jABC AT.
- 5210dmg 138 %mtr. Corner only. Always walk backwards to near-max 5A range after each 4[C] to keep the loop working. timings are very char dependant, good luck
Air counterhit confirms
See a jp video here: (player name, anyone?)
MBAACC H青子【コンボ集】 simple to very advanced/situational options
Basic air CH combos:
Assumes you already have air counterhit with a jumping normal and landed.(these work whatever happens)
note: Air CH from a normal (JA etc) will not allow the falling opponent to be picked up with 2AC or 2BC.
- 5B3C JCB JBC AT
- 2C5C3C jBC jBC AT
- 2C5C3C 63214a
- 2C5C4C 412[a/b]
- 2C 22A jAC jBC AT
Advanced air CH combos:
Assumes you already have air counterhit with an orb and are grounded
note: Air CH from an orb (popped or placed earlier) allows
all your loop/pickup options, with good spacing of course. \(^.^)|
- (veryclose range) 2B 2C (5A)6AA 4[C] - goes into the loop only from point blank with 2B2C
- (veryclose range) 2B 2C (5A) 2A2C (5A)6AA 4[C] - more gravity and swagger
- (mid/far range) 2C (5A)6AA 4[c] 66 2C (5A)6AA 4[C] - goes into the loop only from mid/max range 2C
- (veryclose range) late 5[C]4[C] ....(can end in anything...412[b] / 214b 214c / Arc Drive / dash2c jumpcancel)
- (veryclose range) late 5[C] 2C (5A)6AA 4[C] 66 2B 2C (5A)6AA 5[C]4[C] 66 2B2C 5C3C jBC jBC AT
5560dmg 131.3 %mtr - (damage from a pop'd held orb and versus Aoko)
Air throw followups
anywhere/universal
- land 2c5c3c jbc jbc AT...: : : : : : : : : : : : : : : : : : : : : :3167dmg. 12.6%mtr. bnb, lands anywhere
- land 2c5c3c jbc sjc j214c land 5[c]4[c]...: : : : : : : : : : ????dmg ???mtr. bnb 2. lands anywhere. you can superjump for ages to get up, dont jc early.
- land 2c5c 643214a 412[b], or land 2c4c 421[a]...: : : : : ????dmg ???mtr. AT into orb for no meter.
Aoko can 2a2c or 2b2c into her ground loops from an airthrow, however it is not possible to pickup like this post-airthrow against these characters: (see character specific section too)
- Akiha/VAKiha/Sei
- Warachia
-
The jp video here shows ways to use the pickup and other options :
http://www.nicovideo.jp/watch/sm20622328
Metered Combos
H-Aoko can pretty much play without needing to use meter in combos. However, metered combos are good for setups from airthrows, awkwards long distance confirm 2b/2c's into 214C or J214C and easier air counter-hit conversion than the loop. 214C Curcuit break kills your opponents meter on hit but doesn't nearly last long enough; you'll probably be spending the elsewhere.
Any airstring ending on superJC will allow you to combo to J214c, land and continue. Commonly with 5[c]4[c].
The cancel/link between 'JC and J214C' is tight, learning the heights that it will whiff at just takes time. JBC JBC J214C will work with decent delays between 2C 5C 3C and gravity taken into consideration.
Remember only 3 groundbounces (4[c]'s) per combo, and only one '6aaa 5[c]' will connect.
J 214C combos Examples of EX orb extended combos
- Air counter hit - 66 2c5c3c jbc 8jc j214c land 5[c]4[c]- This allows you to drop like Fmoon and stay on the same side. Continue the combo or set up oki. delay 2c5c3c to keep them really low or you wont make the jc > J214C link.
- dash momentum 2a2b5b 5c 2c3c jbc jbc j214c delay 5[c]4[c] 2a2c 6a(whiff) 6aa 4[c] 2a2c 5c 3c 63214a 412[a] 5154dmg -2.8 %mtr.
orb momentum will throw you forwards after j214c. does work if you are not in the corner but you will land and combo back towards the centre. learn to hit 5[c] late after j214c, get them low
Curcuit break combos
note: 214c OTGs and launches with curcuit break, so you can empty dash after 4[c] for example, and get closer than '214B xx 214C' will allow.
http://www.youtube.com/watch?v=Fjr5g1MuGng&feature=youtu.be (work in progress still, will notate later)
Character Specifics
For more damage, '4[C] 2B2C' works instead of '4[C] 2A2C' or '4[C] 2C' in all combos but 2B will only connect on half the cast.
2b's active frames and hitbox make for much more lenient timing especially on dash combos.
'2B2C (5A)6AA' also ensures that 5A will always whiff, if you're too close after dash 2c, 5A will hit and ruin the 4[C] setup.
The list below shows the character divides for pickups in ground combos,(usually after a ground bounce from 4[c]) while the image below and right shows which characters can be picked up after an airthrow. The only difference is that the purple characters can not be picked up atall with either 2a or 2b after an airthrow. For example, in midscreen ground combos, Nero can be pickedup with either 2a or 2b. However after an airthrow, neither will work.
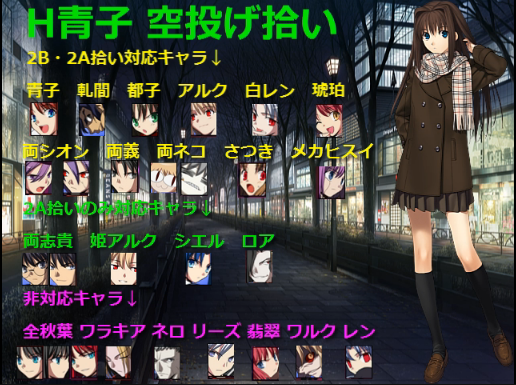
H-Aoko pickup/juggle POST AIRTHROW. Purple chars work with a 2a pickup in ground combos.
2B pickup works on :
- Kouma
- Arcueid
- Aoko
- Sion
- HVSion
- Miyako
- All the maids, all the teams.
- Satsuki
- Ryougi
- Nero
- White Len
- Neko's
2A or just 2C instead picks up :
- Roa.
- Red Arc
- Nanaya
- Tohno
- Hime
- Ciel/PCiel
- Ries
- Wara
- Akiha/VAkiha/Sei
- Ciel
- Len
notes:
- 2B2C pickup actually works against ALL the cast after you pop a held orb for an air CH!
- Whiff cancel combos midscreen all work VS Nero, but once you reach the very corner most strings will not whiff but hit instead, amking invalids. Use the difficult 'Meter building loop' for max damage potencial VS the farm.
Blockstrings
Forward moving normals are 5b, 2c, 6aa. For inspiration see here:
http://www.nicovideo.jp/watch/sm16737063
http://www.nicovideo.jp/watch/sm18955986
or
http://youtu.be/bxLGtX6GZmc
http://youtu.be/ui5iccKriWk
Strategy
Spacing
Pressure
Orb pop stuff
I put these strings under strategy/pressure as it is not advisable to use these as canned strings, but to give an idea to orb uses.
ground strings, assuming an already held orb
- hold[a]....2b5b5c 214b pop[a] 66...
- if you hold [a] orb, you can use 2AB/5AB 5E 214AB release [a], for easier execution. Mixup between high and low with 2b or 5b first here.
- hold[c]....66.. 5a6a..6a...2b...2a...pop[c]
- holding C leaves some nice stagger and reversebeat options
- hold[a]....2b5b5c 236b pop[a] Arc Drive or any EX that will reach.
- the orb hits before 236b does, cancel 5c into 236b then release the orb after. all the hits of 236b can EX cancel or ArcDrive cancel apart from the last hit...
jump-in strings assuming a held orb
(these are best in the corner, but you can space stuff like this midscreen too and put teh FEARINTHEM
- hold[a] IAD jb/c, land 2b5b5c 214b pop[a]....
- can condition the opponent into blocking low after jump ins for fuzzy fun.
- hold[b], j[c] (hold c and release b) 66 j.ab land... any combo.
- "Jc, 66 jab" combos for a high damage 3hit starter, and can condition the opponent into blocking high for a few hits then low with 2b... see fuzzy combos.
- hold[a], jc j623a land 2b5b5c pop[a].... or hold[a] (high)jc 66 jc 623a land 2b5b5c into pop[a]
- leads to pretty much maximum damage Haoko can deliver. follwed by a low proration combo (66 2b5b5c 2c3c...etc) is very damaging.
Fuzzy.
The options haven't changed from PS2, see the PS2 wiki and read the meltybread.com threads on ActressAgain and Current Code .
-also check videos such as:
Tonberry's tribute to MeltyBlood.
Aozaki_Kyo's HAoko video thanks to #Mages-Association.
- hold[a] IAD deep jb, instant 9jb pop[a] 66 jb land... any combo.
- the "double jb then orb pop" hits fuzzy on the second jb and the orb provides hitstun till you land even without the airdash jb.
- hold[b], j[c] (hold c and release b) 66 j.ab instant 9jb pop[b] land... any combo
- the fourth hit, the second jb is the fuzzy here again. extended approach from jumpin #2 above.
- jc 66 jab 9jb jc - orbless, 9jb is fuzzy
- jc 66 jab 9jb jc 623a - orbless fuzzy same, but 623a combos off jc.
With an orb out, cover the charge or combo out of 4[c] overhead.
Example In the corner...
- hold[a] IAD jb j214[b] (hold b, release a) land 4[c], release[b]orb, 66, continue combo..
...falling jb, j214[b] pops an air orb on them, but keeps the first orb held to use after 4[c].
Carefully placed j214a/b air orbs will fling the opponent upwards if you throw them into it. if you get a maximum range ground throw onto an air orb you will have enough time to superjump up and confirm them, even connect j214c and continue on the ground. Just around or above aokos head height is ideal placement to work. doesn't matter about charged orbs or not. Pretty sure all aokos can do this.
Move Descriptions
Normal Moves
2A
|
| Damage
|
Red Damage
|
Proration
|
Cancel
|
Guard
|
| 300
|
200
|
75%
|
-
|
HL
|
| First Active
|
Active
|
Recovery
|
Frame Adv
|
Circuit
|
Invuln
|
| 3
|
3
|
9
|
0
|
3.0%
|
-
|
|
A very short elbow poke.
|
|
5A
|
| Damage
|
Red Damage
|
Proration
|
Cancel
|
Guard
|
| 350
|
200
|
70%
|
-
|
HL
|
| First Active
|
Active
|
Recovery
|
Frame Adv
|
Circuit
|
Invuln
|
| 4
|
4
|
9
|
-1
|
4.0%
|
-
|
|
A short downward kick towards the legs.
|
|
5A6A
|
| Damage
|
Red Damage
|
Proration
|
Cancel
|
Guard
|
| 600
|
400
|
80%
|
-
|
HL
|
| First Active
|
Active
|
Recovery
|
Frame Adv
|
Circuit
|
Invuln
|
| 7
|
4
|
16
|
-5
|
2.0%
|
-
|
|
Description
|
|
5A6AA
|
| Damage
|
Red Damage
|
Proration
|
Cancel
|
Guard
|
| 1000
|
800
|
60%
|
-
|
HL
|
| First Active
|
Active
|
Recovery
|
Frame Adv
|
Circuit
|
Invuln
|
| 9
|
4
|
17
|
-3
|
9.0%
|
-
|
|
Description
|
|
2B
|
| Damage
|
Red Damage
|
Proration
|
Cancel
|
Guard
|
| 600
|
350
|
85%
|
-
|
L
|
| First Active
|
Active
|
Recovery
|
Frame Adv
|
Circuit
|
Invuln
|
| 6
|
7
|
15
|
-7
|
8.0%
|
-
|
|
A deceptively long range low kick.
|
|
5B
|
| Damage
|
Red Damage
|
Proration
|
Cancel
|
Guard
|
| 700
|
500
|
85%
|
-
|
HL
|
| First Active
|
Active
|
Recovery
|
Frame Adv
|
Circuit
|
Invuln
|
| 7
|
5
|
15
|
-5
|
7.0%
|
-
|
|
A punch that moves Aoko forward.
|
|
2C
|
| Damage
|
Red Damage
|
Proration
|
Cancel
|
Guard
|
| 800
|
500
|
65%
|
-
|
L
|
| First Active
|
Active
|
Recovery
|
Frame Adv
|
Circuit
|
Invuln
|
| 8
|
5
|
18
|
-8
|
12.0%
|
-
|
|
A long range low sweep. Moves Aoko forward, and is safe if spaced properly.
|
|
3C
|
| Damage
|
Red Damage
|
Proration
|
Cancel
|
Guard
|
| 800
|
500
|
65%
|
SP, EX, (J), N
|
HL
|
| First Active
|
Active
|
Recovery
|
Frame Adv
|
Circuit
|
Invuln
|
| 9
|
3
|
21
|
-6
|
3.0%
|
-
|
|
Aoko's standard launcher. Has a clash hitbox.
|
|
4C
|
| Damage
|
Red Damage
|
Proration
|
Cancel
|
Guard
|
| 800
|
500
|
70%
|
SP, EX, (J), N
|
HA
|
| First Active
|
Active
|
Recovery
|
Frame Adv
|
Circuit
|
Invuln
|
| 24
|
1
|
19
|
-5 (standing), -2 (crouching)
|
8.0%
|
-
|
|
Aoko swings her leg downward for an axe kick.
|
|
4[C]
|
| Damage
|
Red Damage
|
Proration
|
Cancel
|
Guard
|
| 1000
|
750
|
50%
|
-
|
H
|
| First Active
|
Active
|
Recovery
|
Frame Adv
|
Circuit
|
Invuln
|
| 24
|
1
|
16
|
-2
|
6.0%
|
-
|
|
Description
|
|
5C
|
| Damage
|
Red Damage
|
Proration
|
Cancel
|
Guard
|
| 850
|
550
|
100%
|
SP, EX, (J), N
|
HL
|
| First Active
|
Active
|
Recovery
|
Frame Adv
|
Circuit
|
Invuln
|
| 10
|
7
|
14
|
-3
|
10.0%
|
-
|
|
An upwards kick. Decent range, and can be used as a situational anti-air with proper spacing.
|
|
5[C]
|
| Damage
|
Red Damage
|
Proration
|
Cancel
|
Guard
|
| 1200
|
200
|
100%
|
SP, EX, (J), N
|
HL
|
| First Active
|
Active
|
Recovery
|
Frame Adv
|
Circuit
|
Invuln
|
| 28
|
2
|
16
|
0
|
12.0%
|
-
|
|
A charged version of her 5C. Aoko shoots a large beam from her foot, and while it has a very large hitbox its long charge time means that it rarely sees use.
|
|
5[C] (Laser)
|
| Damage
|
Red Damage
|
Proration
|
Cancel
|
Guard
|
| 350
|
200
|
100%
|
-
|
HLA
|
| First Active
|
Active
|
Recovery
|
Frame Adv
|
Circuit
|
Invuln
|
| 36
|
3
|
7
|
8~10 (1 hit = 8, 3 hits = 10)
|
5.0%
|
-
|
|
See 5[C]'s desription.
|
|
j.A
|
| Damage
|
Red Damage
|
Proration
|
Cancel
|
Guard
|
| 300
|
150
|
75%
|
-
|
HL
|
| First Active
|
Active
|
Recovery
|
Frame Adv
|
Circuit
|
Invuln
|
| 4
|
4
|
11
|
-
|
3.0%
|
-
|
|
A quick and slightly downward angled punch. Best used for air-to-airs.
|
|
j.B
|
| Damage
|
Red Damage
|
Proration
|
Cancel
|
Guard
|
| 600
|
400
|
90%
|
-
|
H
|
| First Active
|
Active
|
Recovery
|
Frame Adv
|
Circuit
|
Invuln
|
| 6
|
5
|
-
|
-
|
6.0%
|
-
|
|
Description
|
|
j.C
|
| Damage
|
Red Damage
|
Proration
|
Cancel
|
Guard
|
| 900
|
700
|
90%
|
-
|
H
|
| First Active
|
Active
|
Recovery
|
Frame Adv
|
Circuit
|
Invuln
|
| 9
|
5
|
-
|
-
|
9.0%
|
-
|
|
Description
|
|
Special Moves
Blazing Starmine
22A/B/C
|
| Damage
|
Red Damage
|
Proration
|
Cancel
|
Guard
|
| 800x3 (2400)
|
500x3 (1500)
|
50%
|
EX
|
HLA
|
| First Active
|
Active
|
Recovery
|
Frame Adv
|
Circuit
|
Invuln
|
| 15
|
6
|
36
|
-2
|
4.0%
|
-
|
|
The laser comes out of the ground directly in front of Aoko. This is a nice way to end pressure because if your opponent tries to mash or jump they'll get hit by this and you can get a small combo out of it. If your opponent blocks it, it's rock/paper/scissors after it unless you cancel into a super. 3C beats jump, 2A 2C beats certain backdashes, 623B beats other backdashes, 623A beats mashing, 1 beats heat or a reversal.
|
| Damage
|
Red Damage
|
Proration
|
Cancel
|
Guard
|
| 800x3 (2400)
|
500x3 (1500)
|
50%
|
EX
|
HLA
|
| First Active
|
Active
|
Recovery
|
Frame Adv
|
Circuit
|
Invuln
|
| 23
|
6
|
33
|
1
|
4.0%
|
-
|
|
The laser comes out further in front of Aoko. This is also a nice away to end pressure if you're a bit further away. It's also RPS after it unless you cancel into a super with your opponent having the same option.
|
| Damage
|
Red Damage
|
Proration
|
Cancel
|
Guard
|
| 250x20 (5000)
|
200x20 (4000)
|
100%
|
-
|
HLA
|
| First Active
|
Active
|
Recovery
|
Frame Adv
|
Circuit
|
Invuln
|
| 3+15
|
29
|
21
|
-14
|
-100%
|
-
|
|
Aoko shoots 5 beams. This move has only very limited uses. It's main use is for beating superarmor(use on Kouma 22C for example.) You can also use it after a BE5C used as an antiair if your opponent gets hit by that. The last use is kind of limited but it beats teching away from Aoko in midscreen after a throw or a neutral tech. The only problem is you have to input 22C before your opponent actually hits the ground to cover neutral tech.
|
|
Browning Starmine
236A/B/[B]/C (236 and 22A/B/C Air OK)
|
| Damage
|
Red Damage
|
Proration
|
Cancel
|
Guard
|
| 1000
|
600
|
100%
|
EX
|
HLA
|
| First Active
|
Active
|
Recovery
|
Frame Adv
|
Circuit
|
Invuln
|
| 16
|
4
|
15
|
-1
|
8.0%
|
-
|
|
Aoko shoots a beam out of her hand. You can't hit the beam only Aoko with an extended hitbox. This move is primarily used for sniping your opponent going for greedy IADs and badly spaced jumpins.
|
| Damage
|
Red Damage
|
Proration
|
Cancel
|
Guard
|
| 500x6 (3000)
|
300x6 (1800)
|
100%
|
-
|
HLA
|
| First Active
|
Active
|
Recovery
|
Frame Adv
|
Circuit
|
Invuln
|
| 33
|
12
|
19
|
-10
|
5.0%
|
-
|
|
Aoko chills for a bit before shooting a large laser that is fullscreen.
|
| Damage
|
Red Damage
|
Proration
|
Cancel
|
Guard
|
| 500x5 (2500)
|
300x5 (1500)
|
100%
|
-
|
N/A
|
| First Active
|
Active
|
Recovery
|
Frame Adv
|
Circuit
|
Invuln
|
| 92
|
10
|
46
|
-30
|
5.0%
|
-
|
|
Aoko spends some quality time(93 frames-data from AA) charging before she fires a full screen laser that is unblockable. This isn't that great since it can be dodged on reaction as it takes so damn long to come out. It's alright to do this on rare occasion to keep your opponent from feeling safe at full screen but it's not going to hit very often. Inputting 236A > 236A after the charge flash makes a few more lasers come out. Always do this if you do 236[B] as it adds on some damage and looks cool (that's the important part).
|
| Damage
|
Red Damage
|
Proration
|
Cancel
|
Guard
|
| 100, 350x14 (4900)
|
0, 300x14 (4200)
|
100%
|
-
|
HLA
|
| First Active
|
Active
|
Recovery
|
Frame Adv
|
Circuit
|
Invuln
|
| 2+13
|
75
|
24
|
-3
|
-100%
|
Full 1-33
|
|
EX lasers. Aoko opens a portal and a lot of small lasers fire out of it.
|
| Damage
|
Red Damage
|
Proration
|
Cancel
|
Guard
|
| 1000
|
700
|
100%
|
-
|
HLA
|
| First Active
|
Active
|
Recovery
|
Frame Adv
|
Circuit
|
Invuln
|
| 16
|
12
|
-
|
-15
|
10.0%
|
-
|
|
A single hit laser that keeps the momentum in the air that Aoko has. This move is great in conjunction with the rest of her keepaway(IABD J236A) to stop opponents from rushing at you recklessly.
|
| Damage
|
Red Damage
|
Proration
|
Cancel
|
Guard
|
| 500x3 (1500)
|
300x3 (900)
|
100%
|
-
|
HLA
|
| First Active
|
Active
|
Recovery
|
Frame Adv
|
Circuit
|
Invuln
|
| 23
|
12
|
-
|
2
|
5.0%x3 (15.0%)
|
-
|
|
This is much better if your opponent manages to get closer to you than J236A because it stops all momentum Aoko has in the air and you can cancel it into EX orb to start pressure and stay safe.
|
| Damage
|
Red Damage
|
Proration
|
Cancel
|
Guard
|
| 500x5 (2500)
|
300x5 (1500)
|
100%
|
-
|
HLA
|
| First Active
|
Active
|
Recovery
|
Frame Adv
|
Circuit
|
Invuln
|
| 7+33
|
12
|
-
|
2
|
-100.0%
|
-
|
|
EX version. You can use this at the end of a standard air combo or you can cancel into this after a J236B if that hits to get some more damage. Can be used in fuzzyguard strings to kill an opponent with low health.
|
|
I'll kick you over!
623A/B/C (Air OK) A/B A/B
|
| Damage
|
Red Damage
|
Proration
|
Cancel
|
Guard
|
| 1000, 800
|
550, 650
|
100%, 60%
|
EX
|
HLA, HA
|
| First Active
|
Active
|
Recovery
|
Frame Adv
|
Circuit
|
Invuln
|
| 4
|
10(8), 3
|
24
|
-8
|
8.0%, 8.0%
|
High 1-4
|
|
A version of the wheelkick hits twice and the second hit is an overhead. This move is good as an antiair and its good to beat mashing. It's not invincible at startup but it's ok for antiairing if you use it cleanly. Caution: -8 on block. This move is used in combos to set up Kicking Ass!, leaving you a very strong tech punish setup.
|
| Damage
|
Red Damage
|
Proration
|
Cancel
|
Guard
|
| 800
|
650
|
100%
|
EX
|
HA
|
| First Active
|
Active
|
Recovery
|
Frame Adv
|
Circuit
|
Invuln
|
| 29
|
3
|
10
|
6
|
8.0%
|
-
|
|
This has some startup time(you can easdily get mashed ot of it) and hits overhead. It's +6 on block, comboes to 5a/2a on hit and goes across ~1/2 the stage. This move is great if you can get your opponent to respect it because it puts you at point blank range, gives you all your normals back, and is safe on block. It also punishes backdashes.
|
| Damage
|
Red Damage
|
Proration
|
Cancel
|
Guard
|
| 1000, 800
|
550, 650
|
100%
|
-
|
HL, HLA
|
| First Active
|
Active
|
Recovery
|
Frame Adv
|
Circuit
|
Invuln
|
| 5+28
|
8(4), 6
|
20
|
-13
|
-100%
|
Full 1-7
|
|
EX wheelkick. You can use this move as a reversal. It's generally better to do it on wakeup since bunker is a lot safer to go for in the middle of a blockstring. This does decent damage and takes Aoko across half the screen(unless your opponent blocks it standing) very fast. It's -10 on block so you better be prepared for some pain if your opponent baited you.
|
| Damage
|
Red Damage
|
Proration
|
Cancel
|
Guard
|
| 800
|
500
|
100%
|
-
|
HLA
|
| First Active
|
Active
|
Recovery
|
Frame Adv
|
Circuit
|
Invuln
|
| 14
|
11
|
-
|
12 (Lowest Height TK)
|
8.0%
|
-
|
|
is NOT an overhead AND it hits only on the way down. works best as an extra movement tool for unpredictability. Comboes from JC in jumpins etc.
|
| Damage
|
Red Damage
|
Proration
|
Cancel
|
Guard
|
| 800
|
500
|
70%
|
-
|
HA
|
| First Active
|
Active
|
Recovery
|
Frame Adv
|
Circuit
|
Invuln
|
| 19
|
8
|
-
|
-2 (Lowest Height TK)
|
8.0%
|
-
|
|
IS an overhead. Slow, but could be used to get in an unexpected overhead. Must be initiated low to be useful.
|
| Damage
|
Red Damage
|
Proration
|
Cancel
|
Guard
|
| 800x2 (1600)
|
500x2 (1000)
|
70%
|
-
|
HLA, HLA
|
| First Active
|
Active
|
Recovery
|
Frame Adv
|
Circuit
|
Invuln
|
| 7
|
4(8), 13
|
-
|
-2 (Lowest Height TK)
|
12.0%
|
-
|
|
Not EX. Is NOT an overhead. Flies lower than 623b but similar distance, good for movement.
|
|
Magic Draw
214A/B/C
|
| Damage
|
Red Damage
|
Proration
|
Cancel
|
Guard
|
| 1000
|
800
|
100%
|
EX
|
HLA
|
| First Active
|
Active
|
Recovery
|
Frame Adv
|
Circuit
|
Invuln
|
| 12
|
-
|
29
|
-4
|
10.0%
|
-
|
|
Aoko puts her hand on the ground and shoots a shockwave of energy. You can have up to two out on the screen at a time. This version of the move travels the slowest. This move's main use is to keep your opponent from sitting on the other side of the screen when you have some held orbs up. It's -3 on block if you do it at point blank range so don't use it in a blockstring unless you pushed yourself a decent distance away. After, 3c from its max effective range with a jumpcancel/rebeat or special cancel to 214C
|
| Damage
|
Red Damage
|
Proration
|
Cancel
|
Guard
|
| 1000
|
800
|
100%
|
EX
|
HLA
|
| First Active
|
Active
|
Recovery
|
Frame Adv
|
Circuit
|
Invuln
|
| 10
|
-
|
36
|
-8
|
10.0%
|
-
|
|
This version of the move travels faster than the A version. This is mainly used to peg opponents who want to sit full screen away from you and in the 4[C] combo in midscreen. Always, always cancel into 214C if you're using it after 4[C] because its -8 on block.(AA data)
|
| Damage
|
Red Damage
|
Proration
|
Cancel
|
Guard
|
| 400x3 (1200), 1000
|
300x3 (900), 700
|
100%, 50%
|
-
|
HLA
|
| First Active
|
Active
|
Recovery
|
Frame Adv
|
Circuit
|
Invuln
|
| 5+5
|
-
|
32
|
-11~14
|
-100%
|
-
|
|
EX version. This causes circuit break on hit and it can be + on block. This move is great because if you combo into it you take away all wakeup options your opponent has that require meter and it's great on block too since it's so safe.
|
|
Floating Starmine
j214A/[A]/B/[B]/C
|
| Damage
|
Red Damage
|
Proration
|
Cancel
|
Guard
|
| 800
|
650
|
70%
|
EX
|
HLA
|
| First Active
|
Active
|
Recovery
|
Frame Adv
|
Circuit
|
Invuln
|
| 23/27 (held)
|
320 (Orb)
|
-
|
0 (Lowest Height TK)/24 (held)
|
8.0%
|
-
|
|
(A or B) Aoko sets up an orb then falls to the ground with the momentum she had before setting up the orb. There is no difference between an A orb and a B orb besides the fact that you can't have 2 A orbs or 2 B orbs but you can have one of each. This move is great in pressure if your opponent will respect you as it grants lots of +frames. It's also good in conjunction with held orbs in neutral to keep your opponent from reaching you.
([A] or [B]) Aoko sets up an orb then falls to the ground eithout gathered momentum. There are no different properties to the orb after charging them up but you can TK a charged orb to get faster low orb placement than you can get with IABD orb.
|
| Damage
|
Red Damage
|
Proration
|
Cancel
|
Guard
|
| 800
|
650
|
50%
|
-
|
HLA
|
| First Active
|
Active
|
Recovery
|
Frame Adv
|
Circuit
|
Invuln
|
| 3+12
|
160(Orb)
|
-
|
-7 (Lowest Height TK)
|
-100%
|
-
|
|
Big EX orb. This move has a couple of uses. If you're about to run out of heat you can burn the remaining meter with EX orb to stay relatively safe behind it. You can also use it after J236B to keep your pressure safe or to keep your opponent from hitting you after they dashed in if you don't have anything to protect you. The other great use for it is at the end of an air combo so that you can set up a held orb for oki.
|
|
Floating Starmine
421A/B/C(~8) (No EX)
|
| Damage
|
Red Damage
|
Proration
|
Cancel
|
Guard
|
| 800
|
650
|
70%
|
-
|
HLA
|
| First Active
|
Active
|
Recovery
|
Frame Adv
|
Circuit
|
Invuln
|
| 33
|
16 (Orb Explosion)
|
3
|
6
|
8.0%
|
-
|
|
Aoko creates a held orb which goes a different distance in front of her depending on which version you use. After the orb is created you can hold either A, B, or C for the orb to stay there. It slowly moves down on the screen over time. You can have up to two of these on the screen at the same time and you can switch what button you're holding to use different specials/normals. This move is great for getting CHs and zoning in general and it's also good in pressure. Having one or two of these out in neutral makes life a LOT easier in most matchups.
A version sends an orb kind of close to her on the ground. Can be used in pressure if you get respected because an immediate pop gives +8 and if you want oki instead of damage you can end a combo in 2C>421A or 2C>4C>421A (don't use this deep in corner because the 4C will make you advance and the orb will pop off screen).
|
| Damage
|
Red Damage
|
Proration
|
Cancel
|
Guard
|
| 800
|
650
|
70%
|
-
|
HLA
|
| First Active
|
Active
|
Recovery
|
Frame Adv
|
Circuit
|
Invuln
|
| 43
|
16 (Orb Explosion)
|
-9
|
16
|
8.0%
|
-
|
|
B version sends an orb ~1/2 screen away from her.
|
| Damage
|
Red Damage
|
Proration
|
Cancel
|
Guard
|
| 800
|
650
|
70%
|
-
|
HLA
|
| First Active
|
Active
|
Recovery
|
Frame Adv
|
Circuit
|
Invuln
|
| 46
|
16
|
-13
|
21
|
8.0%
|
-
|
|
C version sends an orb ~full screen distance from her. You can use the C version to punish wakeup heat/backdash after you do an aircombo in midscreen.
Inputting 8 while holding sends the orb ~double jump height from the ground. This is extremely useful in certain matchups, like vs that whore Warc who likes to be in the air a lot.
A few warnings about this move:
--If you're holding A you can't throw or airthrow.
--If you're holding B you can't dodge.
--If you're holding C if you input 236B you're forced to do 236[B].
|
|
Browning Starbow
63214A/B/C
|
| Damage
|
Red Damage
|
Proration
|
Cancel
|
Guard
|
| 1000
|
750
|
100%
|
EX
|
HLA
|
| First Active
|
Active
|
Recovery
|
Frame Adv
|
Circuit
|
Invuln
|
| 11
|
2(2), 2(2), 2(2)
|
21
|
-9
|
10.0%
|
-
|
|
The circle forms very quickly and only hits once. Reflect projectiles, and hits HardKnockDown higher and further than 4c reaches, quickly. Good at the end of longer combos.
|
| Damage
|
Red Damage
|
Proration
|
Cancel
|
Guard
|
| 150x8 (1200)
|
50x8 (400)
|
100%
|
-
|
HLA
|
| First Active
|
Active
|
Recovery
|
Frame Adv
|
Circuit
|
Invuln
|
| 28
|
2(2)x8
|
18
|
23
|
1.5%x8 (12.0%)
|
-
|
|
The circle takes some time to come up aka you can get mashed going for this, but if your opponent blocks you get of +23. If your opponent tries to jump out after you used a normal with a good amount of blockstun and you use this move you get free guardbreak(not guardcrush.) This move is pretty good in rushdown once you get your opponent to start respecting your blockstrings.
|
| Damage
|
Red Damage
|
Proration
|
Cancel
|
Guard
|
| 200x8 (1600)
|
150x8 (1200)
|
100%
|
-
|
HLA
|
| First Active
|
Active
|
Recovery
|
Frame Adv
|
Circuit
|
Invuln
|
| 13+29
|
2(2)x8
|
21
|
20
|
-100%
|
Full 1-32
|
|
This is a safer version of B mirror but at the cost of 100 meter. This isn't really that great since Aoko has many better ways to use the meter and it's even 3 less +frames than B version. The only time to use it is after a blocked 22A, preferably if you're in heat.
|
|
Arc Drive
Severe Break
41236C
|
| Damage
|
Red Damage
|
Proration
|
Cancel
|
Guard
|
| 7200
|
1913
|
50%
|
-
|
HLA
|
| First Active
|
Active
|
Recovery
|
Frame Adv
|
Circuit
|
Invuln
|
| 9+4
|
28 (39) 28
|
58
|
-27
|
removes all
|
Full 1-117
|
|
Assumes a similar stance to her 236X but instead of pointing forwards with her finger, she pulls her left arm back before she thrust forward like she would punch someone. A giant laser beam then extends out of her fist. After the first beams disappears she then repeats the same move with her right arm.
|
|
Another Arc Drive
Severe Break Slider
41236C
|
| Damage
|
Red Damage
|
Proration
|
Cancel
|
Guard
|
| 14400
|
3174
|
50%
|
-
|
HLA
|
| First Active
|
Active
|
Recovery
|
Frame Adv
|
Circuit
|
Invuln
|
| 9+4
|
28 (39) 28 (43) 39
|
58
|
-27
|
removes all
|
Full 1-236
|
|
Similar to her AD, except she extends it after the second laser beam by jumping upwards and shooting down a laser from her foot that makes the ground explode.
|
|
Last Arc
Severe Break Slider
41236C
|
| Damage
|
Red Damage
|
Proration
|
Cancel
|
Guard
|
| 3500-6300
|
-
|
-
|
-
|
-
|
| First Active
|
Active
|
Recovery
|
Frame Adv
|
Circuit
|
Invuln
|
| -
|
-
|
-
|
-
|
removes all
|
-
|
|
Aoko traps her opponent in a blue energy cage, lifts them up while barraging them with energy orbs, then releases the energy cage in a huge explosion. Activated by performing an EX Shield on the ground.
|
|
MBAACC Navigation


